How to Use Things for Mac
Things, (link to Things 3 website) is an excellent to-do application for the Mac and iOS. It is beautifully designed and provides a great deal of functionality. I have been using Things for the last couple of years and wanted to create a guide on how to use this wonderful application. Things is a to-do application that, while not cheap, is very functional and is good for users that need more than the functionality that is built into the Reminders app but don’t need all of the bell and whistles of an application like OmniFocus.
Learning to use any application can take a bit of time, so I wanted to create this guide to help you get up to speed on Things as quickly as possible (and so you don’t have to use trial and error like I did ?). Enclosed below is a table of contents view of this Things guide:
- Getting Started with Things
- Your Things Inbox – The Default Landing Spot for Your To-Dos
- How to Create a To-Do in Things
- Today view
- The Upcoming View in Things
- The Anytime View in Things
- The Someday View in Things
- Logbook
- Trash
- Areas in Things
- Projects in Things
- Importing To-Dos into Things
- Emailing To-Dos into Things
- Sharing in Things
- Things Cloud
- Changing the Appearance of Things
Before we get started with the tutorial, if you are looking to learn more about apps like Notion, Todoist, Evernote, Google Docs, or just how to be more productive (like Keep Productive’s awesome Notion course), you should really check out SkillShare. Skillshare is an online learning platform with courses on pretty much anything you want to learn. To learn more about Skillshare and its vast library of courses and get 30% off, click the link below:
SkillShare – Online Learning Platform
If you are looking to keep your mac running at it’s best, check out CleanMyMac X by MacPaw. I have been using CleanMyMac for years it keeps my Mac running optimally by:

- Removing unnecessary files and junk from my mac
- Running optimizations to improve performance
- Easy to use app uninstaller to remove apps cleanly
- Malware removal
For more information on CleanMyMac X, click the link below:
CleanMyMac X – The Ultimate Cleaner for Your Mac
Protect your Mac from malware, phishing and viruses with Norton 360. Norton 360 is the end-to-end software solution to protect your Mac from threats. For more information, click the link below:
Norton – Multiple layers of protection for your Cyber Safety
Getting Started with Things
To get started using Things you can go to the Mac App Store and download it or if you are interested in downloading a trial version of Things, go to the following URL:
link to Things 3 Trial download page
The trial allows you to use Things for fifteen (15) days. After the trial period expires, you will no longer be able to save any changes to Things until you purchase it. There is a pricing section of this guide for Things towards the end of this blog post for more details.
Things User Interface
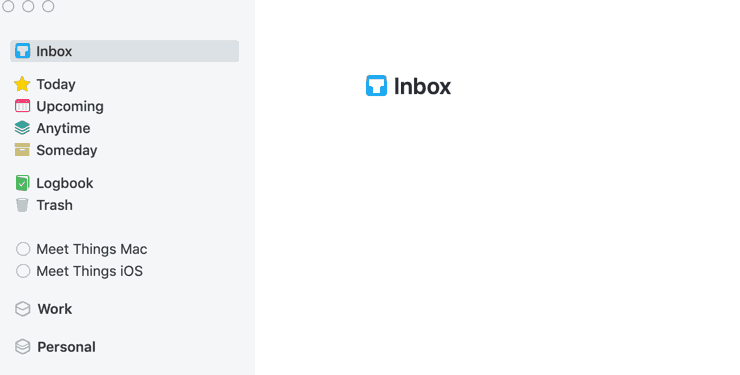
The Things user interface (UI) is simply gorgeous. CulturedCode, the development team responsible for Things, has done a great job of balancing functionality with simplicity. The default view that appears when Things is first opened is the Today view. Its view occupies the main pane of the Things application window. The left hand side of the Things window holds the view panel.

The view panel contains the following entries:
- Inbox
- Today
- Upcoming
- Anytime
- Someday
- Logbook
- Trash
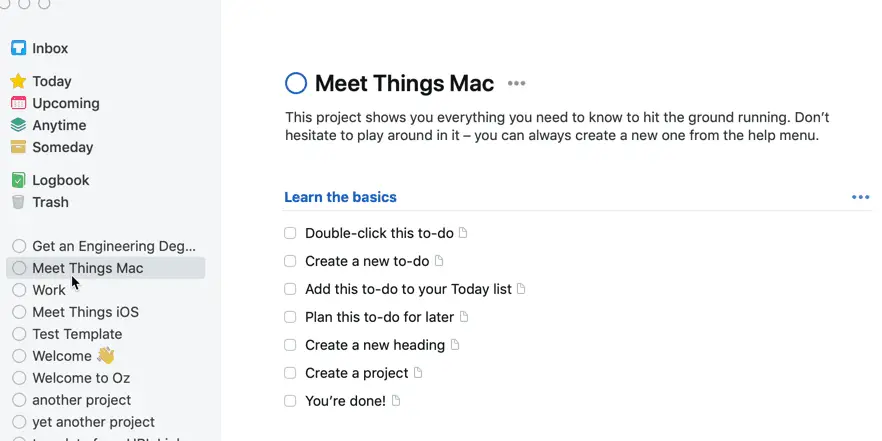
- Meet Things Mac
- Meet Things iOS
Things UI is very clean and not busy. The window area in Things is sparse and inviting.
Do you have an M1 Mac Mini or Mac Studio and want to get the best accessories for it? Check out my Mac accessories guide here.
How to Create a To-Do in Things
Before we get too far into this guide, it is probably a good idea to go over how to create a task.
How to Create a To-Do
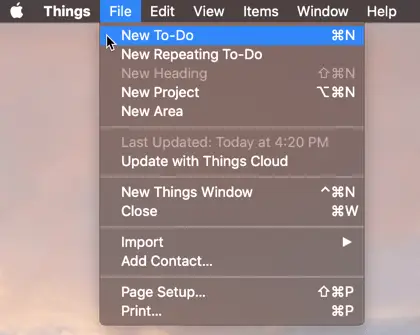
Creating a to-do can be done with the keyboard shortcut Command N or go to File -> New To-Do. A to-do or task depending on your preferred name contains the following information:
- Title
- Notes
- Date
- Tag
- Checklist
- Deadline
Title
Adding a title is very easy. Simply click on the top line of the to-do and start typing and hit Enter when done.

Notes
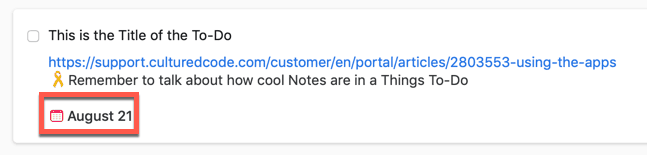
This is one of the cooler parts of creating a to-do in my opinion. You can add notes to your to-do. Adding notes to your to-do provides additional context to your to-do which can be helpful. I typically will put in links to information I might need to complete the to-do or some key concepts or memory-joggers that might help me in getting the to-do done.
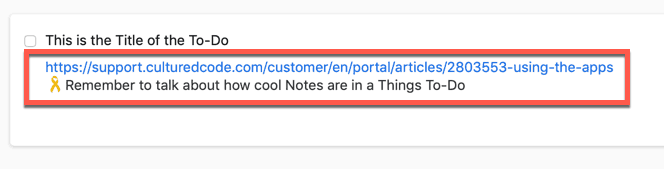
To add some notes to your to-do, simply click in the areas where the word Notes in grey and type in your notes.
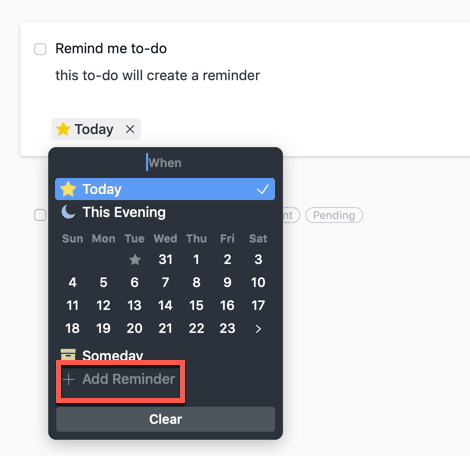
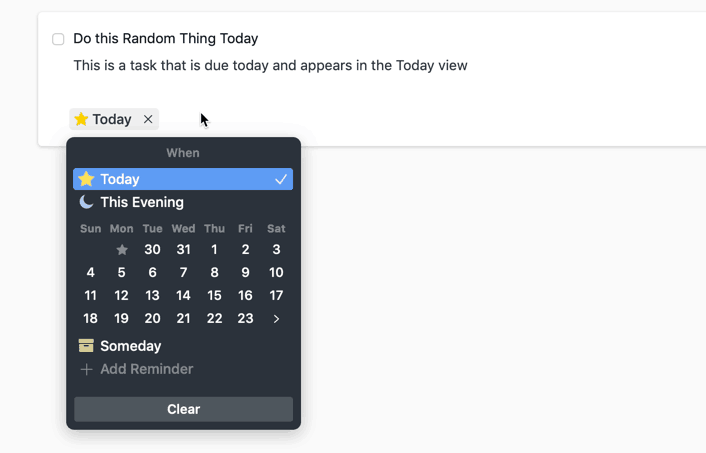
How to assign a Start Date to a Task

You have several options in terms of assigning a date to your to-do. In the screenshot below, you can see that when you click on the calendar icon (Things calls this the Jump Start button), that a pop-up calendar appears with the following options:
- Today
- This Evening
- The Calendar View
- Someday
- Add Reminder
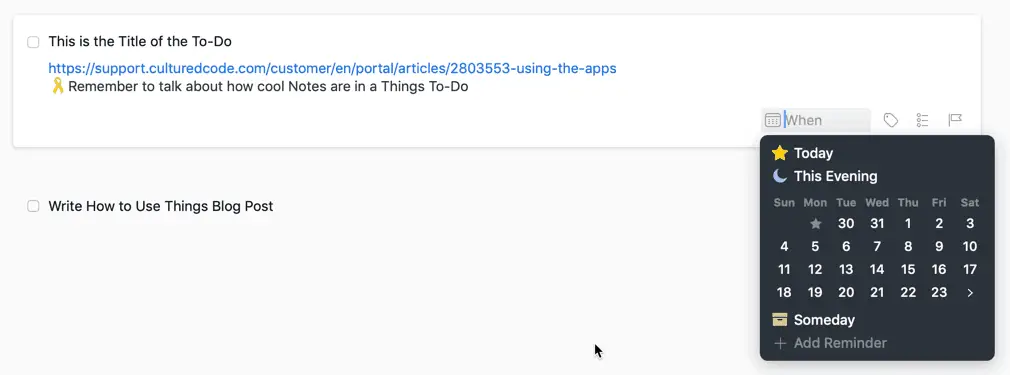
The Today button assigns the to-do today as the date.

This evening is another cool feature. It allows you to assign not only today as a date but also make it specific to the evening. This is great as there are things that need done during the day and other things that need to be done in the evening. The today view actually has two sections, the main view and the This Evening view. It is a great visualization of what needs done when.

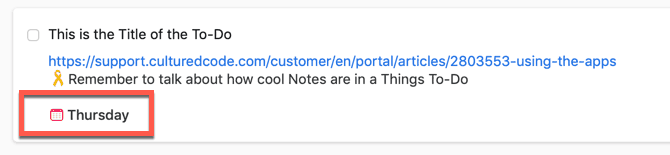
The calendar view works the way you would expect. You click on a date and it is assigned to the to-do. One of the nice things about how the Calendar works is that Things is smart enough to know if the date picked is in the same week as the current date. As a result, when you pick a date in the same week as the current date, Things will use the name of the day on the to-do vs the date (i.e. Thursday). A nice little nuance.
If the date is beyond the next week, the format for the date on the to-do is [MONTH, DAY]. You can also type in the date in the When text box above the calendar pop-up. Start typing the in the date and it will provide some contextual options as you type that match what you are typing. You can type in the date like September 1, 2019, 9/1/2019 or Friday and Things will understand and auto-suggest as you type.
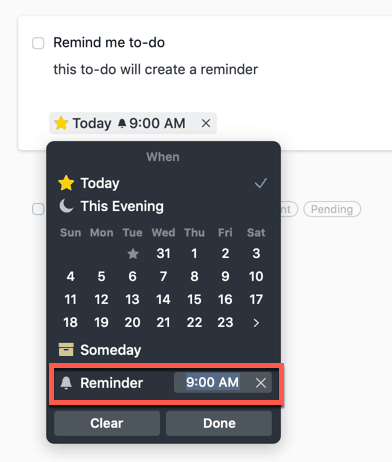
How to Add a Reminder to a To-Do
Things supports adding reminders to a to-do. Reminders will alert you when a to-do is due. To add a reminder to a to-do, do the following:
- Create or Open a to-do you want to set a reminder for
- Click on the Jump Start button and select a date
- Click on + Add Reminder
- A Reminder area will appear below the calendar. Enter the time of day you want to be alerted
How to Remove a Date from a To-Do
Removing a date from a to-do is easy. Hover over the assigned date with the mouse pointer. The date should change to include an X at the end of it. Click the X to remove the date. You should note the Jump Date button appear once you have removed the date.
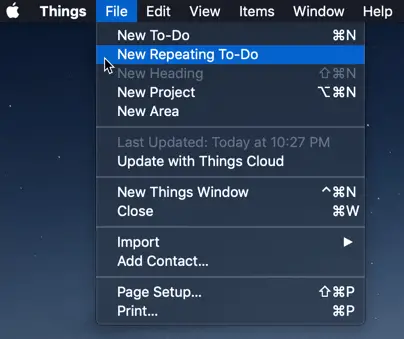
How to Create a Repeating To-Do in Things
Repeating to-dos are great for things that occur in a repeated pattern (i.e. every week, every month, etc.). Creating a repeating to-do in Things is straight-forward.
To create a repeating to-do in Things, do the following:
- Go to File -> New Repeating To-Do
A window will pop-up that will allow you to set the repeat interval. The following intervals are available:
- After Completion
- Daily
- Weekly
- Monthly
- Yearly
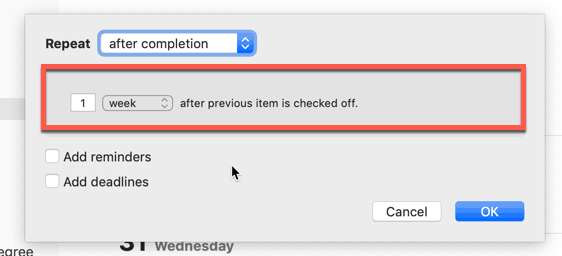
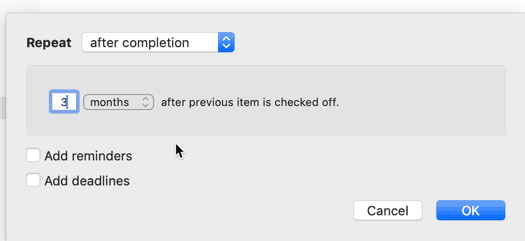
After Completion
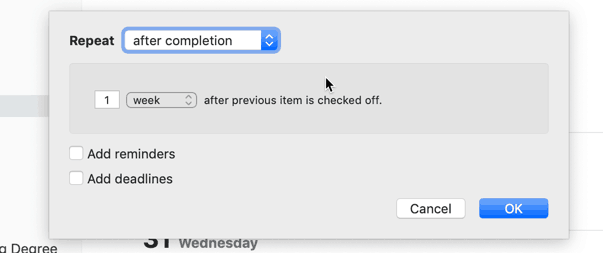
After completion repeats the task once it is completed. Things allows you to set a custom post completion interval. This post completion interval can be set by day, week, month or year. There is also a text box next to the interval window that can allow you to fine tune the interval. So you could setup up the recurring to-do to occur every 3 months after the to-do is completed as an example.
Daily
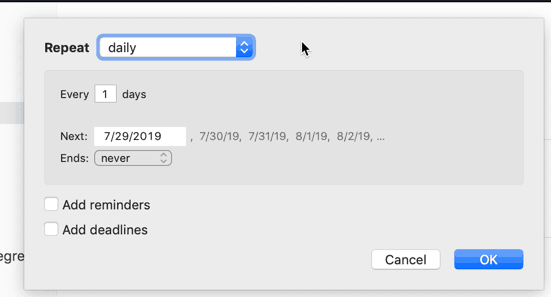
The Daily repeat allows you to setup your recurring to-do to repeat every Y amount of days. So you could set up your to-do to repeat every 3 days or every 14 days as a couple of examples.
One of the cool things that Things does is when you set the time interval is display the dates your to-do will repeat.
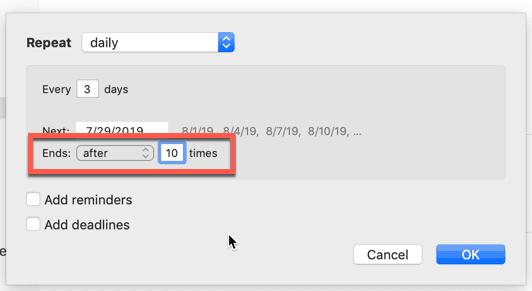
You can also set an end time for the recurring to-dos. There are three options for setting a recurring to-do in Things:
- Never
- After
- On Date
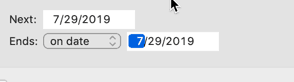
Never means your recurring to-do has no end date. After allows you to set how many times your to-do will repeat before it ends. On date allows you to set a specific end date.
Weekly
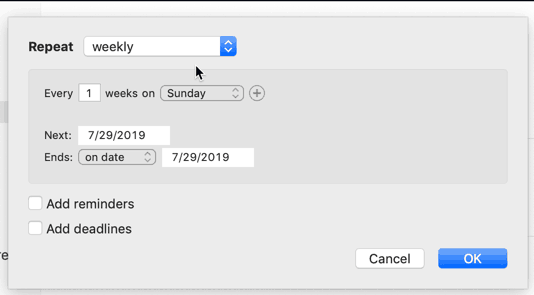
Weekly allows you to specify your recurring to-do to repeat X times every Y weeks. Things allows you to set the weekly interval both on how many weeks as well as the day or days of the week that the to-do occurs. So, for example, you could setup a to-do to:
- Repeat every 3 weeks on Tuesdays
- Repeat every 2 weeks on Mondays and Wednesdays
- Repeat every 1 week on the weekends (Saturday and Sunday)
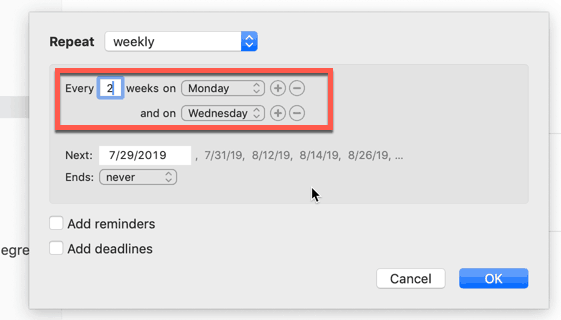
Like the daily option, you can also set an end time for the recurring to-dos. There are three options for setting a recurring to-do in Things:
- Never
- After
- On Date
Never means your recurring to-do has no end date. After allows you to set how many times your to-do will repeat before it ends. On date allows you to set a specific end date.
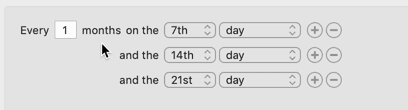
Monthly
Monthly allows you to set your recurring to-do to repeat X times every Y months. You can specify what day(s) of the month your to-do occurs.
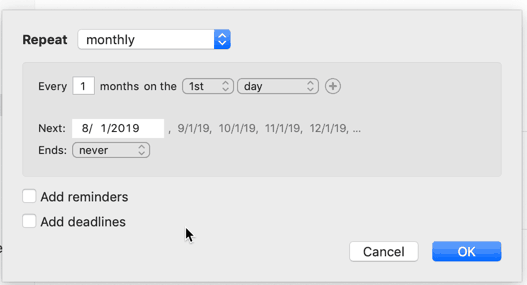
Like the daily and weekly options, you can also set an end time for the recurring to-dos. There are three options for setting a recurring to-do in Things:
- Never
- After
- On Date
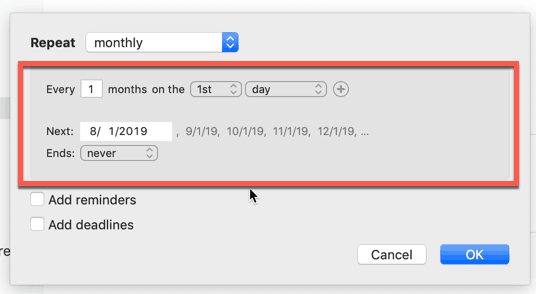
Never means your recurring to-do has no end date. After allows you to set how many times your to-do will repeat before it ends. On date allows you to set a specific end date.
Yearly
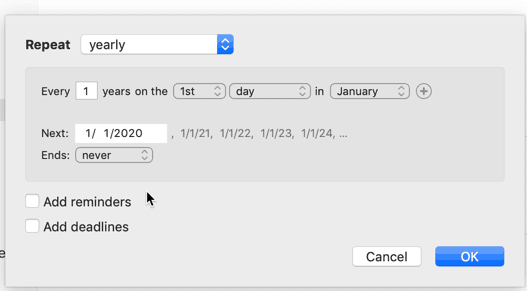
Yearly sets recurring to-dos based a to-do repeating X times every Y years. You can set how many days, months and years your to-do occurs. For example, you could set up your to-do to repeat every 2 years on:
- 10th of January and
- the 20th of March and
- the 25th of May
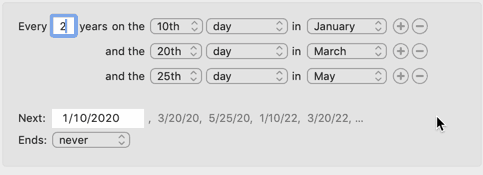
The yearly option, like the daily and weekly options, is very flexible and you can really customize your intervals.
Adding Reminders to Recurring To-Dos in Things
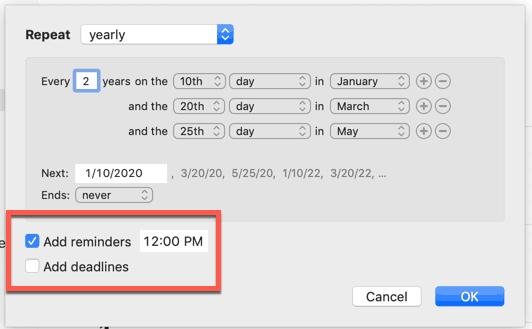
You can add reminders to recurring to-dos very easily. To add a reminder to a recurring to-do, do the following:
- Create your Recurring To-Do
- Check the Add reminders checkbox
- Set the Time of Day You Want the Reminder to Occur
Adding Deadlines to Recurring To-Dos in Things
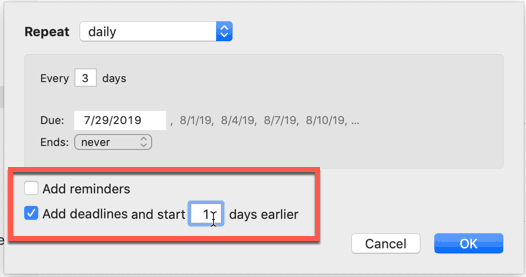
Interestingly, you can add deadlines to your recurring to-dos as well as a start date. To setup deadlines and start dates to your recurring to-dos, do the following:
- Create your Recurring To-Do
- Check the Add deadlines checkbox
- Set How Many Days Earlier You Want to Set the Start Date
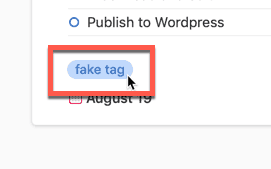
How to Assign Tags to a To-Do in Things
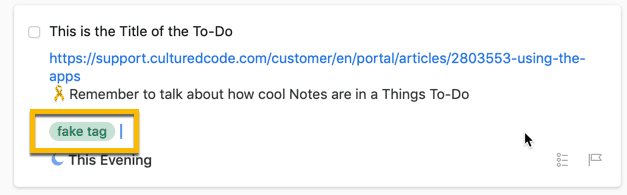
Tags are pieces of metadata that you can add to a to-do that makes it easier to search. When you open a to-do, on the lower right-hand side of the to-do box is a tag icon.
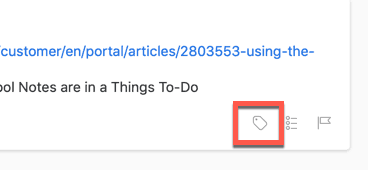
Clicking the tag icon brings up a text box and a drop-down box of your commonly or recently used tags. You can either select of the pre-existing tags from the drop-down or type in your tag in the text box.
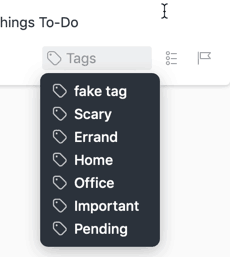
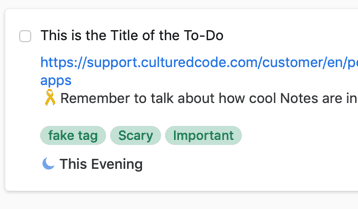
You can add multiple tags to a to-do.
How to Remove a Tag from a To-Do in Things
Removing a tag is simple to do in Things. Open the task and click on the tag. Press the Delete key to remove the tag.
Adding a Checklist to a To-Do in Things
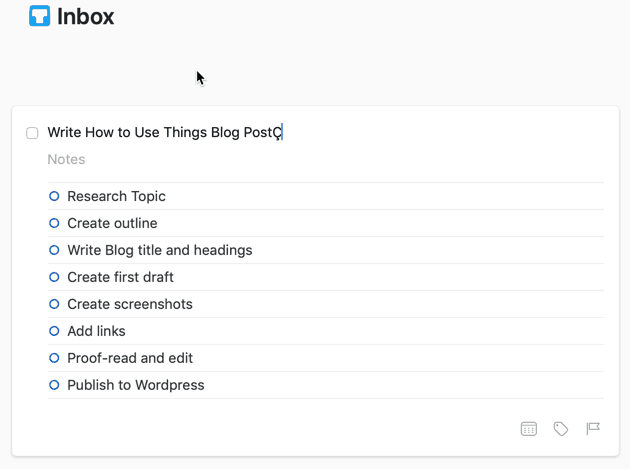
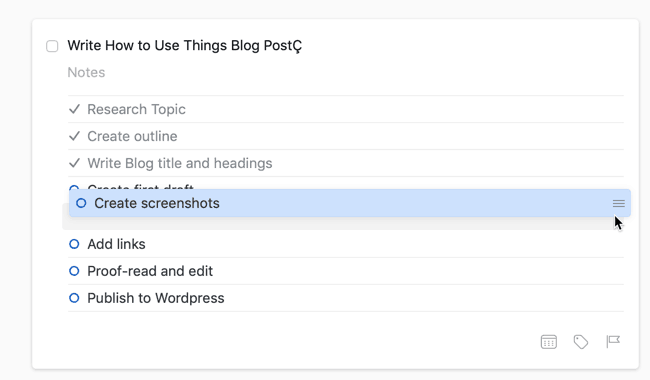
Another cool thing you can do with to-dos in Things is add a checklist. Checklists are great for listing out sub-tasks in your to-dos. An example might be making a blog post. There are several steps you have to take to make a blog post. A checklist is a great way to outline those sub-tasks and check them off as you finish them.
How to Mark a Sub-Task Complete
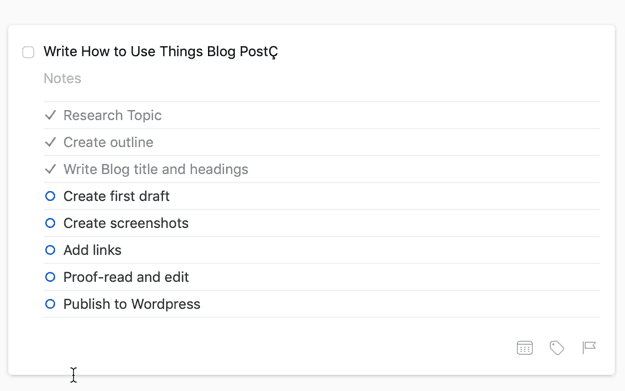
Once you have completed a sub-task on the checklist, click the circle to the left of the sub-task to “check it off”. The text of the sub-task will become grayed-out and a gray check will appear where the circle was.
If you accidentally check off a sub-task, it is easy to uncheck it. Just click on the checkmark and it will revert to a circle (aka an unchecked checkbox).
Changing the Order of the Sub-Tasks in a Checklist
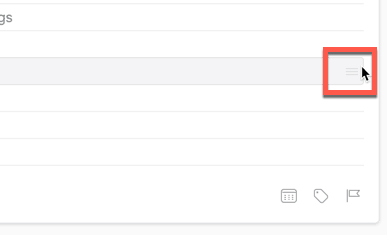
Checklists are not static. You can change the order of the checklist sub-tasks by doing the following:
- Click and hold on the “Move” icon on the far right of the sub-task
- Drag the sub-task up or down the checklist until you have it in the correct position
- Release the mouse button

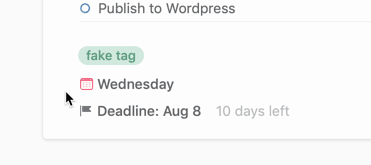
Deadline
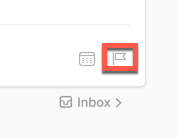
Deadlines in Things are due dates, the date that the to-do must be completed by. To use the deadline feature, do the following:
- Open the task
- Click on the Flag icon
- Select the date
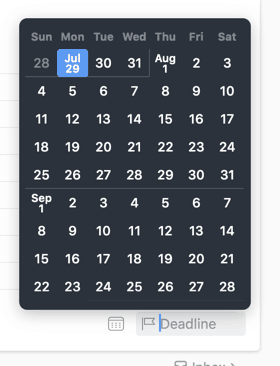
You can select the date either by clicking it in the calendar view or simply typing it in. Typing the date in works just like it does with the Jump Start function. You can type it in like August 31, 2019, 9/31/2019 or Friday.
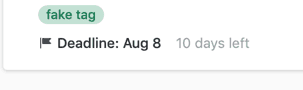
You can use both start dates and deadline dates together in the same to-do.
Quick Entry for Things
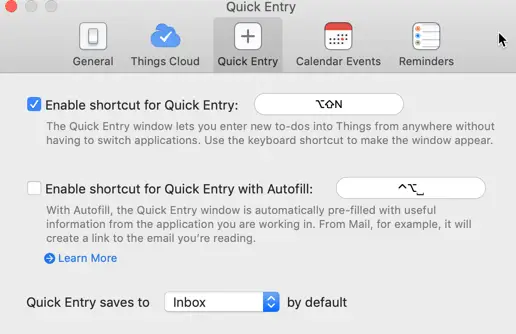
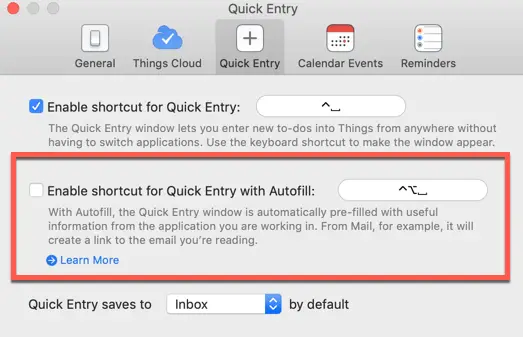
Things offers the ability to use a keyboard shortcut to display a quick entry window that allows you to create a to-do, even if you are not currently in the Things application. To configure the quick entry option, go to Things -> Preferences in the main menu or use the keyboard shortcut Command , and select the Quick Entry tab.
There are the following options for quick entry:
- Enable shortcut for Quick Entry
- Enable shortcut for Quick Entry with Autofill
Enable Shortcut for Quick Entry
Quick entry will bring up a small window to enter a to-do. You can change the keyboard shortcut used to bring up the quick entry window by going to quick entry tab in Preferences, clicking on the keyboard shortcut area and pressing the key combination you want to use.
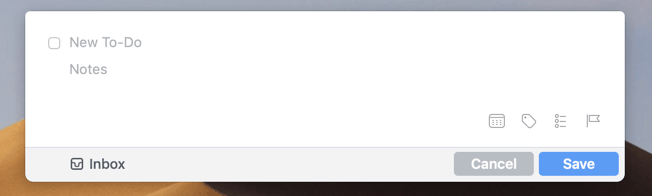
To use the quick entry window, do the following:
- Type in the keyboard shortcut for quick entry
- Fill in your to-do with a title, notes, start dates, tags, deadlines, etc.
- Assign it to a project or inbox
- Press Save when done
Enable Shortcut for Quick Entry with Autofill
Quick entry with Autofill is a special version of quick entry that, when in an email app, browser or Finder, will autofill emails, URL links or files into your to-do notes.
In order to use quick entry with autofill, you will need to install a helper application. To do this, go to Things -> Preferences or use the keyboard shortcut Command , and go to the Quick Entry tab.
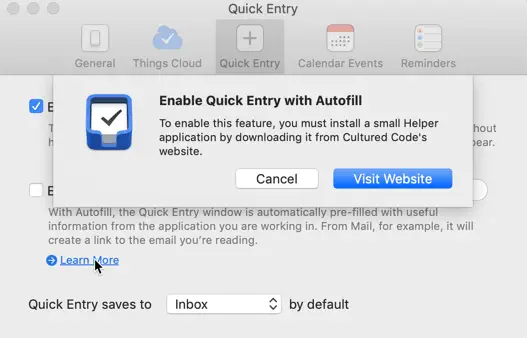
When you check the checkbox next to the Enable shortcut for Quick Entry with Autofill, you will be prompted to install the helper application from CulturedCode’s website. Click the Visit Website button to be taken to the website.
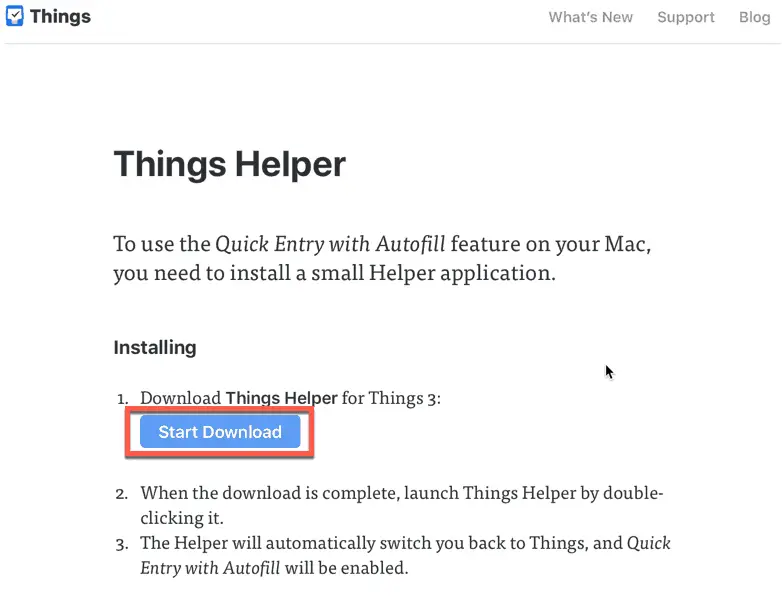
Once on the website, click the Start Download button to download the helper application. Once the application is downloaded, double-click it to install.
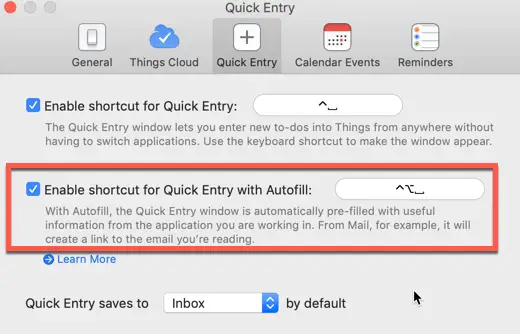
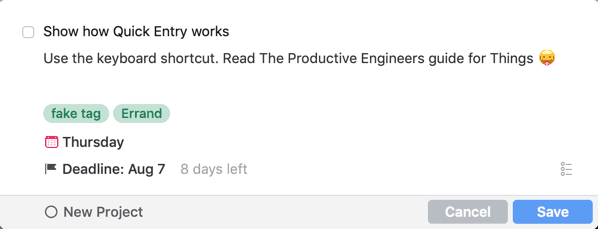
Now that you have the helper application installed, you should test it. Go to a website in your browser and press the keyboard shortcut for quick entry with autofill.
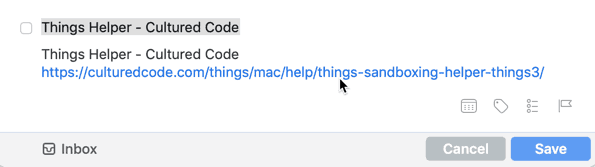
The quick entry with autofill window should look something like this:
Fill in any dates, notes, tags, etc. and press Save.
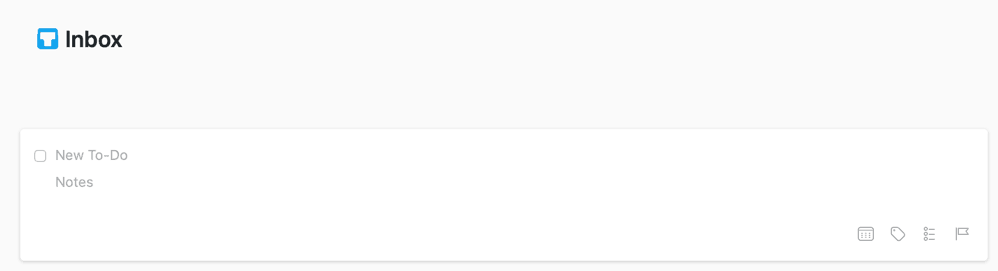
Your Things Inbox – The Default Landing Spot for Your To-Dos
The first item in the left-hand side panel is the Inbox. The inbox is essentially a catch-all bucket for your to-dos. If you send items into Things from email or other sources, it will appear in the Inbox by default.

Think of your Inbox as the starting place for your tasks. As you create them (or they come into Things from external apps/services), you add a due date for the to-do and assign it to a project.
The Today View
The Today view is exactly what it sounds like: a view of all the tasks that are due today. When you assign a due date of today to a to-do, it will show up in your Today view.

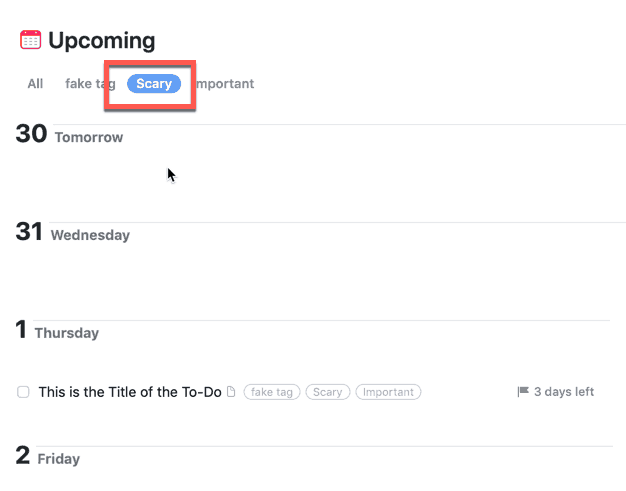
The Upcoming View in Things
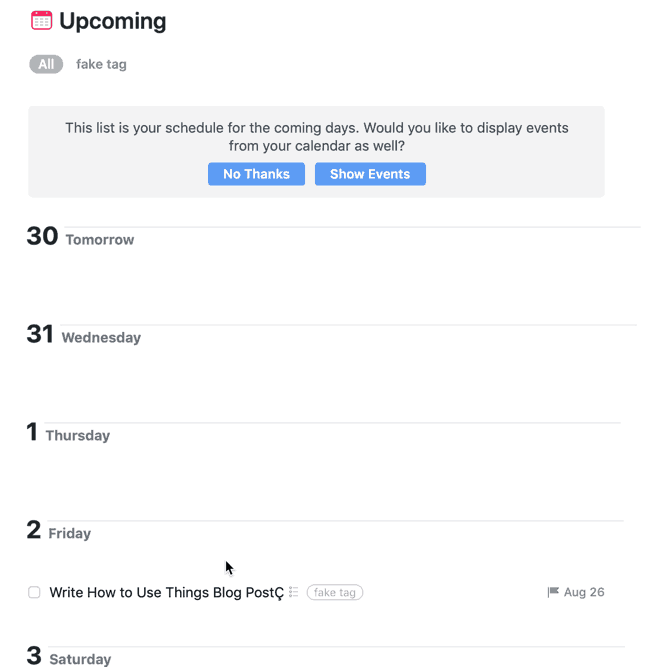
The Upcoming view in Things provides a view of all the to-dos you have that have start or deadlines assigned beyond today. When you first open the upcoming view, you will see a message offering the option to display events from your calendar in your upcoming view in Things.
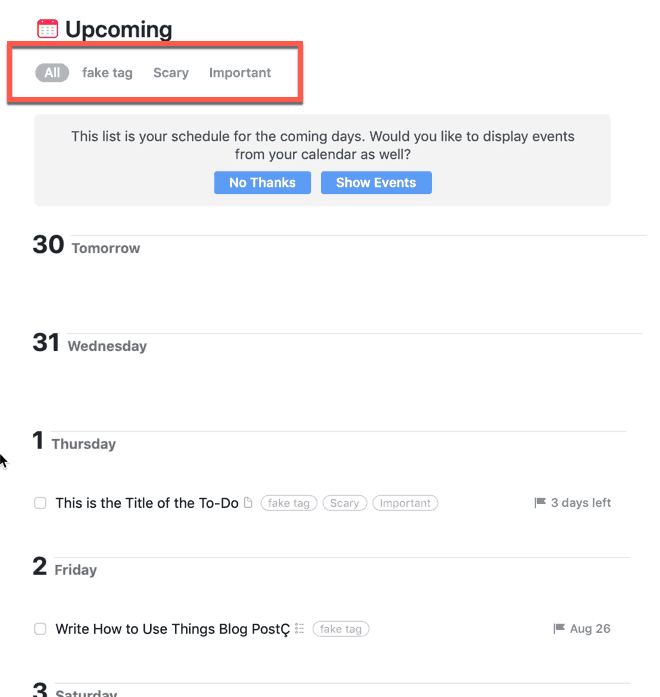
One of the cool features of the upcoming view is that you can filter it by tag.
The Anytime View in Things
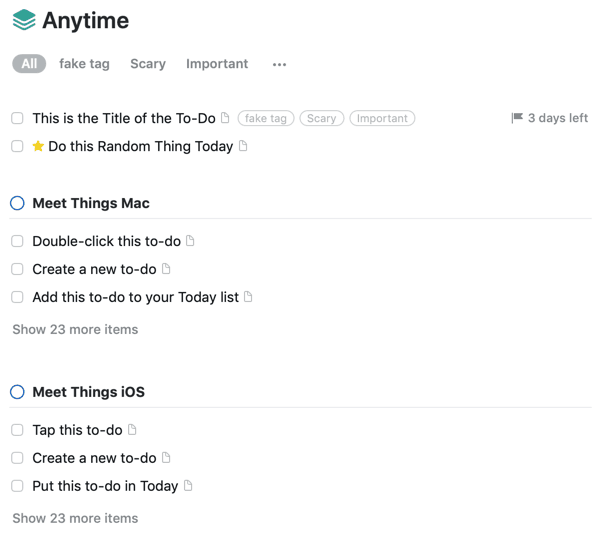
Anytime refers to all the to-dos you have that can be done. Like the upcoming view, it can filter by tag.
The Someday View in Things

The Someday view are for items that you know you want to do but are unsure when you actually want to do them.
Logbook

The logbook in Things is the place your completed to-dos are logged.
Trash
Trash is exactly what you think it is. It is the place where all of your deleted to-dos are sent. To empty your trash, press the Empty Trash button. If you have a to-do that doesn’t belong in the trash, simply click and drag it out of the trash and onto either one of the views or a project (we will talk more about projects later in this guide).
Areas in Things
Now that we have covered how to create tasks, assign dates and use the views, we should talk about how to group to-dos and projects. Things has two core grouping mechanisms:
- Areas
- Projects
Areas can be best thought of as a high-level grouping structure. Examples of areas might be finance, family, career, education to name a few. Areas serve as the highest level grouping of projects and to-dos in Things. Areas are at the top of the hierarchy. An example of the area hierarchy might be:
Education (area) -> Get an Engineering degree (project) -> Take Physics (to-do)
How to Create an Area in Things
To create an area in Things, do the following:
- Go to File -> New Area in the main menu
Projects in Things
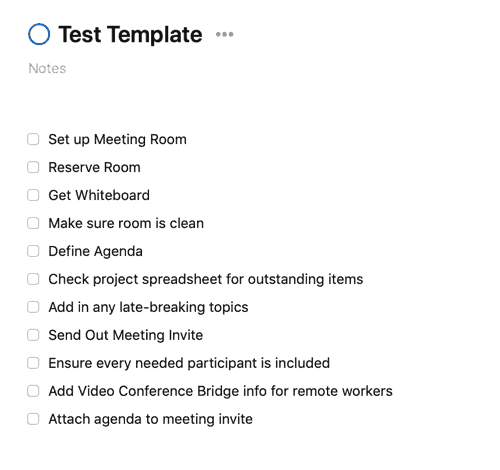
Projects in Things are pretty much what you might think they are. Projects is a goal or outcome that is composed of one or more to-dos. Using the example from earlier, getting an engineering degree would be a project while the individual classes might be to-dos. The screenshot below shows what the beginnings of the project might look like:
While this is a good start, we can beef up the project to contain more context.
Creating a Project in Things
To create a project in Things, do the following:
- Either go to File -> New Project or use keyboard shortcut Option Command N
- Click on the area where it says New Project and type in your project name
Adding Notes to a Projects
One way we can add context to a project in Things is to add notes. To add notes to a project in Things, do the following:
- Open Project in Things
- Click Underneath the Project Title where it says Notes in gray text
- Type in your notes

Now we have some notes that describe exactly what this project is about. Let’s add some more to-dos to the project.
We are getting closer but it still looks like a long list of random items. Let’s see how Things might be able to help us put some order to our project.
Headings in Projects
Headings are a great feature for projects in Things. Things allows you to put headings into your projects to help break up the to-dos into logical categories. This makes managing the project much easier.
How to Add a Heading to a Project
To add a heading to a project in Things, do the following:
- Open Project in Things
- Either navigate to File -> New Heading in the main menu or use the keyboard shortcut Shift Command N
- Click inside the new heading box at the left hand side and start typing. Hit Enter when complete
- Click, hold and drag to-dos to the new heading and release the mouse button
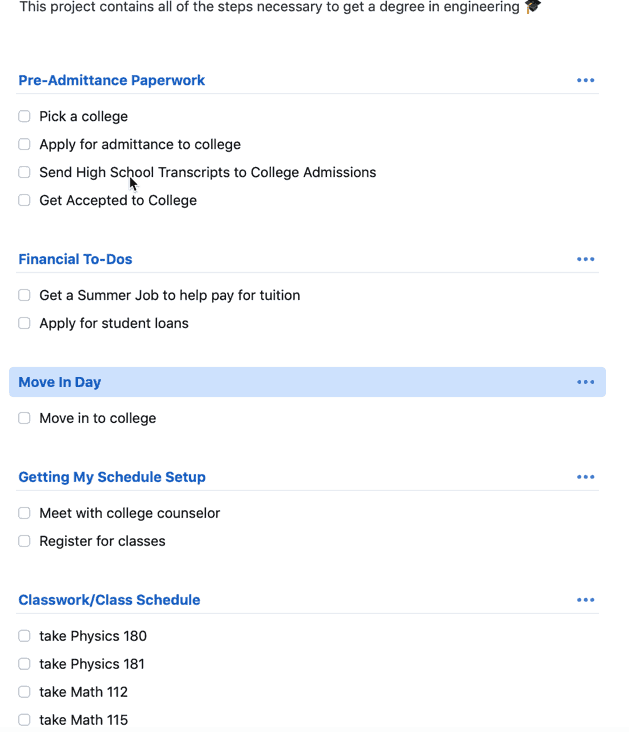
As you can see, the headings really make a difference.
How to Mark a Project Complete
You can mark an entire project complete in Things. To mark a project as complete, do the following:
- Open the Project
- Click on the checkbox circle to the left of the project name
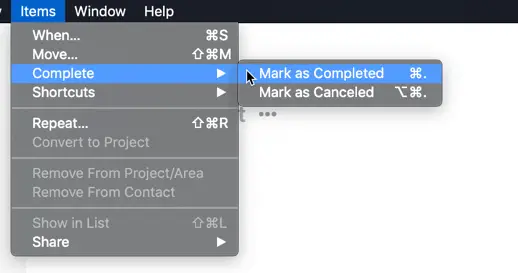
Alternatively you could open the project and go to Item -> Complete -> Mark As Completed or use the keyboard shortcut Command .. Additionally you could open the project and click on the ellipsis … and select Complete Project.
How to Mark a Project as Cancelled in Things
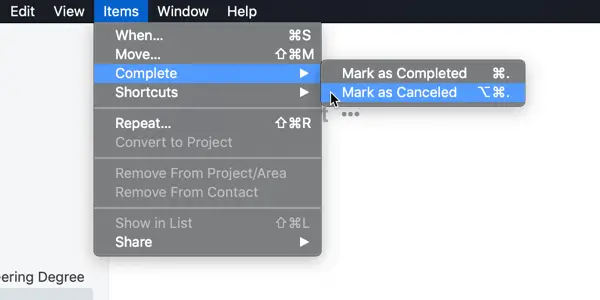
Sometimes you decide that a project isn’t worth doing. Things allows you to cancel an entire project quickly. To cancel a project in Things, do the following:
- Open the Project
- Either go to Items -> Complete -> Mark as Cancelled or use the keyboard shortcut Option Command ..
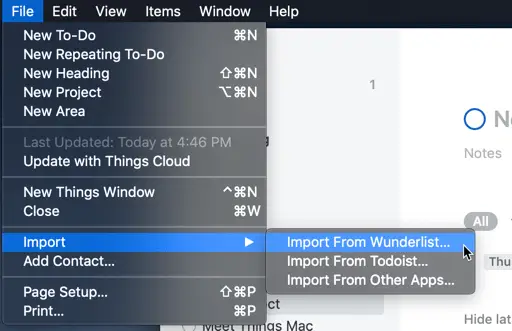
Importing To-Dos into Things
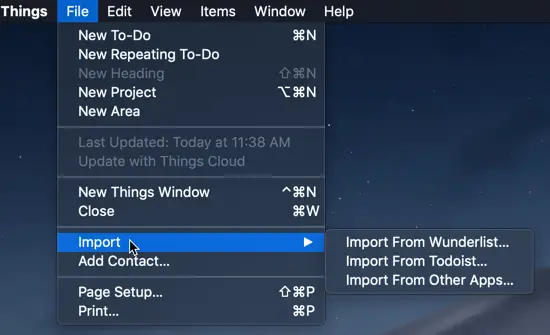
Things offers the ability to import to-dos from other applications. This is helpful if you are moving from another application to Things or if you just want to kick the tires on Things without having to enter all of the to-dos you already have in other application.
Things offers the ability to import from the following applications:
- Wunderlist
- OmniFocus 2 and 3 (Pro)
- Apple Reminders
- Todoist
- Outlook for Mac
- Toodledo
- Plain Text File
- Copy and Paste Text
While I am not going to show you all of the import options in this post, I will show you a couple.
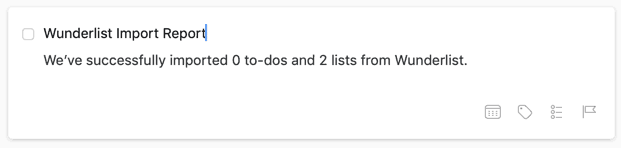
Importing Wunderlist into Things
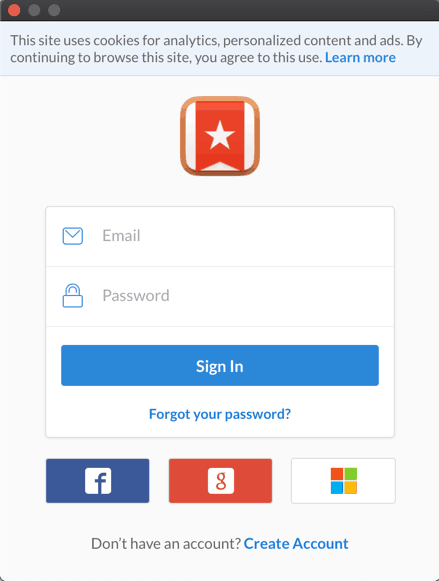
Importing your to-dos and lists from Wunderlist to Things is pretty straight-forward. To import your Wunderlist to-dos and lists from Wunderlist, do the following:
- Go to File -> Import -> Import From Wunderlist
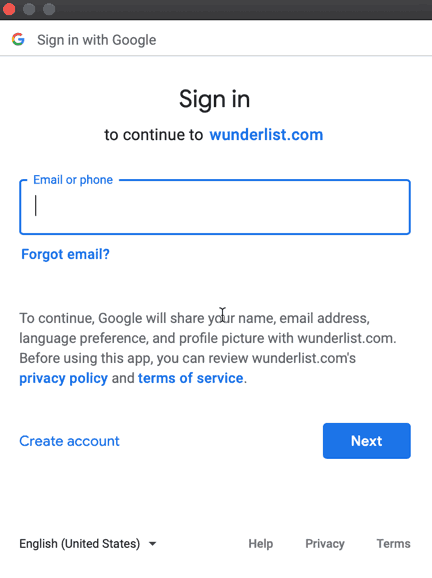
- A pop-up login dialog box will appear. Enter your login information and sign in or use the Facebook, Google or Microsoft login options if you use those to access your Wunderlist account
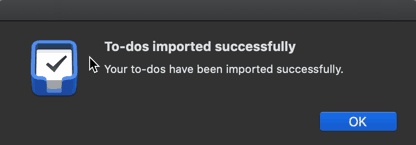
- An authorization dialog box with appear stating what Things will be able to access from your Wunderlist account. Press Authorize to continue.
- Once your Wunderlist data has been imported into Things, a pop-up box will appear indicating that the import was successful

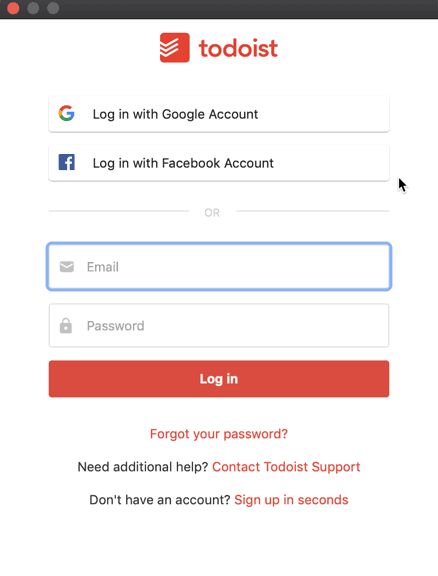
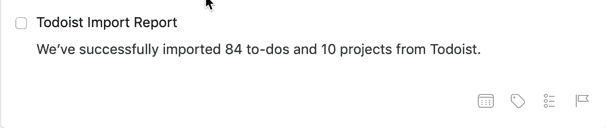
Importing Todoist into Things
To import your Todoist data into Things, do the following:
- Go to File -> Import -> Import From Todoist
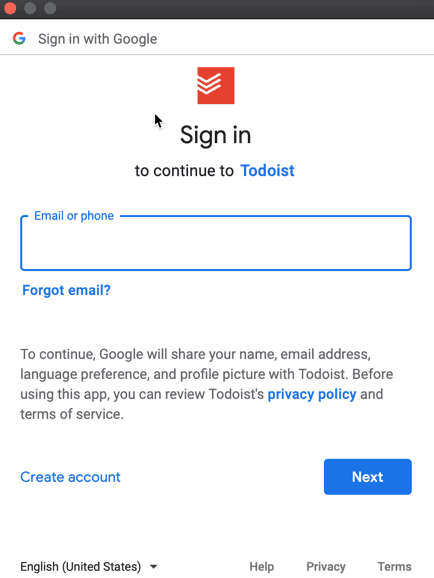
- A Todoist login window will appear. Login using your Todoist credentials or via Facebook or Google authentication if that is what you use to access Todoist
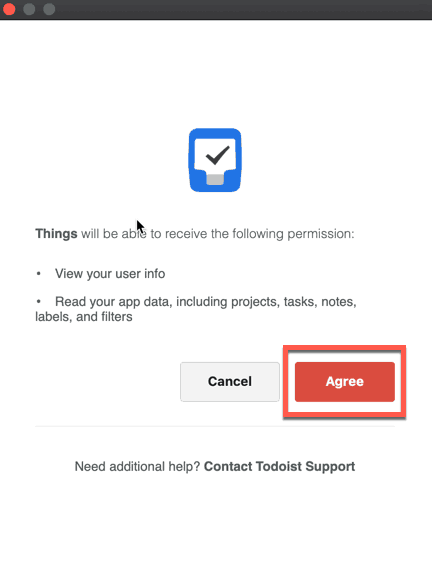
- An authorization window will appear listing the information and access Things will have to your Todoist account. Press Agree to continue
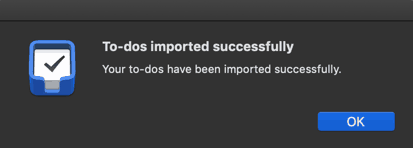
- Once your data has finished importing, you will see a successful import window. Press Ok to close it.
Emailing To-Dos into Things
A lot of times, you are processing through your email and you want to make the content of an email a to-do in your to-do system. Things allows you to send email directly to Things.
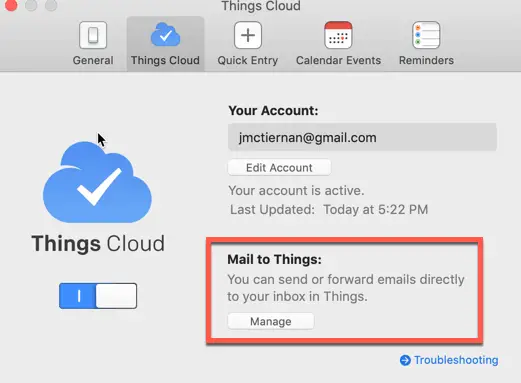
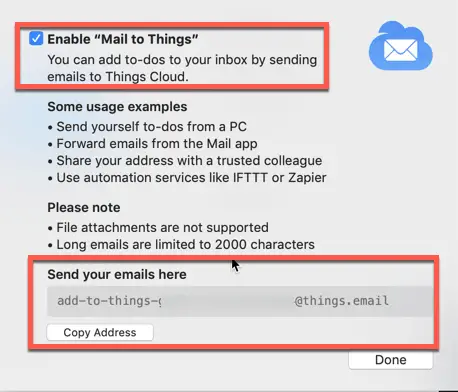
To enable Things for email, do the following:
- Go to Things -> Preferences or use keyboard shortcut Command ,.
- Select the Things Cloud tab
- Press the Manage button under the Mail to Things header
- Check the Enable “Mail to Things” checkbox
- At the bottom of the window here is a Send your emails here header with an email address. This is the email address you will send your email to. Copy the address using the Copy Address button
- Forward your emails you want to put into Things to the Things address you just copied
If you want more information on emailing items to Things, check out our blog post on that very topic:
link to How to Email Items to Things – An Illustrated Guide
Sharing in Things
In Things, you can share to-dos, projects and even areas.
Sharing To-Dos in Things
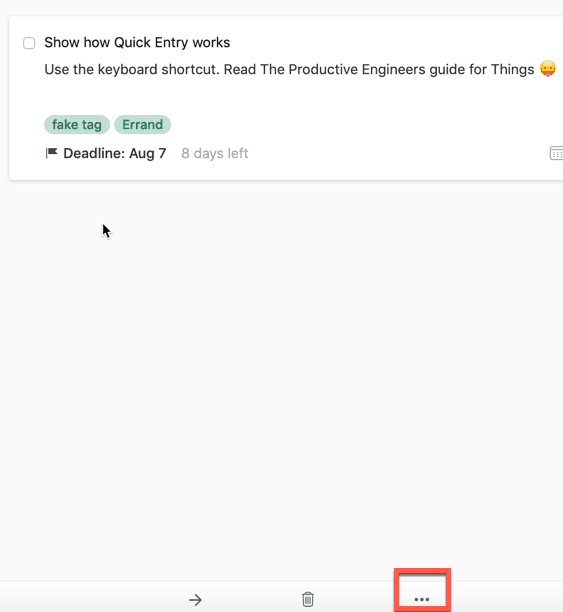
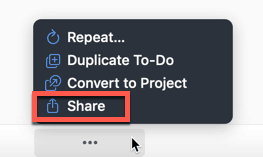
To share a to-do, do the following:
- Open the to-do you want to share
- Click the ellipsis button … at the bottom of the main window
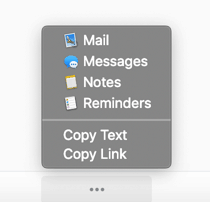
- Select Share from the menu
- Pick the application you want to share the to-do with
Sharing a Project in Things
To share a project in Things, do either one of the following:
- In the left panel, right-click on the project and select Share
- Pick with application to share your project to
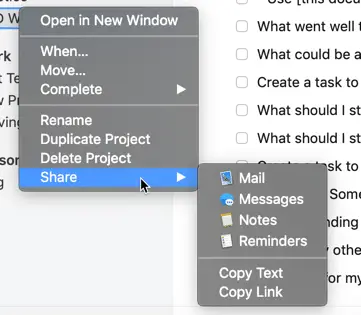
Or you can share the project this way:
- Open the project
- Click the ellipsis button … next to the project title
- Pick with application to share your project to
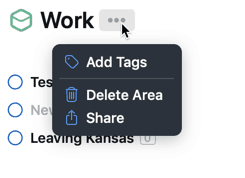
Sharing an Area in Things
To share an area in Things, do either one of the following:
- In the left panel, right-click on the area and select Share
- Pick with application to share the area to
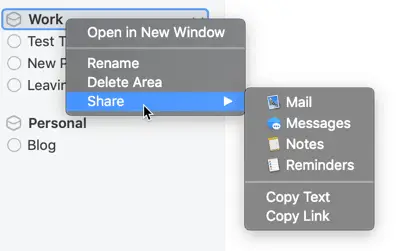
Or you can share the project this way:
- Open the area
- Click the ellipsis button … next to the area title
- Pick with application to share your area to
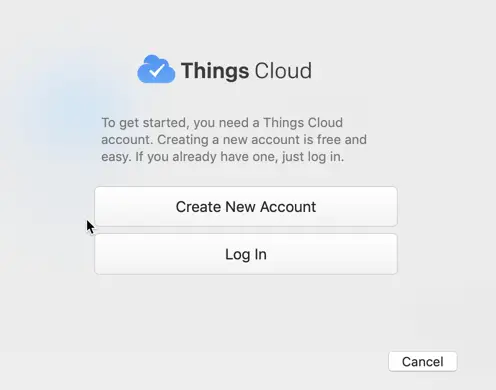
Things Cloud
Things Cloud is Things sync service. It comes as part of Things and doesn’t cost anything. Things Cloud syncs your Things data across all of your devices that have Things installed.
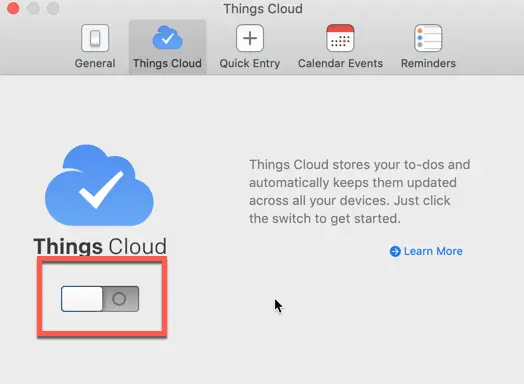
Signing up for Things Cloud is really easy and can be done in Things.
To setup Things Cloud, do the following:
- Go to Things -> Preferences or use keyboard shortcut Command ,
- Select the Things Cloud tab
- Click the switch to turn Things Cloud on
- Select Create New Account if haven’t set up Things Cloud already, otherwise select Log In
- Follow the prompts to create a new account or login
Changing the Appearance of Things
You can also change the appearance of the user interface in terms of light or dark mode. There are three modes:
- Automatic
- Light
- Dark
Automatic will choose light or dark based on the system settings you have setup for light or dark mode for MacOS. Light is the white background theme while dark mode is the dark theme.
To set the appearance of Things, do the following:
- Go to View -> Appearance
- Choose which view you want
Slim Mode
You can toggle the left panel on or off depending on whether you want to see the panel or not.
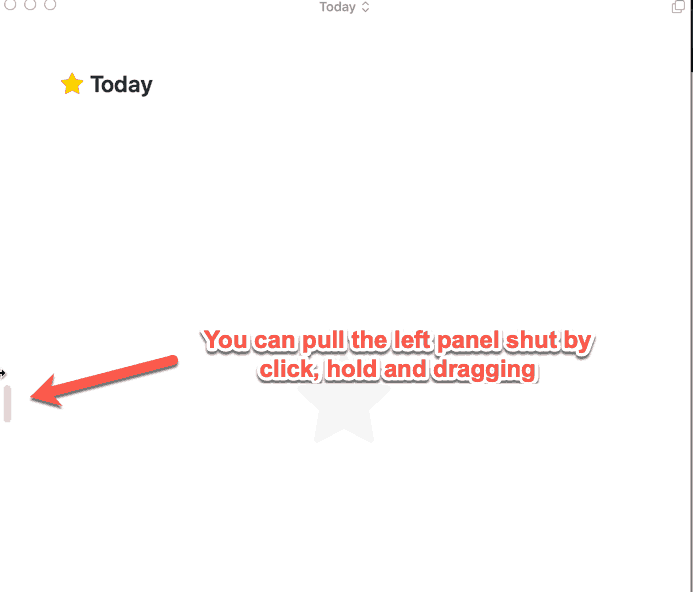
To toggle the left panel on or off, do the following:
- Use keyboard shortcut Command / to toggle the left panel visible or not visible
or
- Click and hold the right edge of the left panel
- Drag the panel from right to left until only the main window is visible
Opening Multiple Windows in Things
Things supports having multiple windows open at the same time. This is great if you want to see two view side-by-side or want to edit two different projects simultaneously.
There are a couple of ways to accomplish this:
- Open a project or to-do and click the Multiple Window button in the upper-right corner of the window
- Use keyboard shortcut Command Control N

You can also open a to-do inside its project in a new window by doing the following:
- Find the to-do outside of the project it belongs
- Hold down Option while right-clicking and select Show in Project
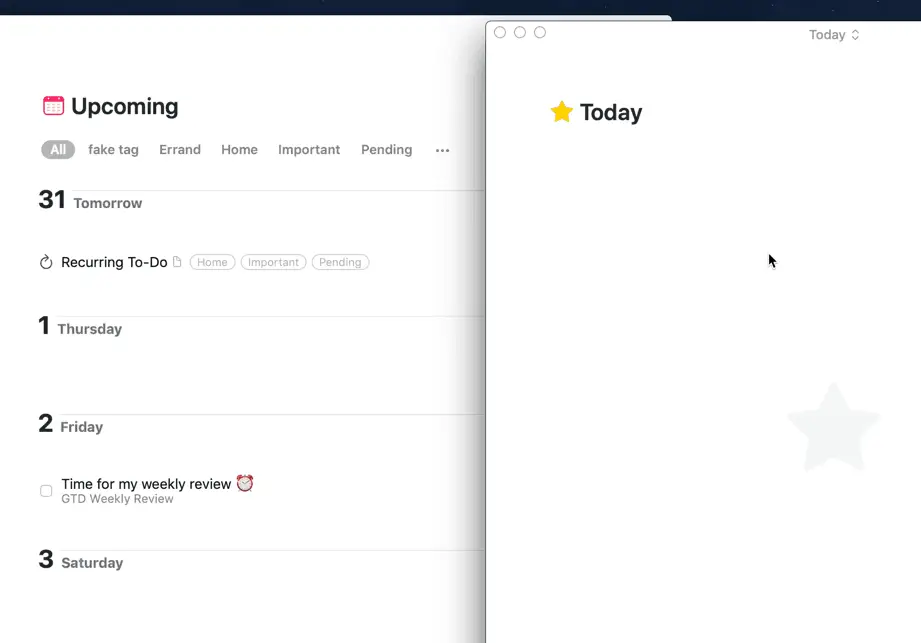
The to-do will show in the project in a separate window.
Summary
Things is a wonderful application to managing your tasks. It has a clean interface that makes it very easy to learn. It also has a great deal of functionality such that you shouldn’t outgrow it.
Subscribe to Our Newsletter
If you haven’t already subscribed, please subscribe to The Productive Engineer newsletter. It is filled with tips and tricks on how to get the most out of the productivity apps you use everyday.
Check Out Our YouTube Channel
We have a YouTube channel now and we are working hard to fill it with tips, tricks, how-tos and tutorials. Click the link below to check it out!
link to The Productive Engineer YouTube Channel
Check out our Resources page
Check out our resources page for the products and services we use everyday to get things done or make our lives a little easier at the link below:
Helpful Links
Things 3 website
link to Things 3 website
Things 3 support website
link to Things 3 support website
Things 3 FAQ
link to Things 3 FAQ
Things Guide
link to Things Guide
Other Articles You Might Be Interested In
How to Email Items to Things 3 – an Illustrated Guide
link to How to Email Items to Things 3 – an Illustrated Guide
What iOS To Do App Should I Use
link to What iOS To Do App Should I Use
How to Create a Mind Map on a Mac
link to How to Create a Mind Map on a Mac