A Guide to Using Smart Folders on MacOS
Being a long time Mac user, you get accustomed to the way things work on a Mac. MacOS has tons of functionality built into it that makes doing things on the Mac easier. One of those pieces of functionality that frequently gets overlooked but I find extremely valuable are Smart Folders. Smart Folders are essentially saved searches. If you are a Windows user, it has an analog to Smart Folder called Search Folders. They are not really folders at all even though they are represented by a folder icon (albeit a purple one with a gear in the middle of it). Using Smart Folders makes finding the items on your hard drive(s) simple.
This blog post will teach you how to use Smart Folders to filter your files and view the ones you need to see. While this blog post will walk you step-by-step how to make and use Smart Folders, here are the steps you need to take to create a Smart Folder:
- Open a Finder Window and Navigate to the Folder You Want to Search Using Your Smart Folder
- Go to Finder -> New Smart Search in the Main Menu
- Select the Folder You Want to Search in the Smart Folder Window
- Press the + Button on the Far Right Hand Side of the Finder Window
- Use the drop-down boxes to define your initial search/filter criteria
- Add more search filters using the + button
- Press Save when you have all your search criteria defined
- Choose Where You Want to Save the Search and Press Save
The files and/or folders will be listed in the Smart Folder.
Before we get started with the tutorial, if you are looking to learn more about apps like Notion, Todoist, Evernote, Google Docs, or just how to be more productive (like Keep Productive’s awesome Notion course), you should really check out SkillShare. Skillshare is an online learning platform with courses on pretty much anything you want to learn. To learn more about Skillshare and its vast library of courses and get 30% off, click the link below:
SkillShare – Online Learning Platform
If you are looking to keep your mac running at it’s best, check out CleanMyMac X by MacPaw. I have been using CleanMyMac for years it keeps my Mac running optimally by:

- Removing unnecessary files and junk from my mac
- Running optimizations to improve performance
- Easy to use app uninstaller to remove apps cleanly
- Malware removal
For more information on CleanMyMac X, click the link below:
CleanMyMac X – The Ultimate Cleaner for Your Mac
Getting Started with Smart Folders
1. Open a Finder Window and Navigate to the Folder You Want to Search Using Your Smart Folder
First thing we need to do is to open a Finder window. Navigate to the folder you want to have your smart folder search. You can choose your whole Mac hard drive if you wish but if you know the files that apply to your search are in one folder, it is better to narrow the scope of the search.
2. Go to Finder -> New Smart Search in the Main Menu
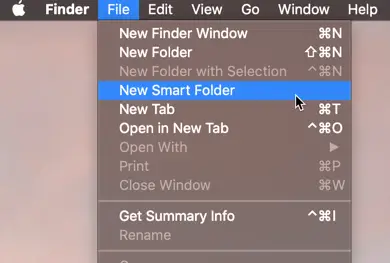
Once you have navigated to the folder you want to use as the scope of your Smart Folder search, go to Finder -> New Smart Search in the main menu. This will bring up the dialog box where you will build you Smart Folder.
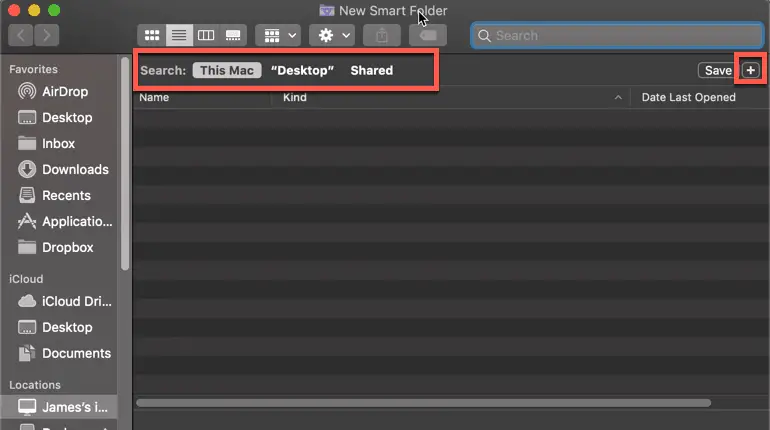
3. Select the Folder You Want to Search in the Smart Folder Window
The New Smart Folder window should have opened at this point
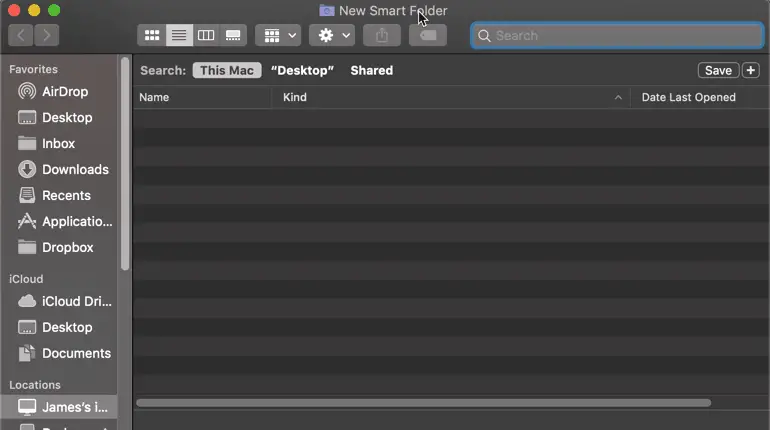
Above the columns in the main panel of the window there is a Search label with three entries:
- This Mac
- [YOUR FOLDER]
- Shared
The [YOUR FOLDER] is the folder you selected earlier as the folder you want your Smart Folder to use as its search scope. What that means is the your Smart Folder will only search the folder you specified. If you want to search your entire Mac, choose the This Mac option.
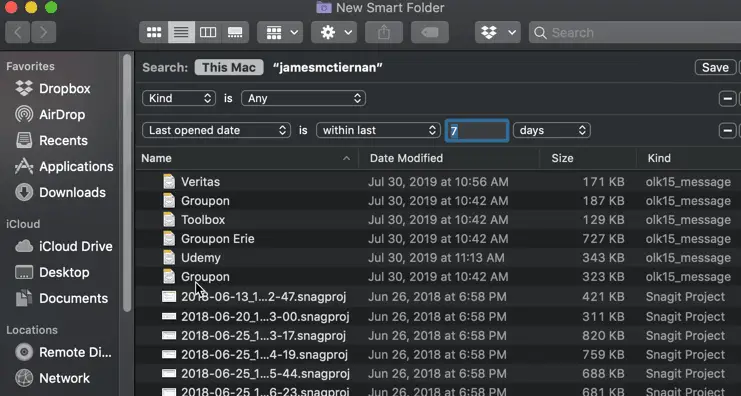
4. Press the + Button on the Far Right Hand Side of the Finder Window

If you look underneath the Search box you should see a little + button. This button adds filter criteria to your search. To add your first search filter to your Smart Folder, press the + button. This will add the first level of your search criteria.
5. Use the drop-down boxes to define your initial search/filter criteria

Once you have clicked the + button a new row will appear underneath the Search folder row. There should be two drop-down menus and a text field. The first drop-down menu, working from left to right, defines the search criteria. The second drop-down box is a clarifier related to the the first drop-down menu. When you click on this drop-down menu box, the following options will appear:
- Kind
- Last Opened Date
- Last Modified Date
- Created Date
- Name
- Contents
- Other
Kind defines what the search criteria is. The clarifier options for the kind attribute are:
- Any
- Application
- Archive
- Document
- Executable
- Folder
- Image
- Movie
- Music
- Presentation
- Text
- Other
I am not going to go every one of these but let’s pick the ones I think are useful.
Any Filter
Any literally means any type. You would use this if you want to search for anything that was opened in the last 7 days by adding a second criteria that specifies the last opened date and the time interval.
Application Filter
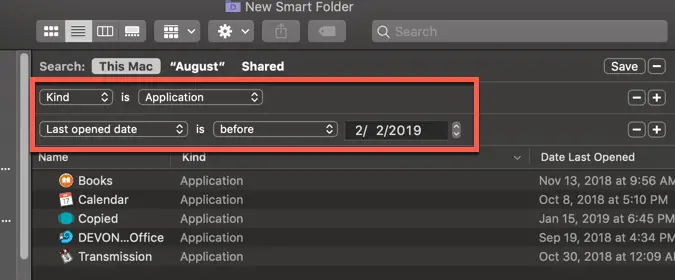
The application attribute refers to an application. A good example of a Smart Folder for this attribute is a search for any application that has not been opened after a past date (like 6 months). If you haven’t opened an application in 6 months, it probably isn’t in your daily workflow and might be a candidate for deletion to save space on your Mac.
Document Filter
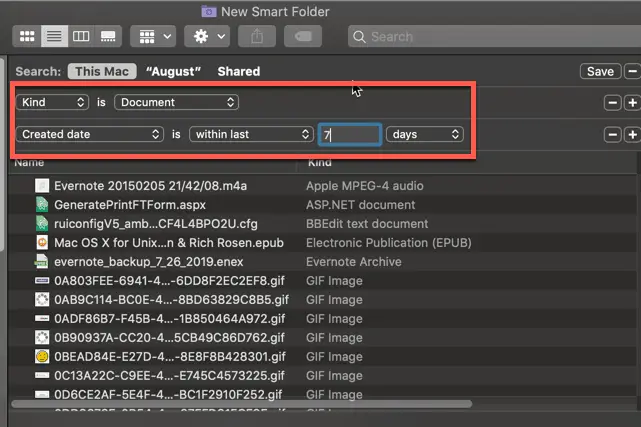
The Document filter references any type of document format including image, video and audio. A good Smart Folder for documents would be any document created in the last week.
Folder Filter
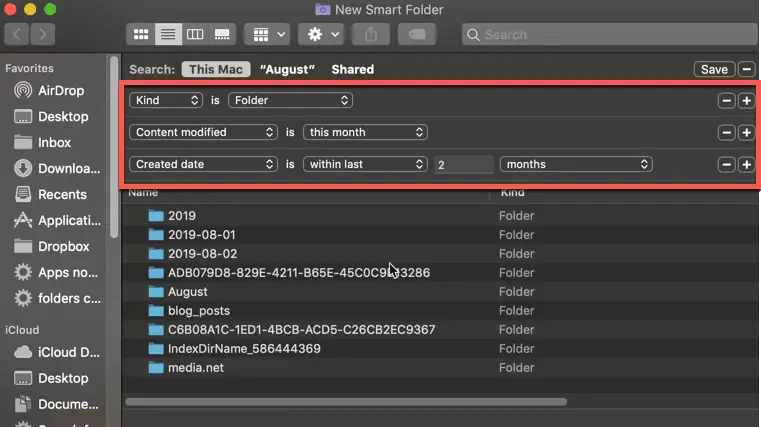
The Folder filter brings up any folders that fits the search criteria. One example I think is handy to have is a Smart Folder that
Image Filter
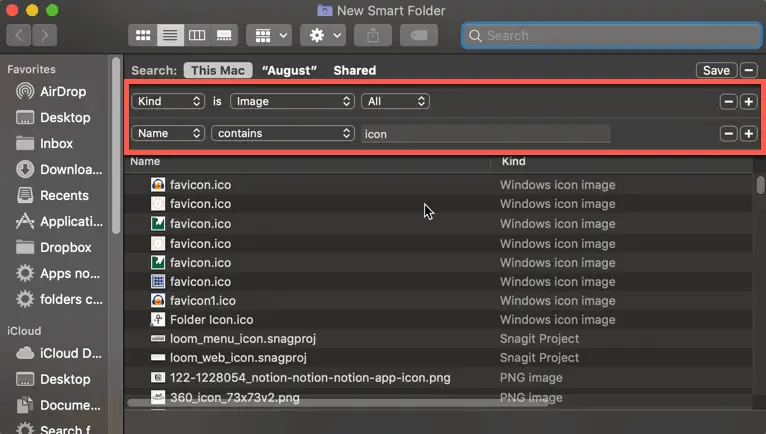
The image filter will return all of the images in a given search scope. I run this blog that uses a lot of images and it is good to have a Smart Folder that is setup to show me all of the images that contain a certain word, phrase or number in the name. An example of this is a Smart Folder that contains all of the images that have the word icon in them.
Music Filter
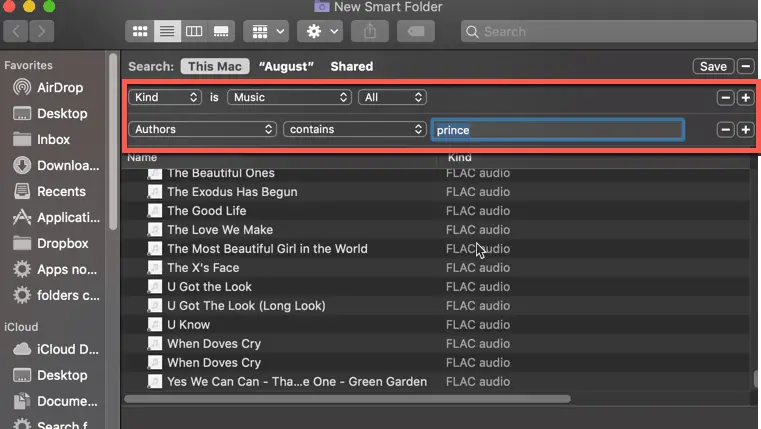
Music will pull up any audio files (mp3, .aac, .flac, .wav, etc.) that fit your criteria. I find it useful if I want to search for a particular artist. The nice thing about this example is you can further filter it by name if you want a specific album .
PDF Filter
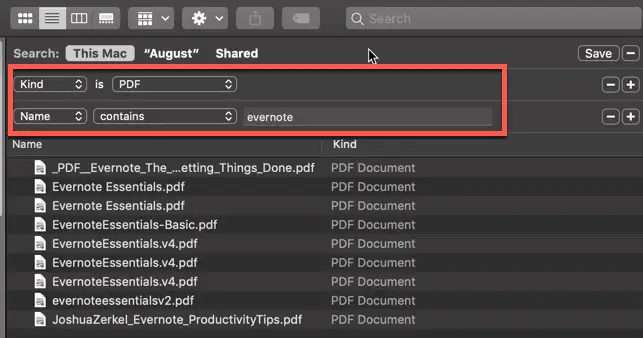
I have a lot of PDFs on my Mac. I am a reference junkie. If it is a guide or reference manual, I keep it like a hoarder on my Mac. Unfortunately, this means finding the ones I want gets more difficult over time. Setting up a Smart Folder that returns all of the PDFs that contain a name or phrase in the name is handy.
Presentation Filter
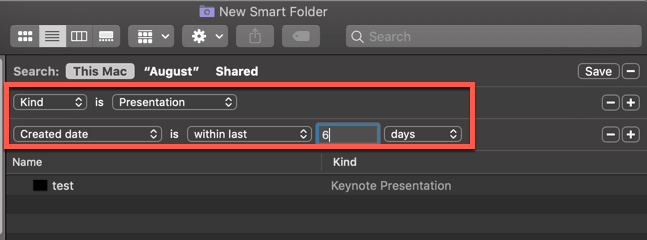
As the title of this section infers, the presentation filter is used to return any presentation files (powerpoint, keynote) it finds that match your search criteria.
Text Filter
The text filter returns any text-oriented file (.txt, .html, .php, .rtf, .h, .xml, .json, etc.). While this filter is good, I would recommend searching for the specific file extension instead (file extension is an option in the Others category). We will cover file extension-based Smart Folders later on in this blog post.
Other
The Other category contains all of the other filter criteria options for Smart Folders. The list of filter options is quite extensive. Rather than document all of the filter criteria, enclosed below is a table containing the filter and it’s description:
| Filter | Description |
|---|---|
| Album | Title for a collection of media, such as a record album |
| Authors | Authors of this item |
| Codecs | Codecs used to encode or decode media |
| File Extension | The filename extension of the item |
| Filesize | Physical size of the item in bytes |
| Pages | Number of Pages in the Document |
| Pixel Height | Height of the document in pixels |
| Security | Encryption method used to make the document secure |
| Tags | Tags associated with item |
| Video Bit Rate | Bit Rate of the Video in the media |
6. Add more search filters using the + button
As you have seen from some of the Smart Folder examples, you can have more than one search filter. To add more filters, simply use the + button and configure the filter.
7. Press Save when you have all your search criteria defined
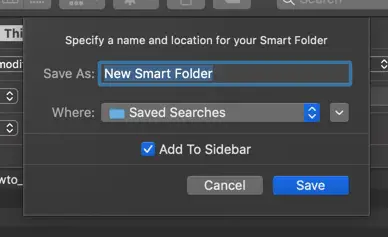
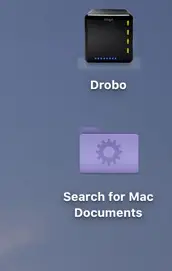
Once you have your Smart Folder configured, press the Save button. The save dialog box will pop up. Select the name you want to give your Smart Folder and choose where you want to save it. I typically put my Smart Folders on my desktop.
8. Choose Where You Want to Save the Search and Press Save
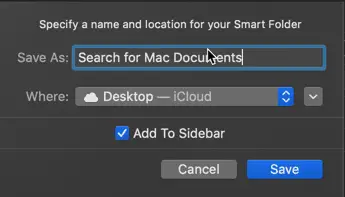
Select the name you want to give your Smart Folder and choose where you want to save it. I typically put my Smart Folders on my desktop.
Protect your Mac from malware, phishing and viruses with Norton 360. Norton 360 is the end-to-end software solution to protect your Mac from threats. For more information, click the link below:
Norton – Multiple layers of protection for your Cyber Safety
Any, All or None – Making Smart Folders Even More Powerful
By default, as you add filters to your Smart Folder, the filters are additive to the search. In other words, it is using AND logic. An example would be:
Search of files of type document that was last opened in the last 7 days and the name matches “checklist”. All of these conditions have to be true in order for the file to show up in the Smart Folder search. But what if you want to have conditional logic in your search criteria? That is where Any, All or None come into play.
To bring up the Any, All or None options, in the New Smart Folder window, hold down the Option key. When you hold down option, the + sign at the end of each filter turns into an ellipsis …. Press the ellipsis. You should now see the next filter underneath and nested inside of the conditional line with a drop-down menu with Any and the text “of the following are true”.
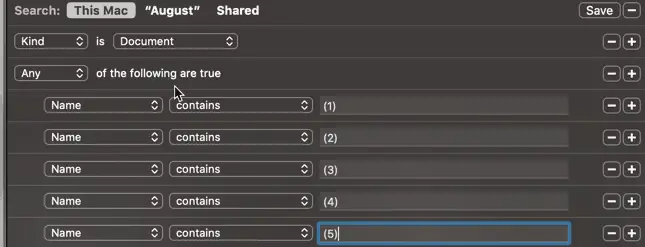
Using the Any Conditional
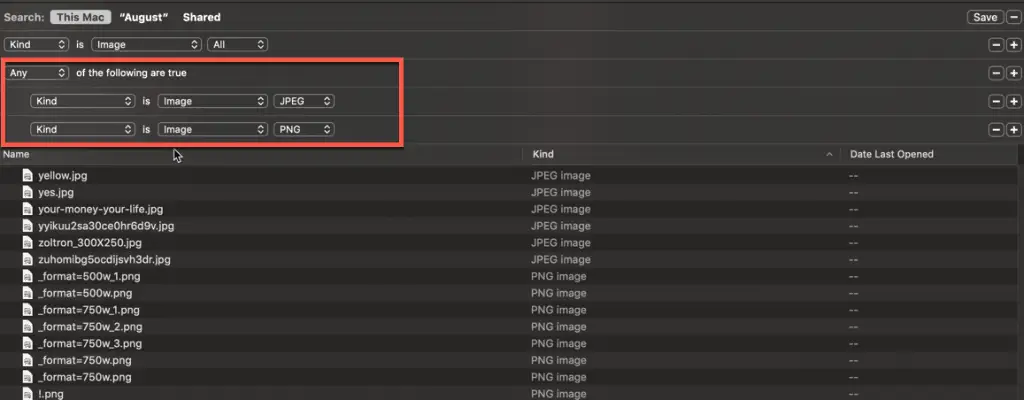
Let’s use an example to show how this works. Let’s create a Smart Folder that only looks for PNG or JPEG images. Enclosed below is a screenshot that shows how you would build that Smart Folder:
Using the All conditional
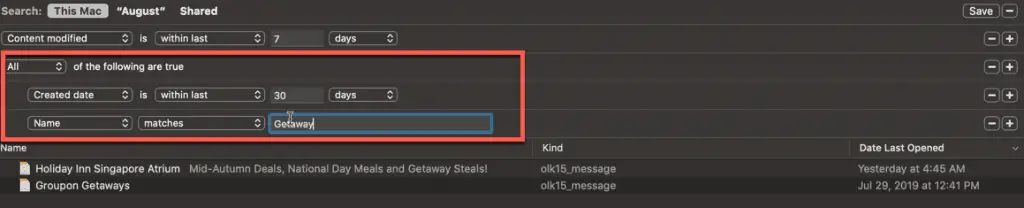
The All conditional allows you to bundle a bunch of filter criteria together in one unit where ALL of the criteria in the block must be true. An example of this might be a search for any file that was modified within the last week where it both must have been created in the last 30 days AND have a name that matches “Getaway”.
Using the None Conditional
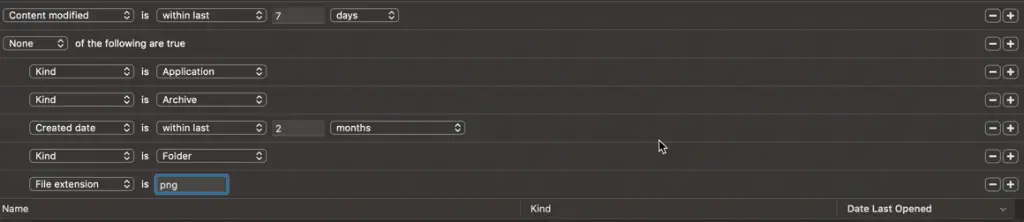
The None conditional is a little weird to use at first as we tend to think additively rather than in an elimination-oriented way. An example of a Smart Folder that leveraged the None conditional would be the following:
Everything that was modified in the last week that was not:
- an application
- an archive file
- created in the last 2 months
- a folder
- a PNG file
While admittedly this example is kind of arbitrary, it shows how the None conditional can be used.
Editing an Existing Smart Folder
To edit an existing Smart Folder, do the following:
- Open the Smart Folder
- In the Smart Folder window, click on the Gear icon
- Select Show Search Criteria
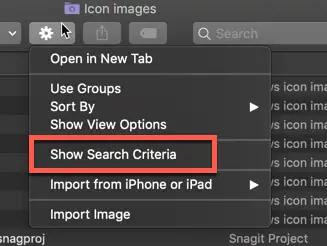
This will bring up the filters and you can edit them and save.

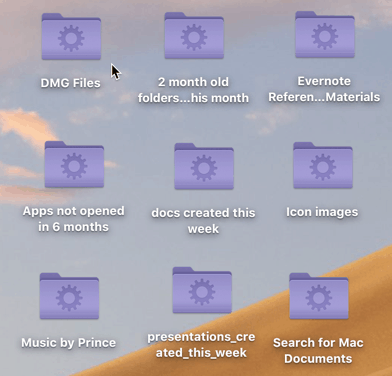
Some Smart Folder Examples
To drive home how useful Smart Folders are, here are some good examples of Smart Folders:
Find all DMG Files
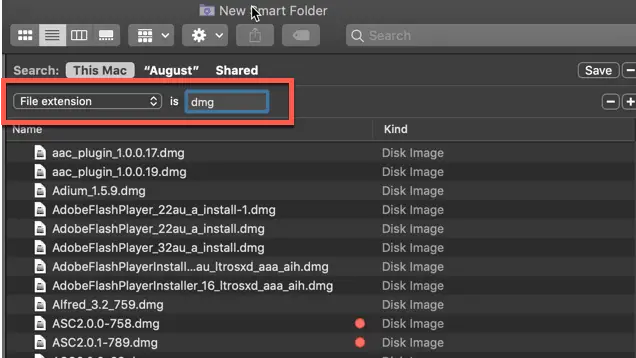
DMG files are the packages that are used to install applications onto your Mac. Once you have installed the application, you might not want or need that file anymore. Conversely, if your application starts acting weird, having the DMG file handy can save time.
Large Files that haven’t be opened in a long while
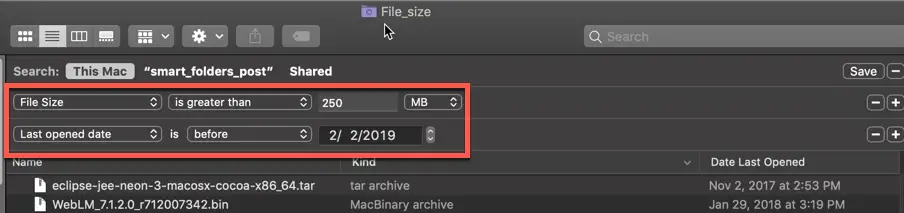
Managing your hard drive and keeping only the files you actually need. Large files can take up a bunch of space on your hard drive and, if haven’t accessed that file in a long time, might not be necessary anymore.
Finding Duplicate Files
Similar to large files, duplicate files take up space when they shouldn’t be. While you can use software like Gemini (link to Gemini) to remove duplicates, Smart Folders can also do this.
Finding All of Microsoft Office Files You are Currently Working On
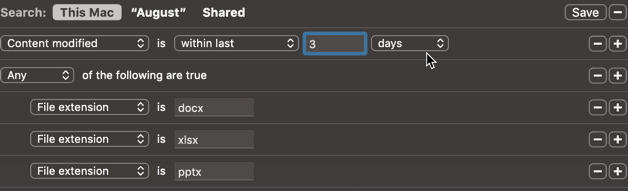
Most of us use at least a couple of Microsoft Office applications in our day. Wouldn’t it be nice to have a Smart Folder that showed you only the office files you have been working on in the last X amount of day?
Do you have an M1 Mac Mini or Mac Studio and want to get the best accessories for it? Check out my Mac accessories guide here.
Summary
Smart Folders have been around in MacOS forever and can be easily forgotten, but they shouldn’t be. The ability to have a constantly updated saved search based on your very specific criteria is extremely powerful.
If you are looking to improve your skills in MacOS, check out MacOS Mojave – The Missing Manual. This book is a must-have for Mac users.
Subscribe to Our Newsletter
If you haven’t already subscribed, please subscribe to The Productive Engineer newsletter. It is filled with tips and tricks on how to get the most out of the productivity apps you use everyday. We hate spam as much as you do and promise only to send you stuff we think will help you get things done.
Check Out Our YouTube Channel
We have a YouTube channel now and we are working hard to fill it with tips, tricks, how-tos and tutorials. Click the link below to check it out!
link to The Productive Engineer YouTube Channel
Helpful Links
link to Get to Know the Finder
Check out our Resources page
Check out our resources page for the products and services we use everyday to get things done or make our lives a little easier at the link below:
Other Articles You Might Be Interested In
How to Use Things for Mac
link to How to Use Things for Mac
What iOS To-Do App Should I Use?
link to What iOS To-Do App Should I Use
How to Create a Mind Map on a Mac
link to How to Create a Mind Map on a Mac
How to Use the Evernote Web Clipper
link to How to Use the Evernote Web Clipper