How to Use the Evernote Web Clipper
Evernote is one of the best note-taking services on the market today. It’s ability to store most anything you can throw at it makes it extremely useful for users who need to ability to quickly access this data. One of the key ways to get content into Evernote is via the Evernote Web Clipper. The Evernote Web Clipper is a browser extension that allows you to capture data from web pages. While other note-taking applications offer web clippers, the Evernote Web Clipper is extremely robust in terms of functionality and customization ability.
The Evernote Web Clipper is easy to use but, at the same time, very functional. The steps to use the web clipper are listed below:
- Install the Evernote Web Clipper Extension
- Log into Evernote via the web clipper
- Navigate to a web page you would like to clip
- Click the Evernote Web Clipper extension icon in the browser
- Rename Web Clipping if Appropriate
- Select the Clip Format You Want to Use
- Select the Evernote Folder You Want to Save the Clip
- Add a tag(s) to the web clipping
- Add any Remarks
- Press “Save clip” Button to Save Clip to Evernote
The Evernote Web Clipper is great at making it simple to get web browser content into your Evernote system quickly and easily. Now that we know the steps we need to take to use the web clipper, let’s get started!
Before we get started with the tutorial, if you are looking to learn more about apps like Notion, Todoist, Evernote, Google Docs, or just how to be more productive (like Keep Productive’s awesome Notion course), you should really check out SkillShare. Skillshare is an online learning platform with courses on pretty much anything you want to learn. To learn more about Skillshare and its vast library of courses and get 30% off, click the link below:
SkillShare – Online Learning Platform
If you are new to Evernote or simply looking to improve your productivity in Evernote, you should check out my Beginner’s Guide to Evernote at the link below:
Beginner’s Guide to Evernote – The Productive Engineer
This comprehensive guide will teach you all you need to know to use Evernote productively.
1. Install the Evernote Web Clipper Extension
The Evernote Web Clipper is available on the following web browsers:
- Google Chrome
- Safari
- Internet Explorer Release 7 and greater
- Microsoft Edge (for Windows 10 or higher)
- Firefox
- Opera
For the purposes of this blog post, we will be using the Google Chrome extension of the Evernote Web Clipper.
Installing the Evernote Web Clipper for Google Chrome
Go to the following website:
Link to Evernote Web Clipper on Evernote website
Click on the Get Web Clipper button. Clicking the button will take you to Evernote Web Clipper extension on the Chrome web store.

Once you are on the Chrome web store page, click the Add to Chrome button to install the Evernote Web Clipper extension into Google Chrome.
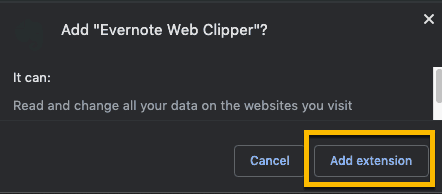
A pop-up window will appear asking you whether you want to add the web clipper and listing the permissions the web clipper will have. Press the Add extension button to install the extension. You should receive a successful installation message popup and the Evernote logo should appear in your browser bar.
Installing the Evernote Web Clipper for Apple Safari
Go to the following website:
Link to Evernote Web Clipper on Evernote website
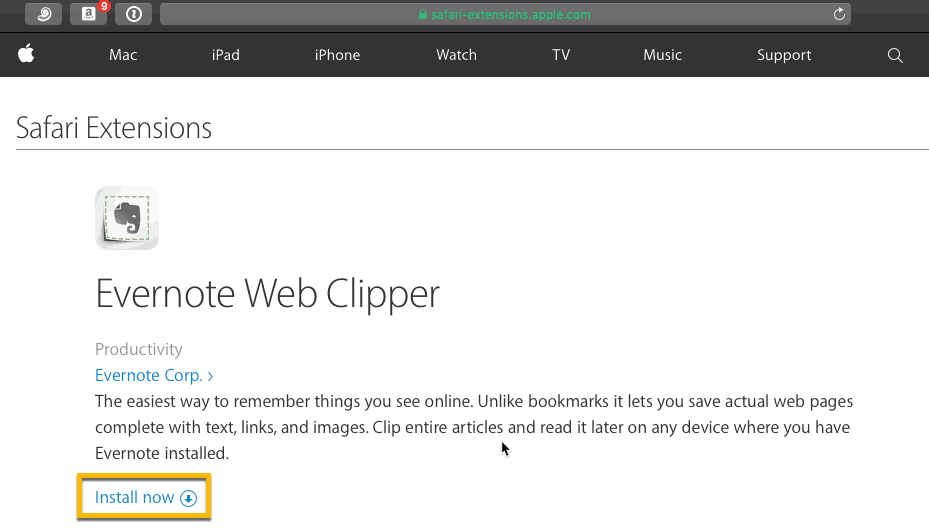
Click on the Get Web Clipper button. Clicking the button will take you to Evernote Web Clipper extension in Safari Extensions.
Click on the Install now button. The web clipper extension will install and Safari will re-route you to the Evernote Web Clipper quick start guide web page.
Installing the Evernote Web Clipper for Mozilla Firefox
Go to the following website:
Link to Evernote Web Clipper on Evernote website
Click on the Get Web Clipper button. Clicking the button will take you to Evernote Web Clipper extension in Firefox Add-ons.
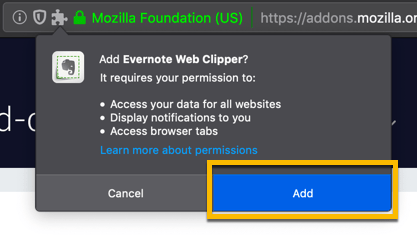
Click on the Add to Firefox button.

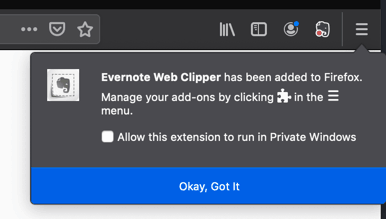
A pop-up dialog will appear asking if you want to add Evernote Web Clipper with a list of the permissions the web clipper will have. Press the Add button to install the extension.
After clicking the Add button, you should see a pop-up dialog box stating that Evernote Web Clipper has been added to Firefox. Press the Okay, Go It button to complete installation.
2. Log into Evernote via the Web Clipper
Once you have installed the web clipper extension, click on the Evernote Web Clipper icon in the browser bar.
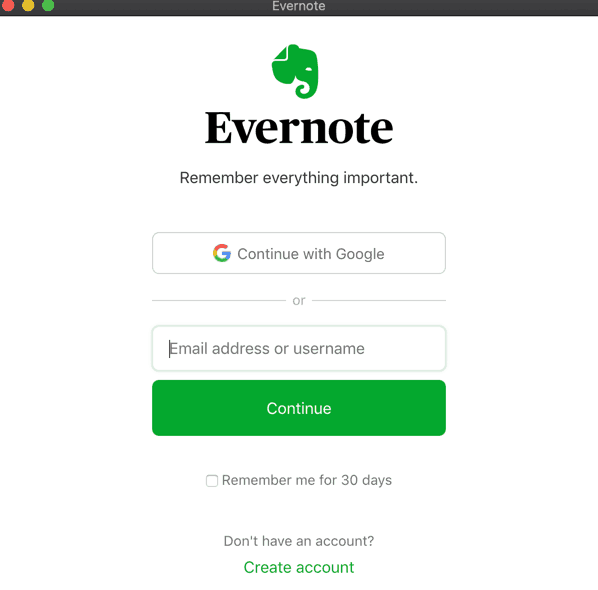
Given you are logging into the web clipper for the first time, you will likely need to log into your Evernote account in order to use the web clipper. A login pop-up window will appear. Login using your Evernote credentials. Once you are logged in, the web clipping window should appear. This indicates you are logged in and ready to clip.
3. Navigate to a Web Page You Would Like to Clip
Now that we are logged into the web clipper, we are ready to clip a webpage. Navigate to a web page that has content you want to clip in your web browser.
4. Click the Evernote Web Clipper extension icon in the browser
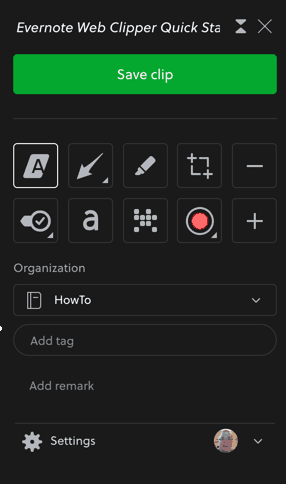
Once you found the web content you want to clip, press the Evernote Web Clipper button in the browser bar. This will bring up the web clipper clipping options pop-up menu.
5. Rename Web Clipping if Appropriate
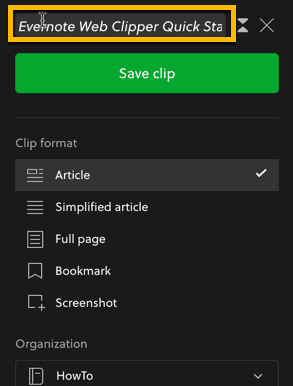
The first thing you can do is change the title of your web clipping. By default, the title will be the name of the web page. To change the title of your web clipping simply click the title text box, delete the current title and type in the new title.
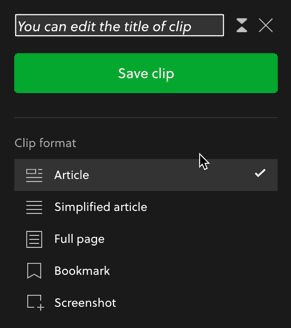
6. Select the Clip Format You Want to Use
The Evernote Web Clipper is very flexible. It allows you to capture web content in a variety of ways. The web clipper offers the following web capture options:
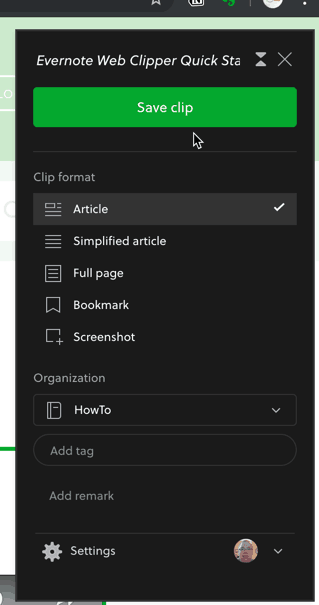
- Article
- Simplified Article
- Full Page
- Bookmark
- Screenshot
- Special Clip Types
- Selection
Article Clip Format
The article option detects the main part of the web page, blog post or news article. The formatting is preserved from the web page (at least the best that Evernote can in replicating it).
While the web clipper does a great job of determining the core content you want to clip in article mode, the web clipper allows you to expand or contract content capture window.
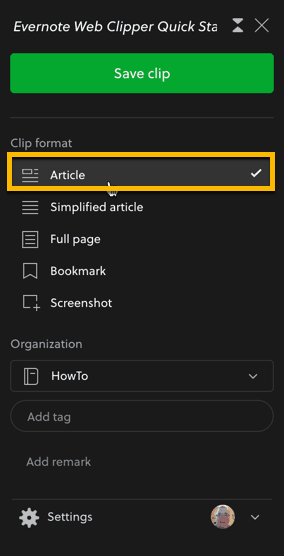
To expand or contract the web capture window, do the following:

- Click the Evernote Web Clipper button in the browser bar
- Select Article for the clip format, a green rectangle with + and – buttons on the top
- Click the + button to expand the capture area or the – button to contract it
- Press the Save clip button in the web clipper pop-up window to save the clip to Evernote
The article will appear in Evernote.
Simplified Article Clip Format

If you want to optimize your web clipping for reading by removing all unnecessary formatting then the simplified article clip format is the one for you. Simplified article strips away all the existing formatting, making the content easier to read.
Full Page Clip Format
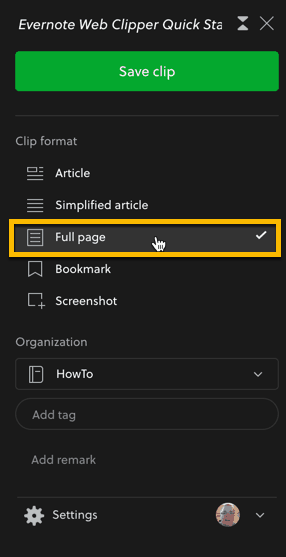
Full page is exactly what it sounds like. It saves a static copy of the entire webpage. This mode is good for web designers who might want to capture and markup a web page’s design elements.

Bookmark Clip Format

If you just want to capture a bookmark of the web site, you can use the bookmark format to grab the link, a thumbnail of the site and a text snippet.

Screenshot Clip Format
The screenshot clip format allows you to capture all or a portion of your browser content window.

Once you select screenshot mode, your browser window will look like this:
Click and drag to select the area you would like to screenshot. Release the mouse button and the area will be selected and the annotation options will appear in the web clipper menu.
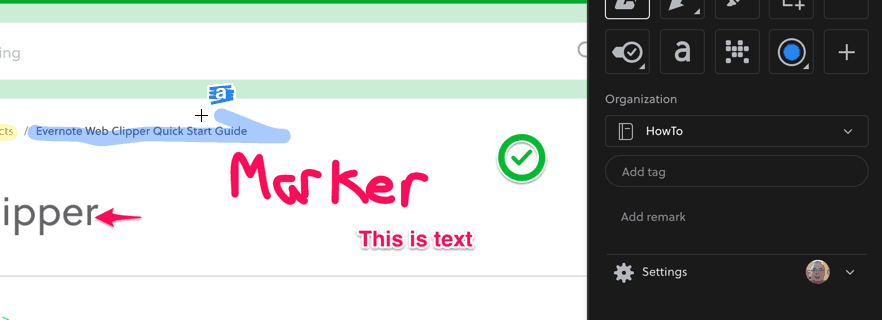
Annotations in Evernote Web Clipper
Once you have taken your screenshot, the Evernote Web Clipper UI will change and the annotation options will appear.
The annotation menu provides a group of tools you can use to markup the web clipping. Enclosed below is a list of the annotation tools:
- Highlighter
- Shapes
- Marker
- Crop Tool
- Zoom Out
- Stickers
- Text tool
- Pixelate
- Colors
- Zoom In
Highlighter in Evernote Web Clipper

The highlighter tool allows you to highlight a section of the web clipping. To use the highlighter, do the following:
- Select screenshot for clip format
- Click and drag section of web page you want to clip then release mouse button
- In the Annotation menu, select the Highlighter tool
- Click and drag over area you want to highlight
- Once done highlighting, click Save clip to save web clipping with highlights to Evernote
Shapes in Evernote Web Clipper

Shapes is the next tool and it allows you to draw shapes onto the web clipping area. There are five shapes available in the Shapes tool:
- Pointer Arrow
- Rectangle
- Rounded Rectangle
- Oval
- Line
To use the shapes tool, do the following:
- Select screenshot for clip format
- Click and drag section of web page you want to clip then release mouse button
- In the Annotation menu, select the Shapes tool
- Select the shape you want to use
- Click and drag the shape where you want it to go and then release the mouse button
- Once done creating your shape, click Save clip to save web clipping with the shape(s) to Evernote
Marker Tool in Evernote Web Clipper

The marker tool allows you to write or draw in marker on the web clipping. To use the marker tool, do the following:
- Select screenshot for clip format
- Click and drag section of web page you want to clip then release mouse button
- In the Annotation menu, select the Marker tool
- Using your mouse, draw or write on the web clipping and then release the mouse button
- Once done, click Save clip to save the web clipping to Evernote
Crop Tool in Evernote Web Clipper
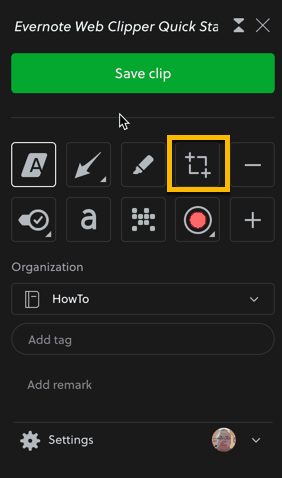
The Crop Tool allows you to crop the web clipping once you have taken it. To use the crop tool, do the following:

- Select screenshot for clip format
- Click and drag section of web page you want to clip then release mouse button
- In the Annotation menu, select the Crop tool
- A box will appear along with a vertical and horizontal line. Click and drag to select the area you want to crop
- Release the mouse button
- Click Save clip to save the cropped web clipping
Zoom Out in Evernote Web Clipper

To zoom out of the web clipping, do the following:
- Select screenshot for clip format
- Click and drag section of web page you want to clip then release mouse button
- In the Annotation menu, select the Zoom Out tool (-)
Stickers in Evernote Web Clipper
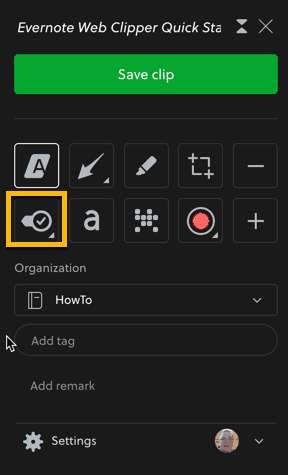
Evernote supports the ability to add stickers to your web clippings. There are five types of stickers:
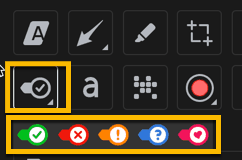
- Approved (Green)
- Rejected (Red)
- Wow! (Orange)
- What? (Blue)
- Perfect (Pink)
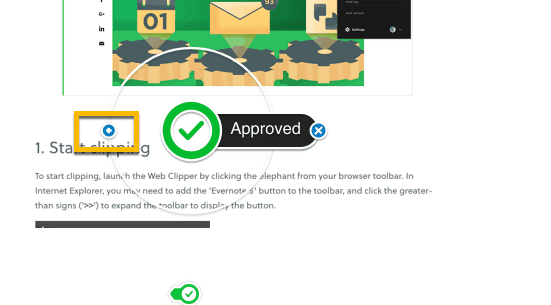
To add a sticker, do the following:
- Select screenshot for clip format
- Click and drag section of web page you want to clip then release mouse button
- In the Annotation menu, select the sticker tool
- Click and drag the sticker onto the web clipping
- Optional – click on the sticker, a white circle should appear around the sticker. Click the blue circle to the left of the sticker to add a Pointer
- Optional – double-click inside the text box to the right of the sticker to change the text.
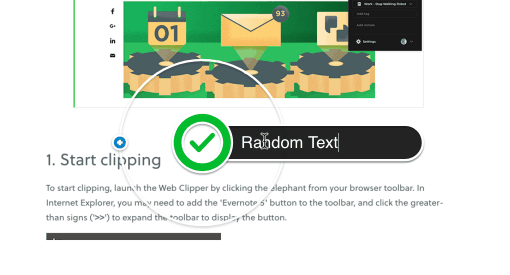
Text Tool in Evernote Web Clipper
The text tool allows you to type text onto the web clipping. To add text to a web clipping, do the following:

- Select screenshot for clip format
- Click and drag section of web page you want to clip then release mouse button
- In the Annotation menu, select the text tool
- Click where on the web clipping you want to add text
- Type in the text
The Pixelate tool in Evernote Web Clipper
Sometimes you need to share a screenshot but it has sensitive information in it that you want to obscure. The pixelate tool is here to help. The Pixelate tool pixelates the area you select with it.
To use the pixelate tool, do the following:
- Select screenshot for clip format
- Click and drag section of web page you want to clip then release mouse button
- In the Annotation menu, select the pixelate tool
- Click and drag over the area you want to pixelate. Release the mouse button when complete
Colors tool
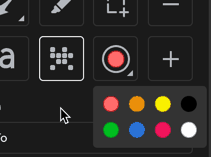
The colors tool simply allows you to change the color of the thing you are doing. There are 8 colors to choose from:
- Red
- Orange
- Yellow
- Black
- Green
- Blue
- Pink
- White
To change the color of the tool you are currently using, do the following:
- Select screenshot for clip format
- Click and drag section of web page you want to clip then release mouse button
- In the Annotation menu, select the tool you want to use
- Click on the color button and select the color you want
- Click on the web clipping and use your tool. It should be using the color you picked
The Zoom In Tool in Evernote Web Clipper
The last tool in the annotation menu is the zoom in tool. This tool allows you to blow up the web clipping. To use the zoom in tool, do the following:
- Select screenshot for clip format
- Click and drag section of web page you want to clip then release mouse button
- In the Annotation menu, select the Zoom In tool (+)
Special Clip Types in Evernote Web Clipper
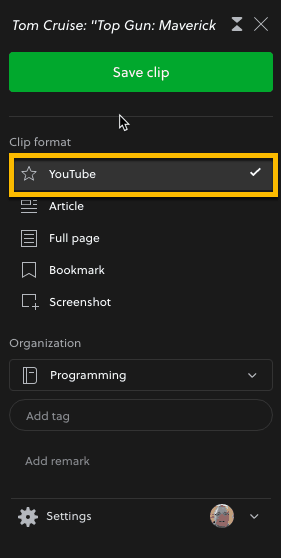
There are a couple of special clip types when appear when your web browser has loaded certain web pages or content types. Sites like Amazon and YouTube has special clipping capabilities.
When you attempt to clip an item on Amazon, you will be presented with a new Amazon option replacing the article option.
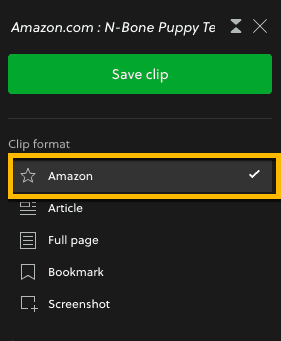
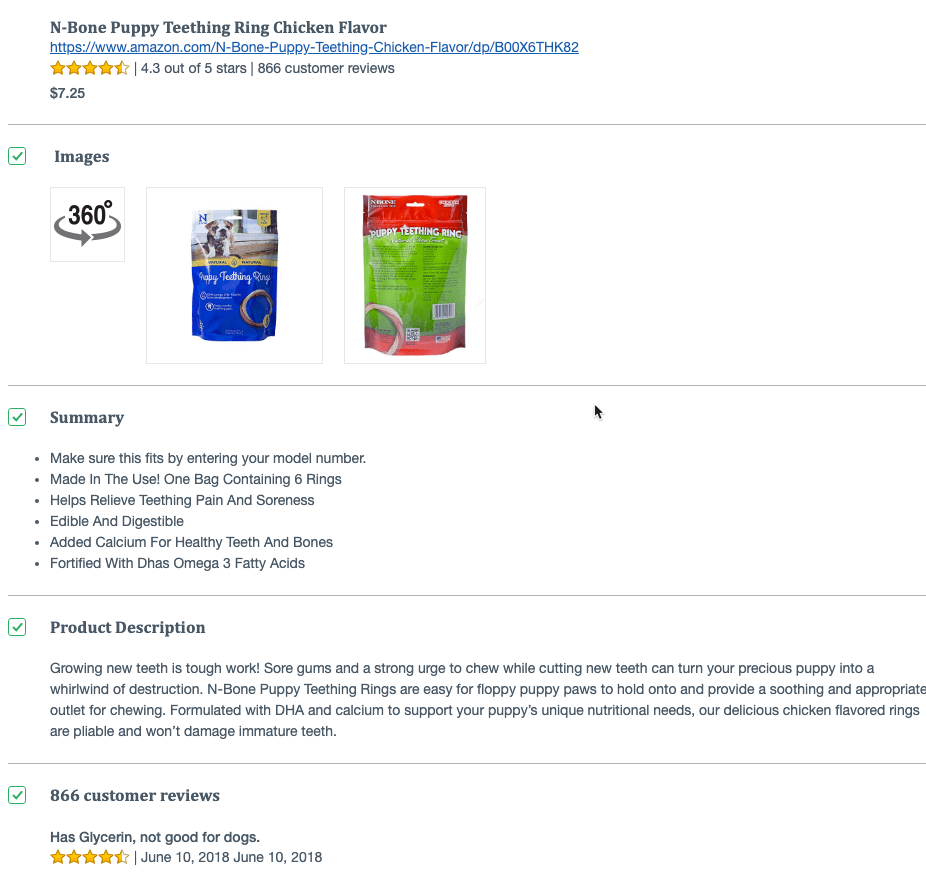
The Amazon option creates a custom web clipping with the following data:
- The title, link, star rating and price in a snippent
- Associated images of the item
- A Summary of the item
- Product Description
- Customer Reviews
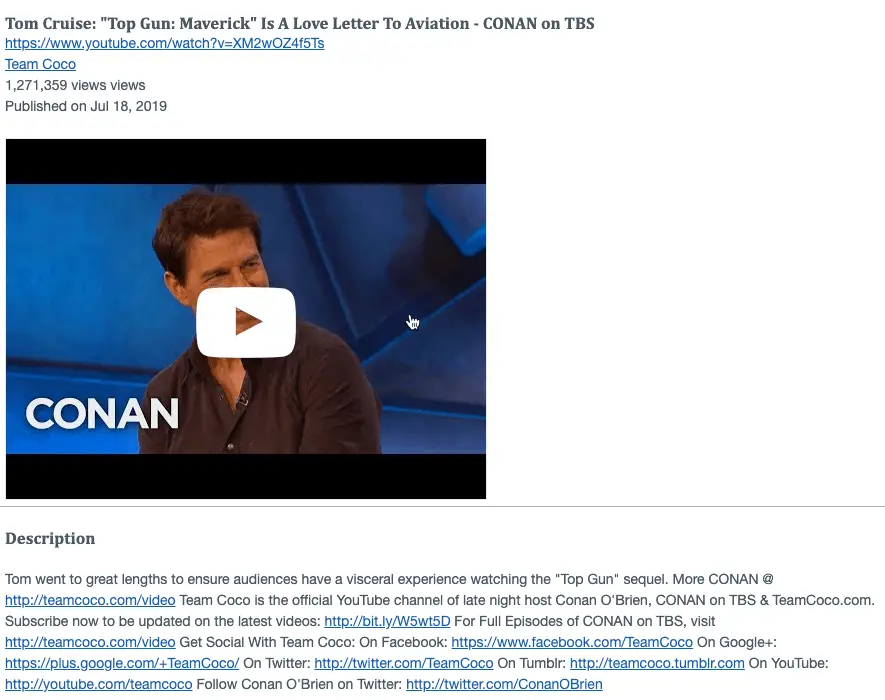
The YouTube custom clip format provides the following information:
- Video Title, URL, Creator, Views and Publish Date in a snippet
- The video itself (embedded)
- Video Description
Gmail also has a custom clip format. To use it you must be inside an email. The clip format includes the following:
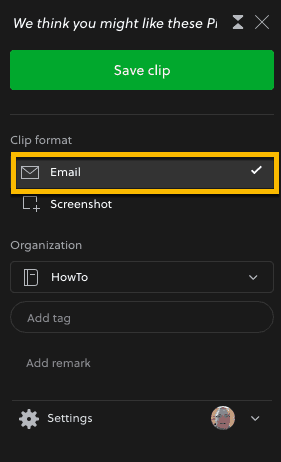

- Title and Participants (from/to addresses)
- The email body
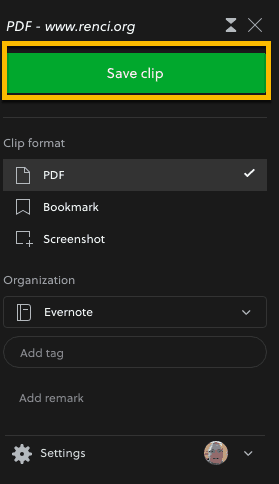
PDF files also have their own custom clip format. If you open a PDF file in your browser and click the Evernote Web Clipper button, PDF will replace article as a clip format. Once you have clipped the PDF to Evernote, it will show up in your Evernote as a PDF file inside a note, just like it would if you dragged a PDF file into a note.

Clipping a Selection
You can also select the text you want to clip before clicking the web clipper.
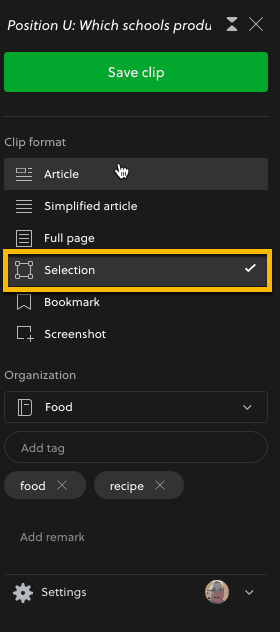
This adds the selection option to the clip format menu. To clip a selection, do the following:
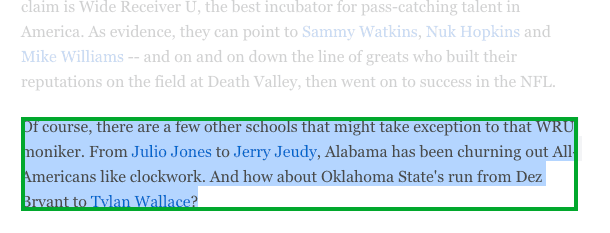
- Select what you want to clip
- Click the Evernote Web Clipper button
- Choose selection
- Press Add clip button to save to Evernote

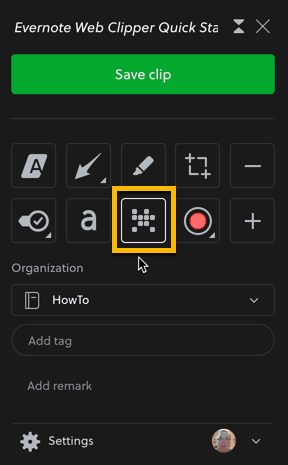
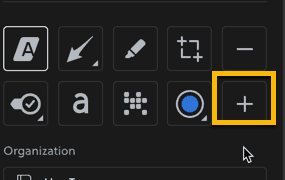
7. Select the Evernote Folder You Want to Save the Clip
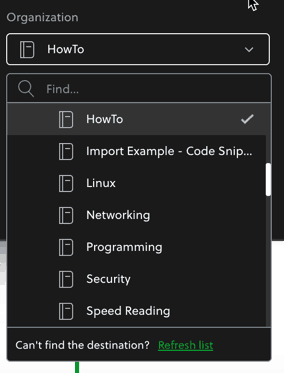
Once you have your clip, you want to pick where in Evernote you want to save it. Within the web clipper menu is an organization heading with a drop-down menu of all of your folders. To pick the folder you want to save your web clipping to, simply select the folder from the drop-down menu.
8. Add a tag(s) to the web clipping
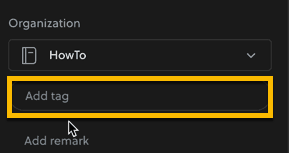
Tags are pieces of metadata that you can add to make your data more searchable and identifiable. Evernote supports tags. In fact, tags are a big part of the value of Evernote. The tagging functionality in Evernote extends to the web clipper. To add a tag (or tags) to your web clipping, do the following:
- Create your web clipping
- In the web clipper menu, click on the add tag text box and start typing your tags
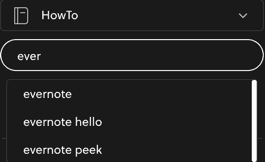
You should notice as you type in the tag that Evernote will suggest existing tags are spelled that way. You can either finishing typing the tag out or select one of the suggestions from the drop-down box.
9. Add any Remarks
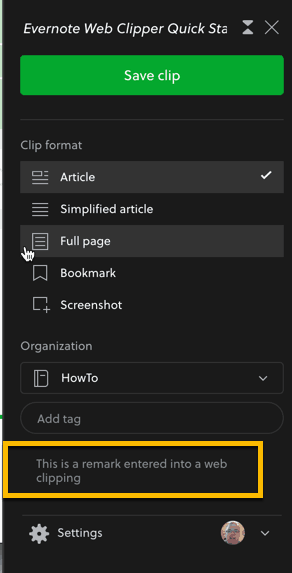
You can also add remarks that will appear at the top of the note that contains your web clipping. To add a remark to your web clipping, do the following:
- Create the clipping
- In the web clipper menu, click on the Add remark text box
- Type in your remark
- Click Save clip to save your clip with remark to Evernote
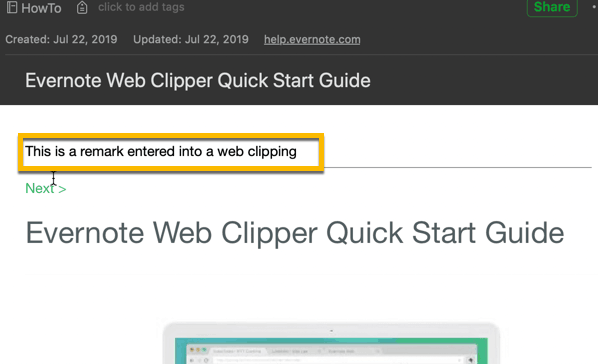
This will prepend the remark to the top of the note body.
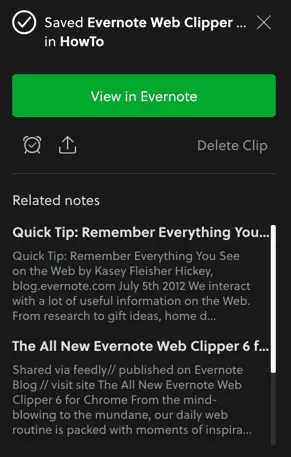
10. Press “Save clip” Button to Save Clip to Evernote**
Once are ready to save your clip, simply press Save clip to save your clip to Evernote.
Evernote Web Clipper Settings
The settings for the Evernote Web Clipper are broken up into four sections:
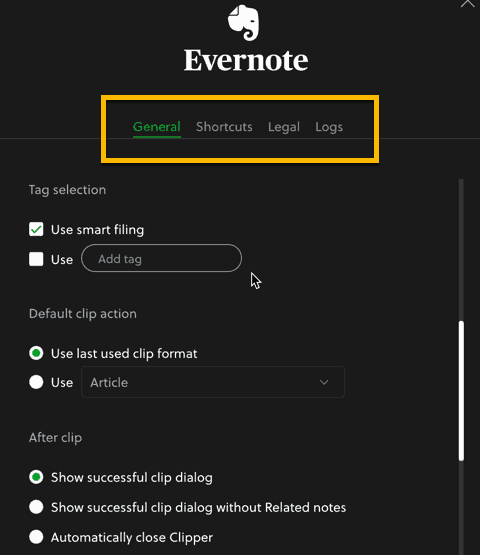
- General
- Shortcuts
- Legal
- Logs
General Settings for the Evernote Web Clipper
The General settings contain the following sub-categories:
- Login/Logout
- Appearance
- Notebook Destination
- Tag Selection
- Default Clip Action
- After Clip
- Related Results
- PDF Page Button
- Multi-Page Clips
Login/Logout
Allows you to log into or out of Evernote.
Appearance
Allows you to choose light or dark mode.
Notebook Destination
Notebook destination provides 3 options:
- Use smart filing
- Use last used notebook
- Use
Smart filing is Evernote using some intelligence based on the contents of the web clipping to pick a notebook. Use last used notebook will pick the last notebook used by the web clipper. Use allows you to pick a default notebook. Inbox would be one example of a good default notebook. It is important to note that these settings just pick the first notebook shown. You still can change the notebook prior to saving the clip.
Tag Selection
There are two options for Tag selection:
- Smart Filing
- Use
Smart filing works the same way as it does for notebooks. It attempts to suggest a tag or tags based on the contents of the web clipping and its similarity to older clips. The use option allows you to hardcode tags that get assigned. Like the notebooks, you can manually change these prior to saving your clip.
Default Clip Action
Default clip action allows you to pick the default clip format for your clips. There are two settings in this section:
- Use last used clip format
- Use
The use last used clip format picks the last format used on the last clip you completed. The use option allows you to set a default clip format.
After Clip
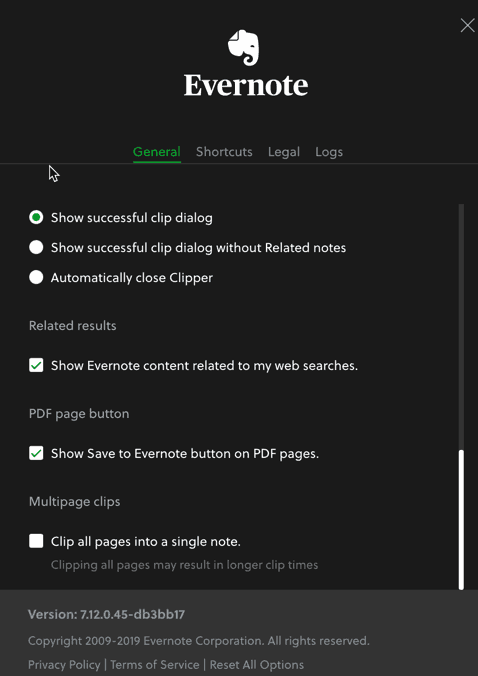
After clip allows you to choose what the web clipper does after it completes clipping. There are three options in this section:
- Show successful clip dialog
- Show successful clip dialog without Related notes
- Automatically close clipper
The show successful clip dialog will display a success message plus the related notes Evernote believes are related to your clipping. Show successful clip dialog without Related notes just shows the success dialog without the related notes. Automatically close clipper just closes the web clipper without any message.
Related Results
Enabling the setting Show Evernote content related to my web searches in Related results will show content Evernote believes is related to your web searches.
PDF Page Button
This setting toggles on or off whether to display the Save to Evernote button when a PDF is displayed in the web browser.
Multi-Page Clips
There is one setting in this section which is Clip all pages into a single note. This will do exactly what it says it does. It will clip all of the pages you clip into a single note. It is important to note that this could result in longer clipping times.
Shortcuts
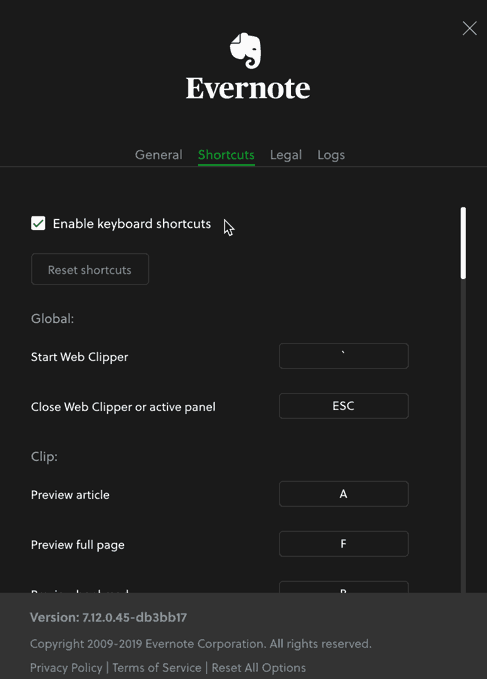
This section of the settings is all about keyboard shortcuts. You can enable or disable keyboard shortcuts and even change one of the existing keyboard shortcuts to another key combination. There are three types of keyboard shortcuts:
- Global
- Clip
- Markup
There are two global keyboard shortcuts:
- Start Web Clipper
- Close Web Clipper or active panel
For the clip level keyboard shortcuts, Evernote has the following options:
- Preview article
- Preview full page
- Preview notebook
- Selection mode
- Take Screenshot
- Simplified article
- PDF clip
- Email clip
- Expand article selection
- Contract article selection
- Move article selection up
- Move article selection down
- Account switch
- Select notebook
- Add tags
- Save
- Minimize web clipper
For markup keyboard shortcuts, Evernote has the following options:
- Select all Markup objects
- Arrow
- Text
- Rectangle
- Rounded Rectangle
- Ellipse
- Line
- Marker
- Highlighter
- Stamp
- Pixelate
- Crop
- Zoom in
- Zoom out
- Zoom to fit
- Zoom to 100%
- Undo
- Redo
Legal
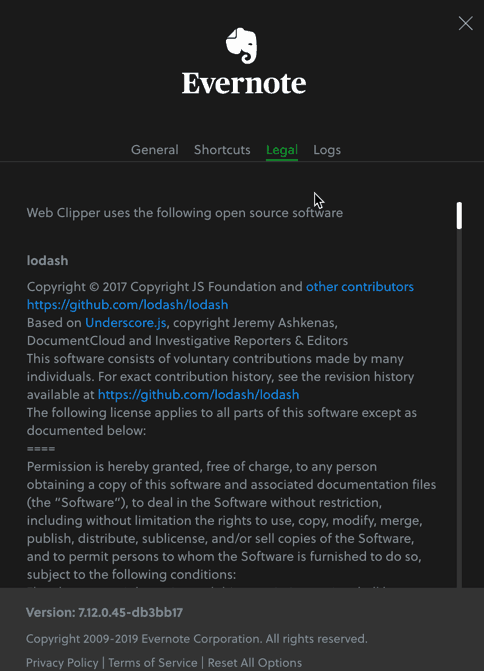
The legal section is the legal language and statements around the open-source components that are used by the Evernote Web Clipper.
Logs
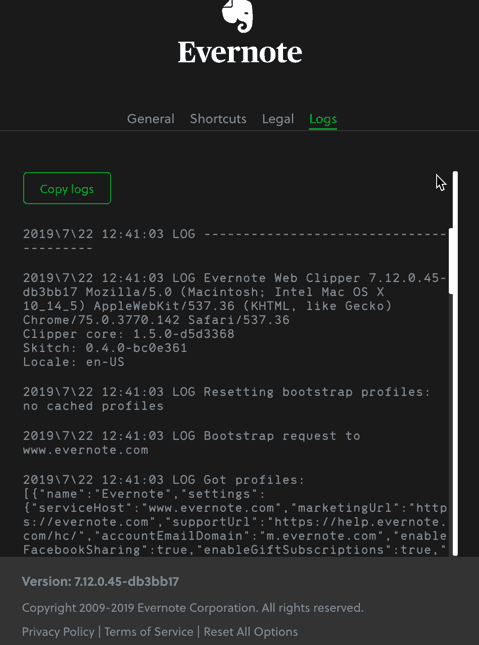
The Logs section is a collection of all the events that the Evernote Web Clipper logger logs.
Check out our Resources page
Check out our resources page for the products and services we use everyday to get things done or make our lives a little easier at the link below:
Summary
The Evernote Web Clipper is a powerful tool that helps you get web content into Evernote quickly and easily. The web clipper also allows you to customize the web content you are clipping in a variety of ways, even ways specific to a website or file type. The settings within the web clipper allow you to customize the behavior of the web clipper and edit the keyboard shortcuts. Overall, the web clipper is a key part of Evernote.
The Doxie Go SE WiFi – A Wireless Scanner With Great Evernote Integration

Do you have a lot of documents you want to put into Evernote but do want to have to snap a picture of them one at a time with your smartphone? Let the Doxie Go SE Wifi do it for you! The Doxie Go SE Wifi will scan, OCR and file your documents into Evernote for you. This will allow you to search the contents of your documents quickly and easily. Don’t forget to use tags to add metadata to your notes to make retrieval and sorting easier. For more information on the Doxie Go SE Wifi, click on the Amazon link below:
Amazon link to Doxie Go SE Wifi
Don’t forget to subscribe!
If you like our content, please subscribe to our newsletter. It contain tips, tricks on how to get things done using these powerful applications like Evernote.
Helpful Links
Evernote Web Clipper
link to Evernote Web Clipper
Evernote Web Clipper Quick Start Guide
link to Evernote Web Clipper Quick Start Guide
Other Articles You Might Find Interesting
How to Organize and Search Evernote
link to How to Organize and Search Evernote
Does Evernote support Markdown?
link to Does Evernote support Markdown?
Why Does Evernote Have An Elephant Logo and Why It’s So Great at Helping You Remember?
link to Why Does Evernote Have An Elephant Logo and Why It’s So Great at Helping You Remember