How to Email Items to Things 3 – An Illustrated Guide
How to Email Items to Things 3
Things 3 from Cultured Code (link To CulturedCode website) is a great task management application available on the Mac and iOS platforms. Things 3 is a beautiful to look at application that makes managing your tasks fun (or at least fun to look at) while also being a fairly powerful app. One of the key features of Things 3 is the ability to send email to Things 3 and have that email become a task in the Things 3 system. This blog post will walk you through how to setup Things 3 for email and how to setup your email clients to be able to send email to Things 3.
Before we get started with the tutorial, if you are looking to learn more about apps like Notion, Todoist, Evernote, Google Docs, or just how to be more productive (like Keep Productive’s awesome Notion course), you should really check out SkillShare. Skillshare is an online learning platform with courses on pretty much anything you want to learn. To learn more about Skillshare and its vast library of courses and get 30% off, click the link below:
SkillShare – Online Learning Platform
How to Setup Things 3 for Email Support
Setting up email support in Things 3 is very simple to do. Enclosed below are the instructions by platform.
How to Enable Email on the Mac
To enable email support on Things 3, perform the following steps:
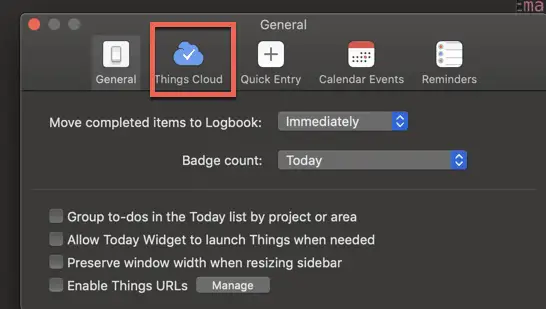
Open Things and open “Preferences”. This can be done in one of three ways:
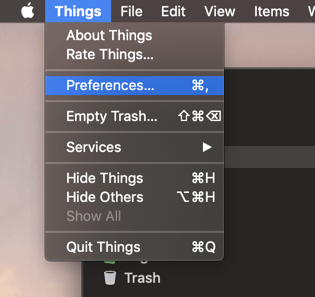
Go to Things -> Preferences in the main menu
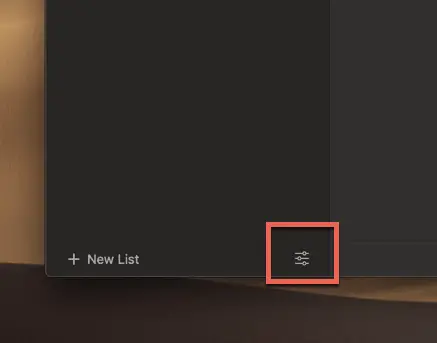
Click on the “Preferences” button at the bottom-right corner of the left panel
Using the keyword shortcut Command , (⌘,)
Once you see the Preferences dialog box display, click on the “Things Cloud” button at the top of the dialog box.
You should now be in the “Things Cloud” section of Preferences.
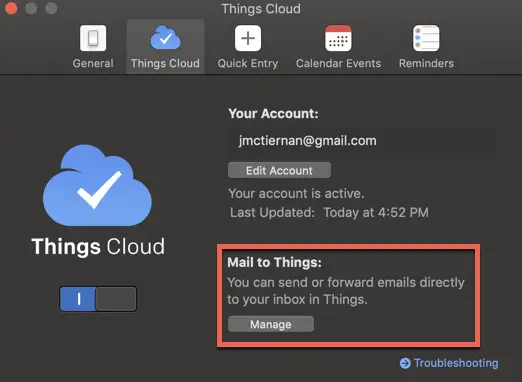
Click on the “Manage” button under the “Mail to Things” section of the screen
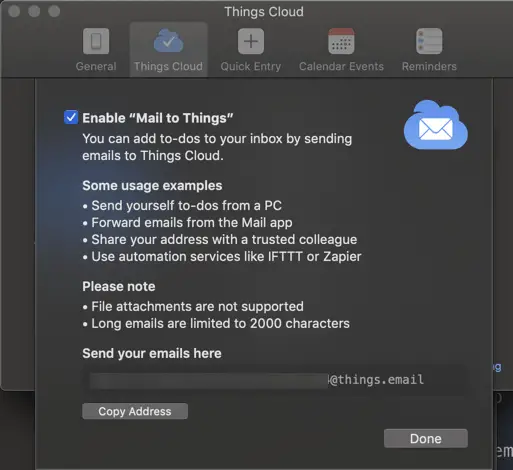
Check the checkbox next to “Enable Mail to Things”.
You should see a custom email address with the domain “things.email”. The email address should start with “add-to-things-” and then a unique string of characters.
This email address is your and you will use this address on both Mac and iOS to mail items into Things 3. Do not share this email address with others unless they are a trusted part of your team and you want them to be able to send emails to your Things account. Otherwise, that email address is only for you to email tasks into Things.
How to Enable Email on iOS
Open Things 3 and click on the “Settings” button at the bottom of the screen

Press the “Things Cloud” option


Press the “Mail to Things” option and click on the “Enable Mail to Things” button

You should see a section with the title “Send your emails here” and an email address ending with the things.email domain. The email address should start with “add-to-things-” and then a unique string of characters. This email address is your and you will use this address on both Mac and iOS to mail items into Things 3. Do not share this email address with others unless they are a trusted part of your team and you want them to be able to send emails to your Things account. Otherwise, that email address is only for you to email tasks into Things.
How to Setup your Email Client on the Mac to Email to Things 3
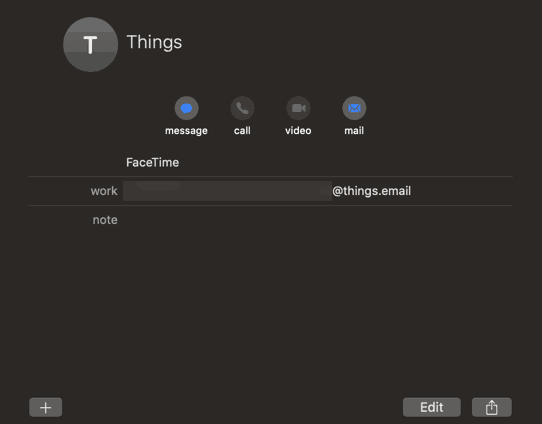
Now that you have an email address, you should add a contact for your Things email address into your Contacts app on your Mac so you don’t have to cut and paste it from Things every time you want to add an email to Things.
Open the Contacts App on your Mac
You should see your existing contacts.
Click the “+” Button
This will open up a new contact. Give your new contact the last name of “Things”
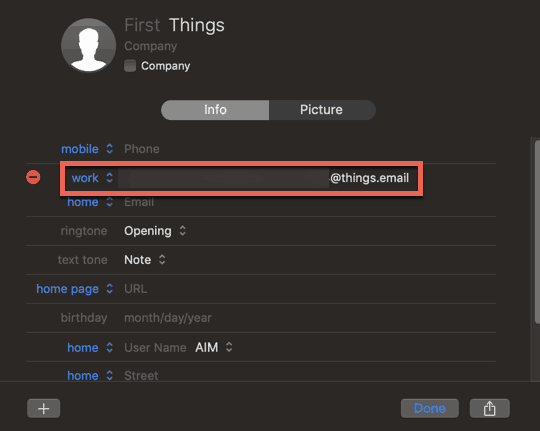
Copy your Things 3 Email Address from Things and Paste It into the Email Address Row
Your new email address for Things should now be in the shown in the email address row.
Click “Done” to Save Your Contact
Your new contact for the Things email address should be saved in your Contacts app. This will make it available to you to use in any of your desktop email clients.
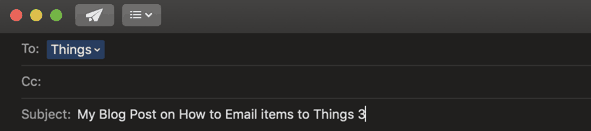
How to Send Items to Things 3 from your Mac
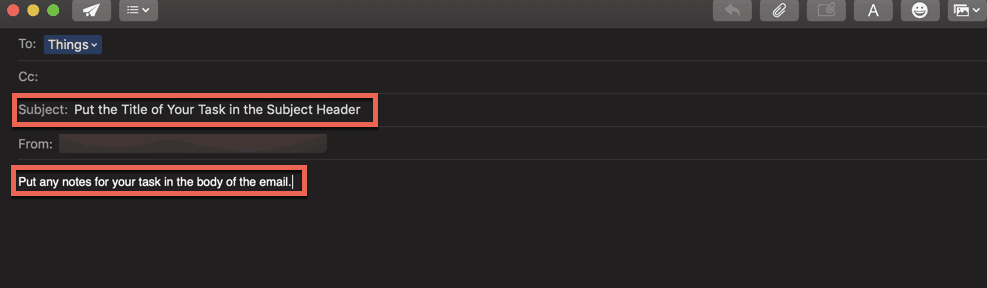
To use the new contact simply open your email client and create a new email. Type out “Things” in the “to” section and your things email address should auto-populate as an option. Select it. Type in the title of your task in the “Subject” header and any notes for the task in the body of the email. Send the email once you have completed it.

Your email will show up as a task in your “Things” inbox. Open your task as you should see the title and notes exactly like you wrote them in your email.
Forward Existing Emails to Things that You Want to Work on in the Future
While creating a new task while you are in your favorite email client is cool, I have found that one of the real values is when I get email that I know I need to process but can’t right now. I just email it to Things and it sits in my Things inbox. From there I can assign that email to a project, give it a due date, add tags, etc.
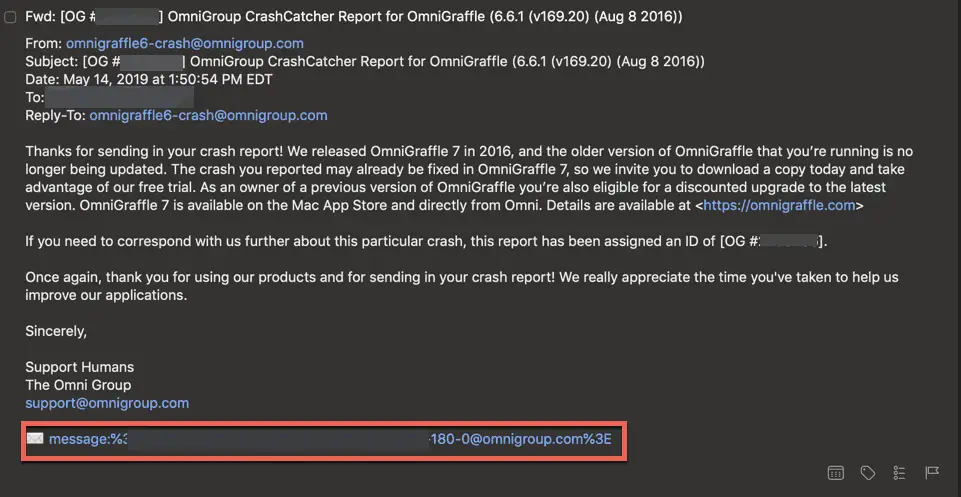
When the email arrives, there will be a link at the bottom of the task that, when clicked, will open your email in your email client. A cool feature that allows you to track your email work inside of Things while giving you a bookmark to your email if you need to review it in your email client.
How to Setup Mail on iOS to Email to Things 3
Email support in Things 3 works the same in iOS as it does on the Mac. You can add a contact for your Things email address in the iOS Contacts app (if you already did this on the Mac, you don’t need to do it again as contacts are synced across the Mac and iOS via iCloud).
Go into Things and Copy your Things Email Address

Open up the Things app on your iOS device. Press the “Settings” button at the bottom of the screen. Press the “Things Cloud” option and press the “Mail to Things” option. Press the blue “Copy Address” button to copy the email address to your clipboard.
Open the Contacts App and Create a New Contact using “Things” as the Last Name

Open up the Contacts application. You should see a “+” button. Press it to create a new contact for your Things app.
Paste your Things Email Address into the Email Row of the Contact

Next, press on the text box of the email address row in the Contacts form and paste your email address. You should now see your email address in the email address row on the Contacts form. Press “Done” to save your new contact.
How to Send Items to Things 3 from your iOS Device
The process to send an email to Things in iOS is the same as it is for a Mac.

To use the new contact simply open your email client and create a new email. Type out “Things” in the “to” section and your things email address should auto-populate as an option. Select it. Type in the title of your task in the “Subject” header and any notes for the task in the body of the email. Send the email once you have completed it.

Your email will show up as a task in your “Things” inbox. Open your task as you should see the title and notes exactly like you wrote them in your email.
Forwarding Existing Email into Things 3 From an iOS Device
Forwarding emails you want to work you later also works the same on iOS as it does for the Mac.
Simply forward your email to Things from your favorite iOS email app.

Your email will show up in the Things inbox. When your email shows up, you will be able to do all the functions you can do on the Mac version of the app and the link to the message will appear at the bottom of the task.
Summary
Things 3 is a powerful task management application. The ability to email into Things and create tasks out of those emails allows you to use Things as your task management hub. Many of our to-do items come to use via email and getting those to-dos into your “trusted system” as GTD (Getting Things Done) advocates would say makes it easier to have a single place to see everything you need to do.
Please Subscribe to our Newsletter
If you like the content on this site, please subscribe to our newsletter. We promise not to be spammy!
Subscribe Form
Check out our Resources page
Check out our resources page for the products and services we use everyday to get things done or make our lives a little easier at the link below:
Helpful Links
CulturedCode (the makers of Things 3) website:
link To CulturedCode website
Things Support Website:
link to Things Support Website
Things Frequently Asked Questions:
link to Things FAQ
Other Articles You May Be Interested In
What iOS To-Do App Should I Use?
link to What iOS To-Do App Should I Use blog post
Microsoft To-Do App for MacOS – An Illustrated Guide
link to Microsoft To-Do for Mac blog post
How to Use Tags in Bear
link to How to Use Tags in Bear blog post