How to Use Tags in Bear
Bear is a great writing and note-taking tool. As with any note-taking tool, a key aspect of the tool is the ability to organize your notes. Using a tool like Bear over time, you will likely accumulate a lot of notes and finding the one you want could be difficult. Fortunately, Bear helps you out by its implementation of tags. Tags allow you to assign pieces of data to the note that can be used to organize your notes efficiently. This blog post walks you through what tags are and how to use them in Bear.
Before we get started with the tutorial, if you are looking to learn more about apps like Notion, Todoist, Evernote, Google Docs, or just how to be more productive (like Keep Productive’s awesome Notion course), you should really check out SkillShare. Skillshare is an online learning platform with courses on pretty much anything you want to learn. To learn more about Skillshare and its vast library of courses and get 30% off, click the link below:
SkillShare – Online Learning Platform
What is Bear?
Bear is a note-taking application that combines functional depth with a beautiful user interface. Bear is available on iOS and MacOS and syncs notes between all of your devices. In the article, we will walk you through how to use tags in Bear. Tags are a key part of Bear and are very powerful.
What are Tags?
Tags are used to organize and sort notes in Bear. Tags are pieces of metadata that you can assign to your notes. This allows you to use this metadata to organize and sort your notes in a variety of ways. Tags allow you to view all of the notes that have a specific attribute such as month created, author, operating system, topic category, etc. Tags can really make your writing workflow more efficient by making it easy to classify your notes in a variety of configurable ways.
How to Make a Tag
To make a tag in Bear, simply add a hashtag (‘#’) and type the word you want to use as your tag.

It is a simple as that. You should now also notice your new tag in the tags panel on the far left side of the Bear window.
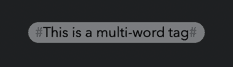
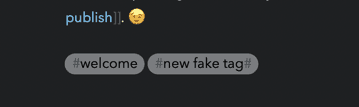
Multi-word Tags
Bear supports the ability to have a tag be comprised of multiple words.
To create a multi-word , start and end your multi-word tag with a hashtag. An example of a multi-word tag is presented below:
How to Rename a Tag
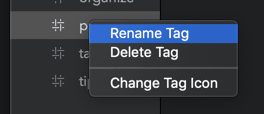
Sometimes you want to rename a tag. To rename a tag simply right-click on the tag in the left panel and select “Rename Tag”. Rename the tag to what you want it to be and hit “enter”. Your tag will be renamed on all notes that have that tag.
How to Delete a Tag
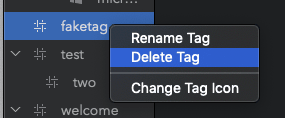
To delete a tag, simply right-click on the tag and select “Delete Tag”.
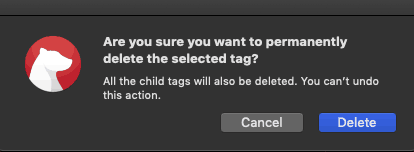
A pop-up will display asking you if you are sure that you want to permanently delete the selected tag. Select “Delete” to delete the tag. Your tag will be delete both from Bear and from all of the note that previously had that tag so be absolutely sure you want to get rid of the tag before doing this.
How to Move Tags Inside of a Note
To move a tag from one part of the Note to another, simply click and hold on the tag. Drag the tag to its new position in the note and release the mouse button. In iOS, long-press on the tag. A border will appear around the tag. Move your finger to the new position of the tag and release.
The Power of Tags
Tags are a very valuable mechanism in Bear. Tags are essentially metadata that you add to notes. This makes organizing your notes so much easier. You can add multiple tags in your note. Your tags will show up in the far left panel.
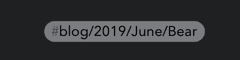
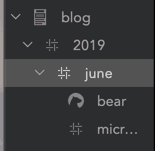
Nested Tags
Perhaps the most important use of tags in Bear are nested tags. Nested tags are exactly what it sounds like. It is the ability to create a hierarchy of tags. Nested tags emulate a file directory type structure . An example of nested tags:
Tags will appear in a hierarchical format in the far right in the Bear window. The image below shows what the list of tags in Bear looks like:
In Bear, there is actually no hard limit to how deep you can nest your tags. I typically would not go beyond 10 levels of tags as beyond that you may never get out :). In all seriousness, try to be judicious in how you use tags. Consistency is the key as using tags follows the GIGO model (Garbage In, Garbage Out) in that if you are not using a consistent model for tagging , the tags will not be nearly as useful. The tags assigned to a note should capture some characteristic of the note itself.
How to View All Notes with a Particular Tag
It is important when viewing your notes to be able to view all of the notes that are assigned a specific tag. Bear support the ability to view all of your notes with a particular tag.
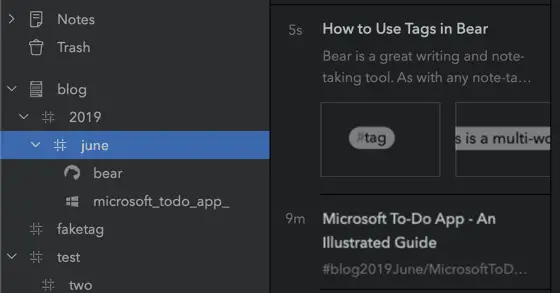
To view all of the notes that have a given tag, select the tag in the left panel. All of the notes that have that particular tag will appear in the panel to the right of the tags panel as shown in the screenshot above.
How to Create A New Note With a Tag Already Assigned

A simple shortcut is to create a new note with a tag assigned to it. To do this, simply select the tag and create a new note (keyboard shortcut Command-N ). This also works for nested tags as you can see in the above screenshot.
How to Assign a Tag to Multiple Notes are the Same Time
If you have a bunch of notes that you want to assign a new tag to at the same, it is easy to do in Bear.

To add a new tag to a bunch of existing notes, select all of the notes you want to assign the tag to and drag them onto the tag you want to add and release the mouse button. Your new tag should now be assigned to each of the selected notes.
TagCons
A unique aspect to tags in Bear are TagCons. TagCons are tag icons and allows the ability to assign an icon to a tag. At first glance, this feels like a purely cosmetic feature and, at some level, it is. However, I personally like having these icons as it makes it easy to quickly identify the content of the note.
How to Export Notes with a Specific Tag
While Bear has excellent sync capabilities, sometimes you want to export your notes out of Bear. There are a variety of reasons to export but the main one for me is to get it as a Markdown document so I can use the document somewhere else.
Bear is very flexible in terms of exporting if you subscribe to the Pro subscription. Bear supports the following export file types:
- Txt
- Markdown
- Text Bundle
- Bear Note
- RTF
- HTML
- DocX
- JPG
- TaskPaper
- ePub
To export all the notes with a given tag:
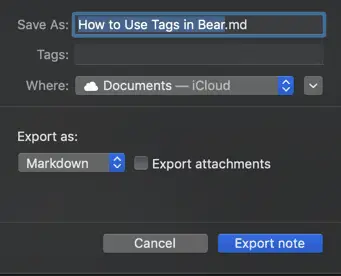
- Select the tag
- Go to File -> Export Notes
- Name your file
- Select location to export to
- Select file type to export to
- Check “Export Attachments” if you want to export any attachments in the note(s) being exported
- Click “Export Note”
You should now have an exported copy of your note(s).
Summary
The tagging functionality in Bear is quite impressive. The ability to leverage tags to identify and organize your notes can be a great tool in a writer’s tool bag. They allow the writer to focus on creating new notes rather than spending time trying to find and organize the notes themselves. Bear has done a phenomenal job implementing tags and, once you get used to using tags, provides in my opinion a superior solution to organizing notes versus the traditional folder method of file management.
Please Subscribe to our Newsletter
If you like the content on this site, please subscribe to our newsletter. We promise not to be spammy!
Subscribe Form
Check out our Resources page
Check out our resources page for the products and services we use everyday to get things done or make our lives a little easier at the link below:
Helpful Links
Bear Notes FAQ Page
URL link to the Bear Notes FAQ web page
Bear Notes Features Page
URL Link to the Bear Notes features web page
Bear Notes Pricing Page
URL link to the Bear Notes pricing web page
Other Articles You Might Be Interested In
Does Evernote Support Markdown?
URL Link to the Evernote Markdown article
What iOS To-Do App Should I Use?
URL link to what to-do app should I use article
How to Embed a Google Sheet into a Notion Page
URL link to how to embed a Google Sheet into a Notion page article