How to Organize Todoist Guide
Todoist is a web-based to-do service. Todoist is great for those who want cross-platform support and want a to-do service that can be integrated into third party automation services like Zapier and IFTTT to create automated workflows. Todoist is an excellent to-do service.
Organizing Todoist can be done in a number of ways, each of which have their merits. The way that I like to organize Todoist is to use a combination of:
- Projects
- Sub-projects
- Labels
- Priority
While this is the way that I typically organize Todoist, it doesn’t necessarily make it the best solution for you. How you organize Todoist should largely be driven by how you view your tasks. Some like to use labels only to organize their task. Others use projects only. Some use projects and labels. It really is up to you in terms of your view of the world.
This blog post will walk through setting up the following structures:
- Labels only
- Projects/labels
- Projects/Sub-Project/Labels
The goal of this post is to give you a feel for the various ways you can organize Todoist so that you can find a way that best fits the way you work.
Before we get started with the tutorial, if you are looking to learn more about apps like Notion, Todoist, Evernote, Google Docs, or just how to be more productive (like Keep Productive’s awesome Notion course), you should really check out SkillShare. Skillshare is an online learning platform with courses on pretty much anything you want to learn. To learn more about Skillshare and its vast library of courses and get 30% off, click the link below:
SkillShare – Online Learning Platform
If you are a Google Calendar user, check out my guide to connecting Google Calendar to Todoist. This allows you to bi-directionally sync Todoist with Google Calendar and allows you to have your tasks and updates sync between Todoist and Google Calendar.
Using Labels in Todoist to Organize Your Tasks
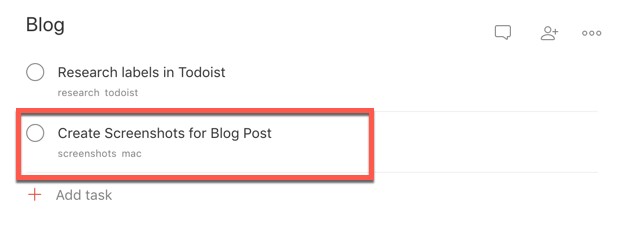
Labels in Todoist essentially function like tags in other to-do systems. Labels are pieces of metadata that you attach to a task that allow you to organize and search them. Tasks can have more than one label. Using labels really makes your Todoist system very flexible. If you have multiple labels on your tasks, you can filter those tags on a variety of criteria.
Before you get started adding a bunch of labels, try to think about how you want to structure your labels. It is about consistency. Pick label names that will be reusable and use them consistently. Don’t create five different labels that mean the same thing. Remember your structure and stick to it. This is make filtering based on label much easier.
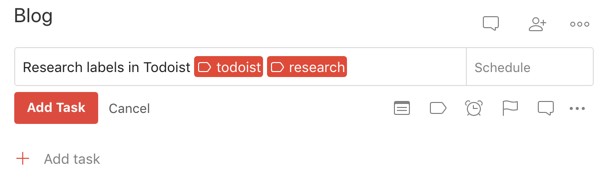
How to Add a Label to a Task in Todoist
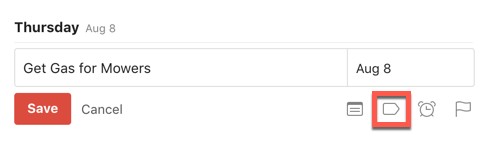
Adding a label to your Todoist task is very easy. To add a label to a task in Todoist, do the following:
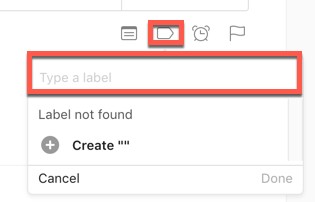
- Create or open a task and click on the Label button
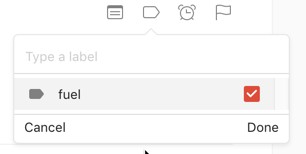
- In the text box with grayed out Type a label, type in the name of your label and press Create
- Check the checkbox next to the new label and click Done
An easier way to add labels to a task is to do the following:
- Create or open a task and click on the Label button
- After typing in the task, press the spacebar and type the @ sign and the name of your label. If you have existing labels, Todoist will show them in a drop-down as you type the name of the label.
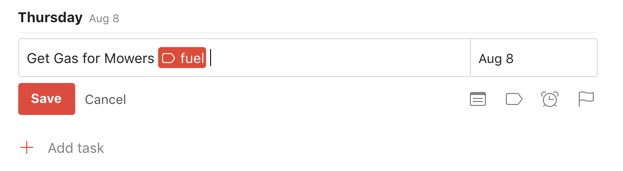
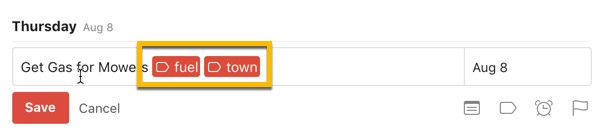
Congratulations, you have added a label to your task! It doesn’t seem like much, but it is the basis for using labels to organize your tasks.
Adding Priority to Your Tasks
Using labels can certainly help make your tasks more useful in terms of organization, filtering and ability to search. However, we can also use prioritization to create a hierarchy of tasks. Using priority and labels together to arrange and filter your tasks is very powerful.
There are four priority levels in Todoist:
- Priority 4
- Priority 3
- Priority 2
- Priority 1
Priority 4 is the lowest priority while priority 1 is the highest priority or most urgent.
How the Assign Priority to Tasks in Todoist
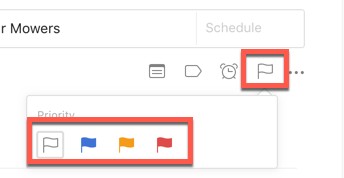
To assign a priority level to a task in Todist, do the following:
- Create or open task
- Click on the Flag icon. A pop-up will show four different flags. White is priority 4, blue is priority 3, orange is priority 2 and red is priority 1
- Click on the flag that matches the priority level you want to set
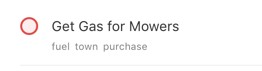
Todoist is color the outline of the check circle to the left of the task based on the priority level. Enclosed below is an example:

Once you have assigned labels and priorities to each of your tasks, you can use filters to create custom views based on the labels and views.
Using Filters to View Your Tasks in a Variety of Perspectives
Filters in Todoist allow you to create custom views. If you are familiar with perspectives in OmniFocus, this is a simplified version of it. Don’t take the preceding statement as a dismissal of the power of filters in Todoist. Filters are one of the key features of Todoist.
Todoist has included several pre-built filters that represent the most common search types. Enclosed below is a list of the pre-built filters:
- Assigned to me
- Assigned to others
- Priority 1
- Priority 2
- Priority 3
- Priority 4
- View all
- No due date
Each of these are self-explanatory. Assigned to me are tasks that are assigned to me. Assigned to others are tasks that are assigned to people other than myself. Each of the priority filters show only the tasks with that particular priority assigned. View all shows all tasks. No due date shows all tasks with no due date assigned.
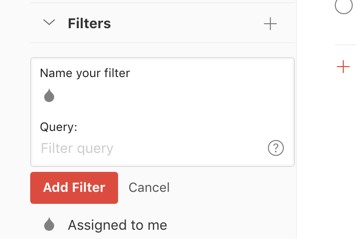
How to Create a Filter in Todoist
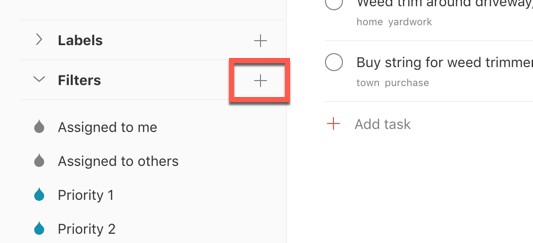
To create a filter in Todoist, do the following:
- In the left panel, click the plus button to the right of Filters
- A box will pop-up asking you to name your filter and to enter the query you want to use.
Setting up a query is pretty easy once you know the syntax. Todoist has a great page on all the syntactic options available in your query at the link below:
link to Filters page on Todoist
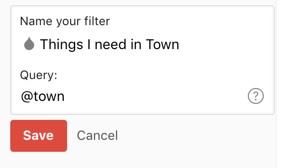
Let’s create a simple example. A good basic filter I might want to have is all the tasks that I need to do in town. Creating this filter is easy:
- Press the + button next to Filters
- Give our filter a name like “Things I need in Town”
- Enter the label town with the @ symbol in front (@town)
- Click Save to save the filter
Filter Example: All Urgent Purchases I Need to Make in Town
Let’s make a slightly more detailed filter. Let’s say I want to filter my tasks for all purchases I must make in town that are urgent (i.e. priority 1). To make that filter, we would do the following:
- Press the + button next to Filters
- Give our filter a name like “Urgent Purchases in Town”
- Add p1 for priority 1
- Add an & symbol and the @town and @purchases labels with an & symbol between them: p1 & @purchase & @town
- Press Save to save filter to Todoist
The last step is new for us. Adding a priority is as simple as entering one of p1, p2, p3, p4 to indicate the priority. Play around with labels, priorities and filters to see how you might use them in your workflow.
Using Projects and Labels in Organize Your Tasks in Todoist
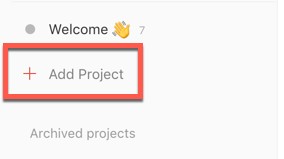
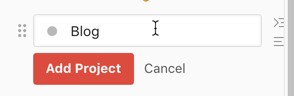
Todoist supports the ability to group tasks that are part of a project into projects. To create a new project, do the following:
- Click on the Add Project button in the left panel
- Give your project a name and click Add Project
Your new project will appear in the left panel.
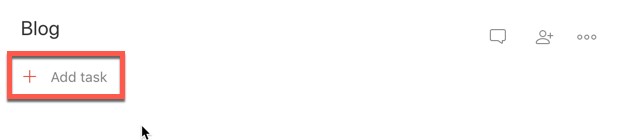
Adding a New Task to a Project in Todoist

To add a task to a project in Todoist, do the following:
- Click the Add task button inside your project
- Fill in title, labels, subtasks and due date as needed

Alternately, you can use the hashtag # and the name of your project. Open your task and type in a hashtag and the name of your project. An example would be: #blog.
Your task will appear inside your project. You should also notice that in the left panel, your project will now have a number next to it indicating how many tasks are in your project.
Adding an Existing Task to a Project in Todoist

Adding an existing task to a project in Todoist is straight-forward. To add an existing task to a project in Todoist, do the following:
- Open task
- Click on the Project button in the task
- Select your project from the drop-down menu
- Click Add Task button to save your task changes
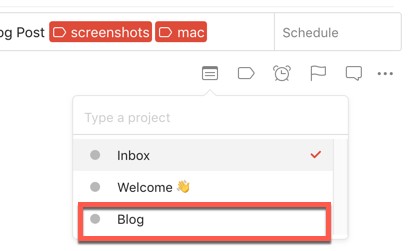
Your task will now appear inside your project.
Using Due Dates to Create a Timeline for Your Projects in Todoist
Most projects have due dates. Very rarely do you have a project that you don’t have a set time in mind to complete it in. Todoist allows you to add due dates to each of your tasks. This helps create a timeline for your project.
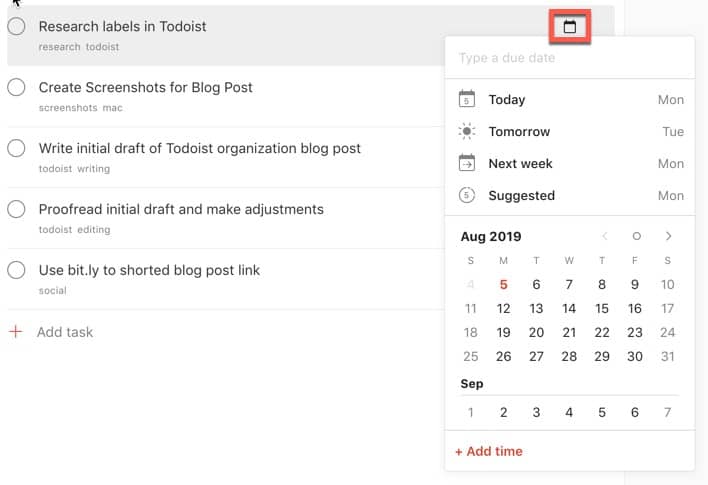
To add a due date to a task in Todoist, do the following:
- Open the task
- Click on the Calendar button
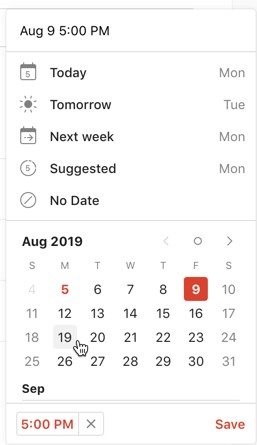
- Select either one of the date presets (Today, Tomorrow, Next Week or Suggested) or a date from the calendar view
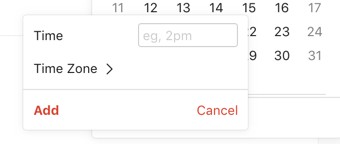
- Optional – add a time by clicking Add time button at the botton of the calendar window, type in a time and click Save
- Press Save to save the task

Use Priority with Tasks in Your Project
Don’t forget to set priorities to your tasks. Setting priorities and due dates provide greater structure to your projects. It also gives you more criteria to filter with.
Using Projects, Sub-Projects and Labels together to Organize Tasks in Todoist
We have covered labels, projects and filters in this blog post but there is one more option we need to talk about: sub-projects. Sub-projects allow to define a general project area you want to focus on and add sub-projects to it. It is easiest to understand this with an example. Let’s say you want to manage all of your career learning as one project with sub-projects for each course or discipline you are pursuing. Todoist makes doing this very easy.

To setup sub-projects inside a main project in Todoist, do the following:
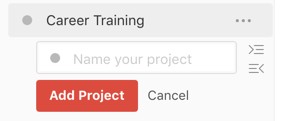
- Create your main project by clicking the + button next to Projects in the left panel, give your project a name and click Add Project
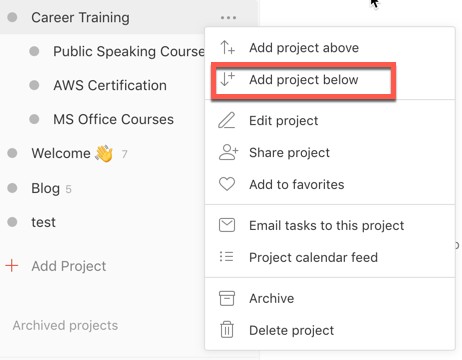
- Click the ellipsis to the right of your new project in the left panel
- Select Add project below from the drop-down menu
- Give your sub-project a name and click Add project
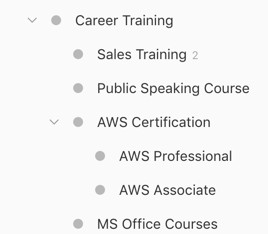
Your sub-project should now be inside of your main project. The nice thing about sub-projects is that you can go multiple levels deep if you need to. Your sub-projects can have sub-projects.
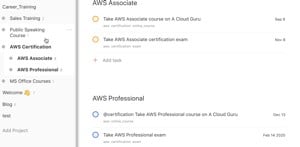
Using Filters with Projects, Sub-Projects, Labels and Priorities in Todoist
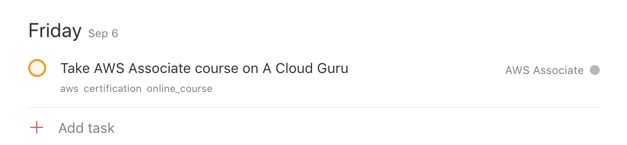
Now lets put everything we have learned together. I have built a project with sub-projects, priorities, labels and due dates as shown in the image below:
To filter on projects, there are a couple of query options:
## plus the project shows all tasks in the project. An example would be:
##blog
It would return all of the tasks in the project blog.
You can use & to create an AND conditional to your query. An example of this would be:
##blog & ##Career_Learning
You can also create a search that covers all projects except for excluded sub-project(s). To exclude a subfolder, you use !#.
For example, I might want to see all of the tasks in Career_Learning except the sales training. To do this, my query would look like this:
##Career_Learning & !#Sales Training
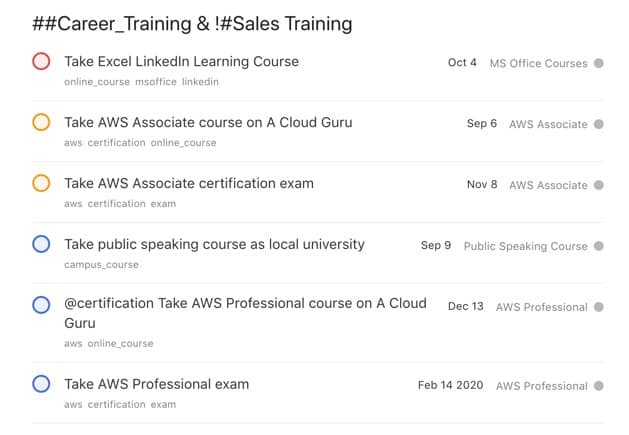
You can get really fancy with you combine in dates and priorities. Let’s say I want to see all tasks in Career_Learning that are p2 that are also due in the next 60 days. The way I would do that is:
60 days & ##Career_Training & p2
You can do variations of these to include labels as well like all tasks that are online courses in the next 90 days:
90 days & @online_course
or all online courses that are due in the next 90 days that are not AWS:
90 days & @online_course & !@aws
Again, the filter system in Todoist is very flexible and allows you to really customize how you view you tasks. The more data you assign to your tasks consistently, the more ways to view your tasks and projects.
Trying to Get More Organized?
If the answer is yes, there is one book you must read: David Allen’s classic Getting Things Done. The GTD system is probably the most established system for improving your productivity. If you have not read it, you owe it to yourself to do so:
Getting Things Done: The Art of Stress-Free Productivity
Want More Tips and Tricks? Subscribe to our Newsletter!
If you haven’t already subscribed, please subscribe to The Productive Engineer newsletter. It is filled with tips and tricks on how to get the most out of the productivity apps you use everyday. We hate spam as much as you do and promise only to send you stuff we think will help you get things done.
Check Out Our YouTube Channel!
We have a YouTube channel now and we are working hard to fill it with tips, tricks, how-tos and tutorials. Click the link below to check it out!
link to The Productive Engineer YouTube Channel
Check out our Resources page
Check out our resources page for the products and services we use everyday to get things done or make our lives a little easier at the link below:
Summary
Todoist is really a great to-do service that allows you to work the way you want to work. It is cross-platform and doesn’t require a large purchase cost as it runs on a “Freemium” per month model. By using labels, priorities, projects, and sub-projects, you have multiple dimensions you can use to filter your tasks to see only what you want to see at that moment.
Helpful Links
Todoist Guide Center
link to Todoist Guide Center
How to Best Use Projects In Todoist
link to How to Best Use Projects in Todoist
How to Best Use Labels in Todoist
link to How to Best Use Labels in Todoist
Filters in Todoist
link to Filters on Todoist
Other Articles You Might Be Interested In
How to Create a Template in Todoist – An Illustrated Guide
link to How to Create a Template in Todoist – An Illustrated Guide
How to Backup Your Evernote Notes
link to How to Backup Your Evernote Notes
How to Use Notion Web Clipper
link to How to Use Notion Web Clipper
How to Use Tags in Bear
link to How to Use Tags in Bear