How to Backup Your Evernote Notes
I have been an avid user of Evernote since January 2010. Evernote has been my note repository where I store my PDFs, powerpoint files and long form notes. Over that time I have accumulated 3,528 as of July 2019. I became a bit curious about two things:
- Where exactly were my notes stored on my Mac
- How to make a backup of my notes onto my NAS (Network Storage Device)
I did a little research in these two topics and wanted to share with you both where your Evernote notes are on your Mac as well as how to make a backup of your Evernote notes database. The steps to find out where on your Mac your Evernote notes currently are stored are the following:
- Open Evernote
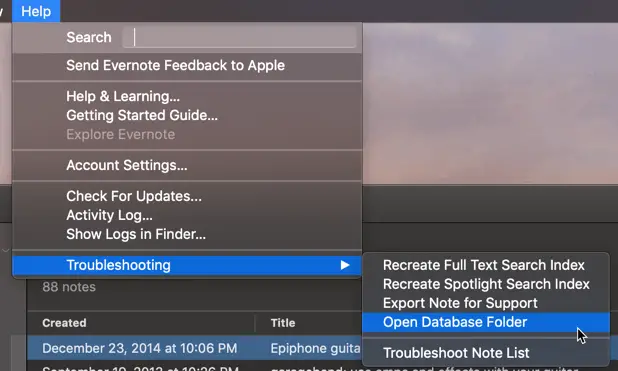
- Hold down the Option key and go to Help -> Troubleshooting -> Open Database Folder
- Once you database folder is open, open the content folder. All of your notes are in this folder
If you are new to Evernote or simply looking to improve your productivity in Evernote, you should check out my Beginner’s Guide to Evernote at the link below:
Beginner’s Guide to Evernote – The Productive Engineer
This comprehensive guide will teach you all you need to know to use Evernote productively.
Making a backup of your Evernote is a straight-forward process as well. To make a backup of your Evernote notes database, do the following:
- Open Evernote
- Select the Notebook(s) You Want To Backup
- Go to File -> Export Notes… in the Evernote Main Menu
- Navigate to where you want to backup your Notes
- Give your Backup a Name
- Select ENEX or HTML for the Backup Format
- Click Save
Before we get started with the tutorial, if you are looking to learn more about apps like Notion, Todoist, Evernote, Google Docs, or just how to be more productive (like Keep Productive’s awesome Notion course), you should really check out SkillShare. Skillshare is an online learning platform with courses on pretty much anything you want to learn. To learn more about Skillshare and its vast library of courses and get 30% off, click the link below:
SkillShare – Online Learning Platform
How to Find Your Evernote Notes on Your Mac
It is always comforting to know where the files of an application are on your Mac. It is particularly comforting when that data is stuff you have collected over 9 year that you definitely don’t want to lose. It is not immediately apparent in looking in the desktop version of Evernote where exactly it is storing your notes. Fortunately, finding the notes is still a pretty straight-forward process.
To find your Evernote notes stored on your Mac, do the following:
1. Open up Evernote
Open up the Evernote desktop client.
2. Hold down the Option key and go to Help -> Troubleshooting -> Open Database Folder

This step is crucial. You must hold down the Option key to bring up the Troubleshooting option. Hold down the Option key and go to Help -> Troubleshooting -> Open Database Folder.
3. Once you database folder is open, open the content folder.

After you click on Open Database Folder, a Finder window will appear. Open the contents folder. The contents folder is where all of you notes are.


How to Backup Your Evernote Notes
While it is nice to know where are notes are, this is of little comfort if something goes wrong with the Evernote notes database. While this is an unlikely event (I have been an Evernote customer for 9 years and it hasn’t happened to me yet) it can potentially happen. This section will walk you through, step-by-step, how to backup your Evernote notes database.
Why Should I Backup Evernote
You might be asking yourself, why do I need to backup my Evernote database? Isn’t Evernote a cloud service that keeps copies of my notes? Well, yes, Evernote is a cloud service and they do keep a copy of your notes. However things can still go wrong. If Evernote were to experience an event where your note database got corrupted or if someone got access to your account and deleted your notes, that would be a problem that having a local backup of your notes would help with.
Additionally, Evernote supports both synced and local notebooks. While synced notebooks are synced into the Evernote service, local notebooks ONLY reside on your computer. If something were to happen to the hard drive of your computer, your local notebooks could be lost. Many times local notebooks are set to be local in part because they contain sensitive data you don’t want sitting in a cloud service. Losing this data would not be good. By backing up your notebooks, including your local notebooks, you protect yourself from losing this data forever.
An additional note in regarding to backing up. You really should have another disk drive, computer or NAS solution where you store your notes backup. If you do a backup to your main computer hard drive, you could still lose everything if that drive dies. Remember, having only one of something means you are one event away from having none. An easy way to think of this is that two is really one and one is really none.
Backing Up Your Evernote notes Using Evernote ENEX Format
ENEX is the archive format Evernote uses. To backup your Evernote notes, do the following:
1. Open Evernote
Open up the Evernote desktop client on your Mac. Click on the Notebooks entry in the left hand side panel. This will bring up the Notebooks screen inside the main Evernote display panel.
2. Select the Notebook(s) You Want To Backup

If you want to backup all of your notebooks, hold down the Shift key and click on the top left side of the beginning of your notebooks and drag to the bottom right and release the mouse button. This will select every notebook.
If you want to backup only some of your notebooks, hold down Command and click on each notebook you want to backup.
3. Go to File -> Export Notes… in the Evernote Main Menu

Once you have all of the notebooks you want to backup selected, go to File -> Export Notes… (unfortunately there isn’t a keyboard shortcut for Export Notes…, sounds like a great feature request to me ?). A file dialog box will appear after you have selected Export Notes...
4. Navigate to where you want to backup your Notes
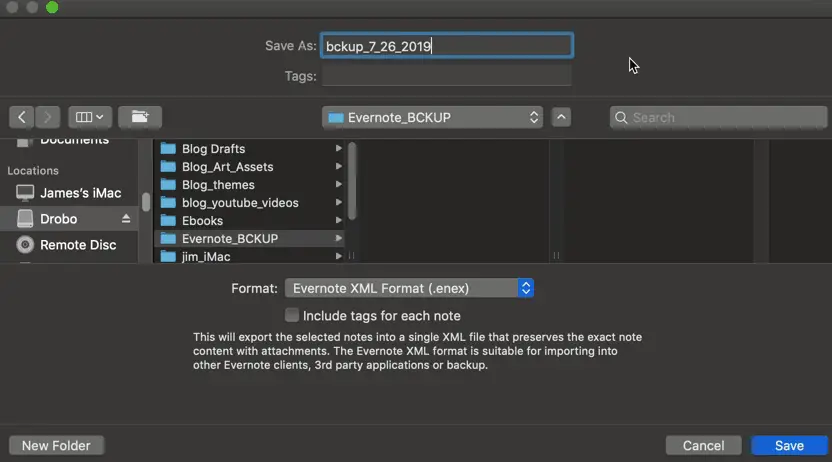
The file dialog box should now be on your desktop. It contains the ability to provide a name to your backup, select where you want to save it on your system, and what backup format you want to use.
5. Give your Backup a Name
First, we need to give our backup a name. Create a name. I HIGHLY RECOMMEND you use a standard naming convention and that it includes the date that the backup was performed. This makes it easier to see your backups in order in a consistent format.
6. Select ENEX for the Backup Format
Evernote allows you to export your notes in two formats:
- ENEX
- HTML
We discussed earlier that ENEX is Evernote’s data archive format. It is an XML variant. HTML is the other option and choosing this option creates an HTML file for each note in your notes database. I recommend backing up in Evernote’s ENEX format for backup purposes and HTML if you are looking to migrate your data to another solution or just want a non-proprietary formatted version of your Evernote notes.
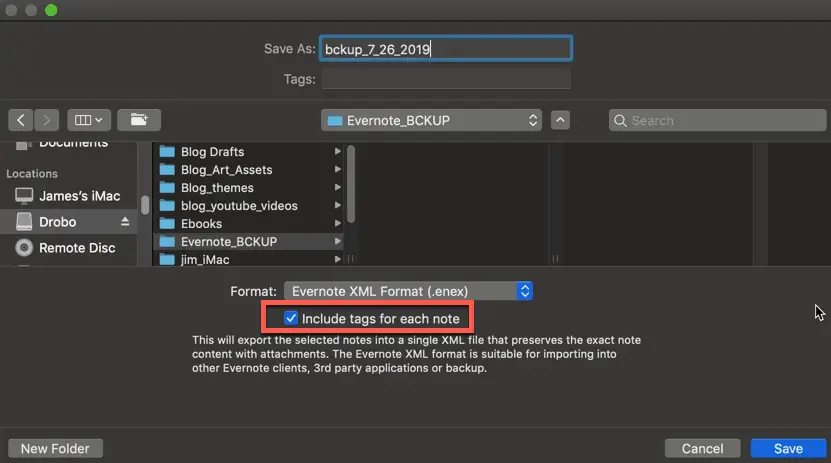
7. Click Save
Once you have given your backup a name, a location to save it and picked the format you are almost ready to save. For the ENEX save option, you also have the option of including tags for each note. I generally check this option as I would like to keep my tags as part of my backup. To start your backup, press the Save button and Evernote will go to work backing up your notes.
Backing Up Your Evernote Notes Using HTML Format
Backing up to HTML format is essentially the same as ENEX. To backup to HTML format, do the following:
1. Open Evernote
Open up the Evernote desktop client on your Mac. Click on the Notebooks entry in the left hand side panel. This will bring up the Notebooks screen inside the main Evernote display panel.
2. Select the Notebook(s) You Want To Backup

If you want to backup all of your notebooks, hold down the Shift key and click on the top left side of the beginning of your notebooks and drag to the bottom right and release the mouse button. This will select every notebook.
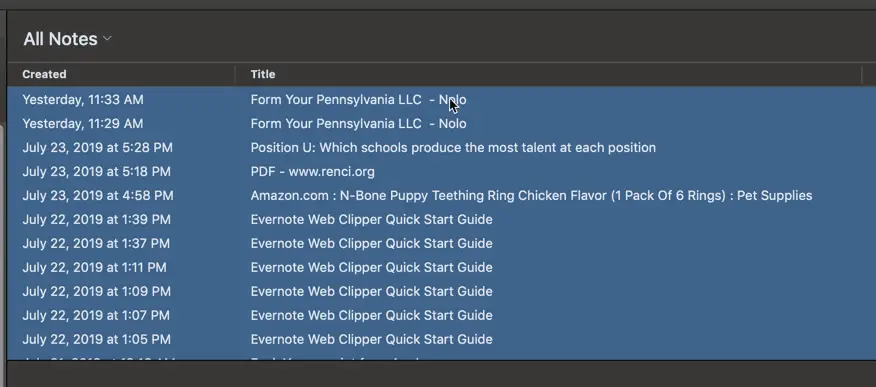
Alternately if you want to backup all of your notes, simply go to All Notes.
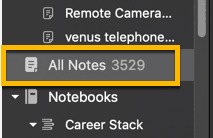
In the All Notes window in the main pane of Evernote, press Command A to select all the notes. Your display should look like the image below:
If you want to backup only some of your notebooks, hold down Command and click on each notebook you want to backup.
3. Go to File -> Export Notes… in the Evernote Main Menu
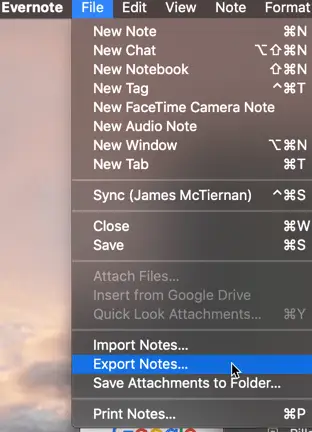
Once you have all of the notebooks you want to backup selected, go to File -> Export Notes…. A file dialog box will appear after you have selected Export Notes...
4. Navigate to where you want to backup your Notes

The file dialog box should now be on your desktop. It contains the ability to provide a name to your backup, select where you want to save it on your system, and what backup format you want to use.
5. Give your Backup a Name

First, we need to give our backup a name. Create a name. I HIGHLY RECOMMEND you use a standard naming convention and that it includes the date that the backup was performed. This makes it easier to see your backups in order in a consistent format.
6. Select HTML as the Backup format option
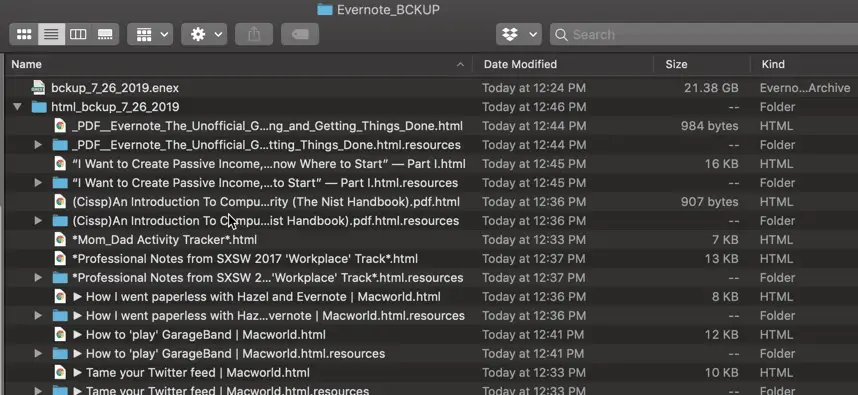
Select HTML as the format in the file dialog box. Unlike ENEX which creates one archive file, the HTML option creates a master folder that holds each note as an .html file and created a folder to hold the resources (i.e attachments like pdf) of each note.
7. Press the Save button
Once you have given your backup a name, a location on your system and selected HTML as the format type, press the Save button to start the backup process.


How Long Does It Take to Backup All of Your Notes
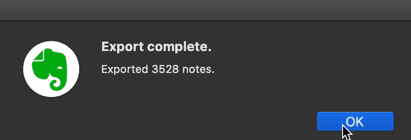
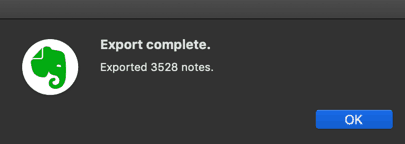
Obviously this is mostly dependent on the size of your Evernote note database. To attempt to create a baseline you could use, I backed up my whole Evernote database of 3,528 notes using both the ENEX format option and the HTML option. I have a late 2015 iMac (providing this info to give you an idea of the computing ability). Enclosed below are my results:
| Backup Format | Size of Backup | Total Time To Backup in Minutes |
|---|---|---|
| ENEX | 21.38 GB | 24 |
| HTML | 15.83 GB | 19 |
Surprisingly, the HMTL backup both took up less space (5.55 GB less) and took less time to process (5 minutes less).
Evernote Note History
If you are a Premium or Business subscriber of Evernote (link to Evernote’s subscription page), you can also use Evernote Note History. Note history allows you to view older versions of your note. This can be valuable if you accidentally delete part of your note that you need to access. To use the Note history feature to pull up an older version of the note, do the following:
1. Open the Note You Want to View an Earlier Version Of
Open Evernote for Desktop and open the note you want to view an earlier version of.
2. Click on the ellipsis … in the top right hand corner of the note
In the upper right hand corner of the note, there is an ellipsis … button. Press the ellipsis button to bring up the note menu.

3. Select Note Details…
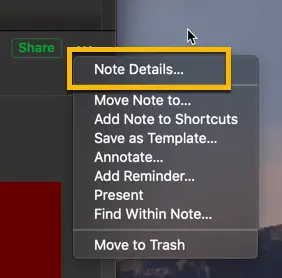
With the note menu open, click on Note Details…. This will bring up the Note Details window.
4. Select View History
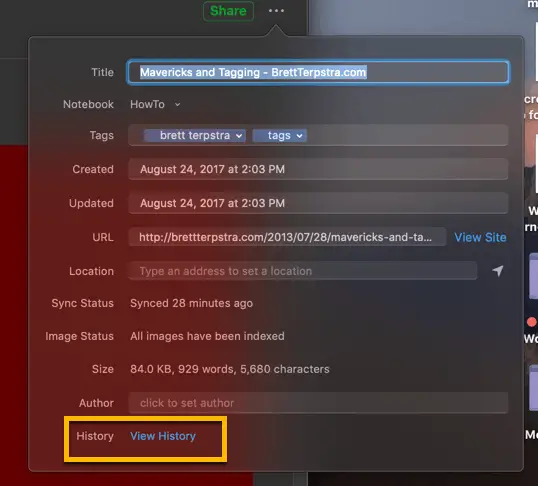
In the Note Details window, click on View History to view the history of the Note.
5. Select the Version You Want to View and Press Import
The Note History screen of your note should be viewable at this point. This screen provides a detailed explanation of the note history functionality and lists all of the versions of your note by date and time.
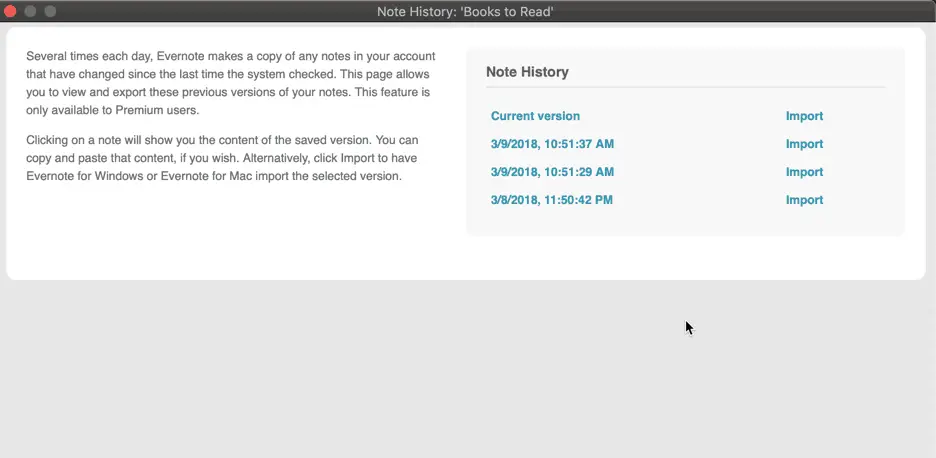
Select the version of the note you want to view by clicking Import on the date/time entry you want.
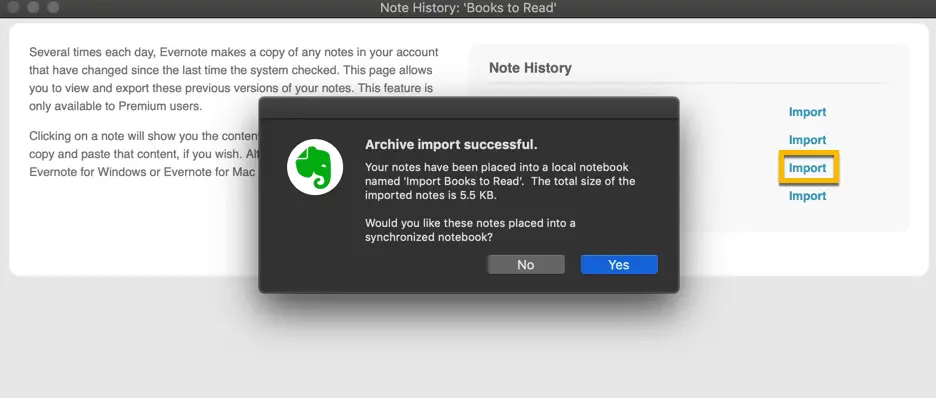
Once this version of the note has been imported back into Evernote, a pop-up dialog box will appear that indicates that the import was successful, the size of the imported note and will ask you whether you want to place the note into a synchronized notebook. Press Yes if you want the note added to the synchronized notebook.
The Doxie Go SE WiFi – A Wireless Scanner With Great Evernote Integration

Do you have a lot of documents you want to put into Evernote but do want to have to snap a picture of them one at a time with your smartphone? Let the Doxie Go SE Wifi do it for you! The Doxie Go SE Wifi will scan, OCR and file your documents into Evernote for you. This will allow you to search the contents of your documents quickly and easily. Don’t forget to use tags to add metadata to your notes to make retrieval and sorting easier. For more information on the Doxie Go SE Wifi, click on the Amazon link below:
Amazon link to Doxie Go SE Wifi
Subscribe to The Productive Engineer newsletter!
If you haven’t already subscribed, please subscribe to The Productive Engineer newsletter. It is filled with tips and tricks on how to get the most out of the productivity apps you use everyday.
Check out our Resources page
Check out our resources page for the products and services we use everyday to get things done or make our lives a little easier at the link below:
Summary
As an overall redundancy plan, backing up the data in the applications and services you use everyday makes a ton of sense. No one wants to lose data and most applications and services make is pretty easy to perform backups. Evernote makes it pretty simple to get your notes out of Evernote and onto your backup solution. It is important to ensure that your data is not backup up solely to your everyday hard drive as this creates a potential single point of failure. Look into getting an external disk drive or a NAS solution and put your backups there. Backups are one of those things where it feels like a waste of time and money all the way up to the point something goes wrong. Then it becomes painfully obvious how important backups are.
Helpful Links
Evernote Subscription Page
link to Evernote’s Subscription page
How to back up (export) and restore (import) notes and notebook in Evernote
link to How to back up (export) and restore (import) notes and notebook in Evernote
Other Articles You Might Be Interested In
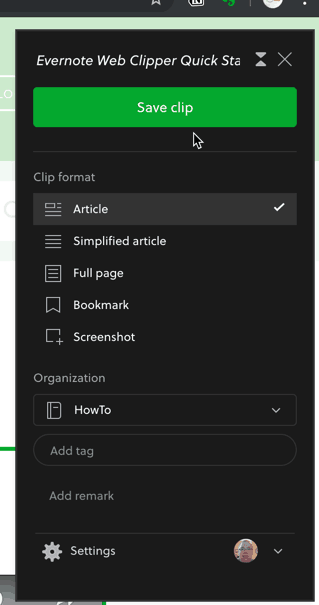
How to Use the Evernote Web Clipper
link to How to Use the Evernote Web Clipper
PDF Handling – Evernote’s Best Feature
link to PDF Handling – Evernote’s Best Feature
Why Does Evernote Have An Elephant Logo and Why It’s So Great at Helping You Remember
link to Why Does Evernote Have An Elephant Logo and Why It’s So Great at Helping You Remember
Does Evernote Support Markdown?
link to Does Evernote Support Markdown?