Habit Tracking in Notion: A Detailed Guide with Video
I am always trying to add a positive habit to my life. Whether it’s drinking more water, exercise, reading or losing weight, I find myself wishing I could create a system to help me maintain these positive habits. Notion is great for tracking tasks and storing and viewing data so I decided to create a habit tracker inside of Notion.
But what are the steps to creating a habit tracker in Notion? Enclosed below are the steps you should take to create a functional habit tracker in Notion (each of these steps will be further explained in the article):
- Open a New Page in Notion and create a full-page table (this will be your main habit database)
- Add columns for the date, description of habit and the measurements you will require to track (i.e. steps taken, calories eaten, pages read)
- Create a column for each habit that tracks whether the habit was completed for that day
- Create a dashboard page for each of your habits as well as a today view and the last 7 days view using linked databases
As mentioned earlier, we will teach you how to do all of the above steps in this tutorial.
Before we get started with the tutorial, if you are looking to learn more about apps like Notion, Todoist, Evernote, Google Docs, or just how to be more productive (like Keep Productive’s awesome Notion course), you should really check out SkillShare. Skillshare is an online learning platform with courses on pretty much anything you want to learn. To learn more about Skillshare and its vast library of courses and get 30% off, click the link below:
SkillShare – Online Learning Platform
If you are just starting out with Notion and aren’t sure where to get started, you really need to check out my comprehensive beginner’s guide to Notion. It goes through all things you need to know to get started the right way. Enclosed below is the link to the guide:
Link to Beginner’s Guide to Using Notion With Screenshots
Looking for some information on the power of Notion? Check out our article containing tips to help you become a power user of Notion at the link below:
Let’s get started with the tutorial 😀.
Creating a Main Habit Database
The first step is to create a database in Notion that will hold all of the habits we want to track. Once we have this database setup, we will be able to create linked databases that will provide customized views of our habits.

To create a database in Notion, open up Notion. Create a new page and give that page a title. This page will be your main page.

Once you have your main page created, click in the body of the page and type /table. A drop-down menu will appear. Select either:
- Table – Inline – Creates a table on the current page or
- Table – Full Page – Creates a table on its own page
In this tutorial, we will use the terms table and database interchangeably. Just know that tables and databases are essentially the same thing. For this tutorial, we will choose the “Table – Full Page” option as we want to have our main database on its own dedicated page.
Give Your New Table/Database a Name

An empty table should now appear on a new Notion page. Give your table a name by clicking where it says “Untitled” and type in the name you want to assign to your table. Hit “Enter” when done to save your title to the table.
Edit/Add Columns of Your Table

Next, you need to create columns for each of the items you want to track in your habit table. For this tutorial, we will be tracking daily water intake. The columns we will be creating are:
| Column Name | Property Type |
|---|---|
| Date | Date |
| Habit | Title |
| Category | Select |
| Water Goal (cups) | Number |
| Water Drank (cups) | Number |
| Water Goal Met? | Formula |
| Percent Complete | Formula |
Add Habit Data to Your Habit Table

Add data for each day in your habit table like I have done above. Don’t populate the “Water Goal Met” and “Percent Complete” columns yet. We will be creating formulas that will automatically populate those columns for us.
Creating Our First Formula
We will now create a formula that will determine whether we met our water drinking goal for the day. This formula will compare the “Water Goal (cups)” column value to the “Water Drank (cups)” column value. If the water drank is the same or greater than the water goal, a checked checkbox will appear in the “Water Goal Met?” column. If not, then an empty checkbox will appear.
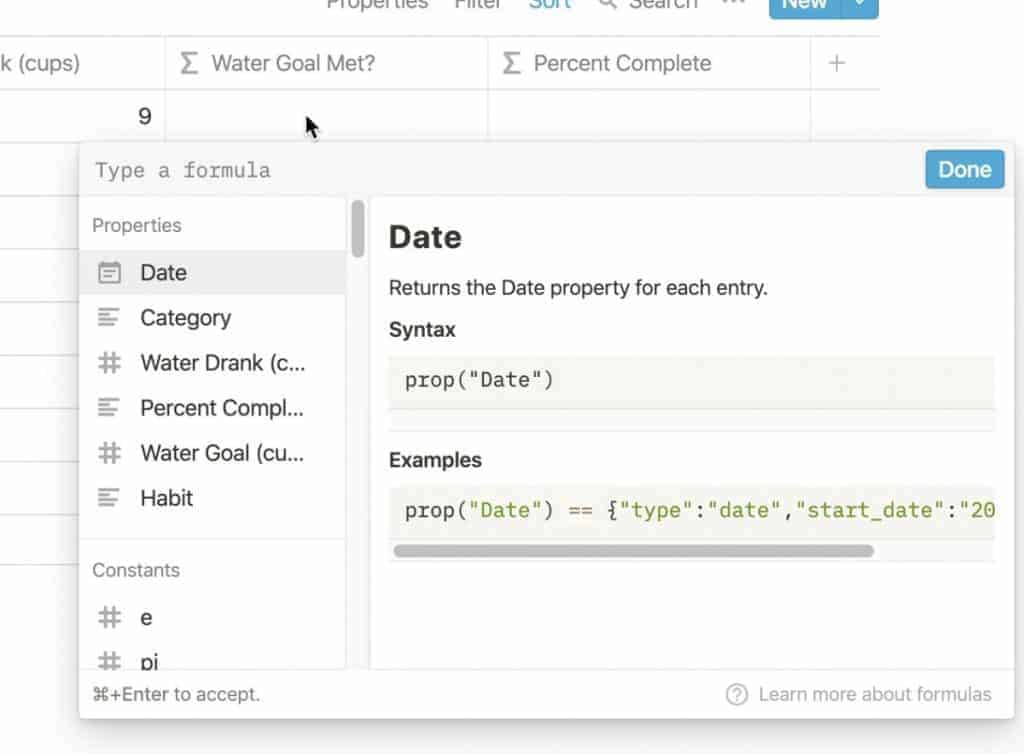
To add the formula to the “Water Goal Met?” column, click on any cell in the column.
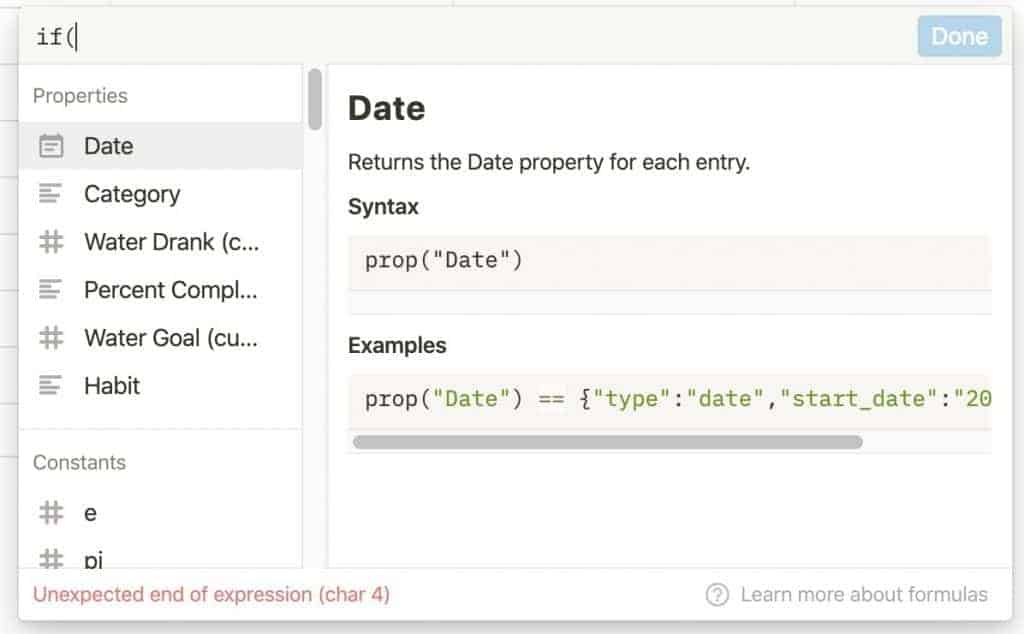
The formula creation dialog box will appear. Click where it says “Type a formula” and type if( as shown above. This tells Notion that you want to do a comparison.
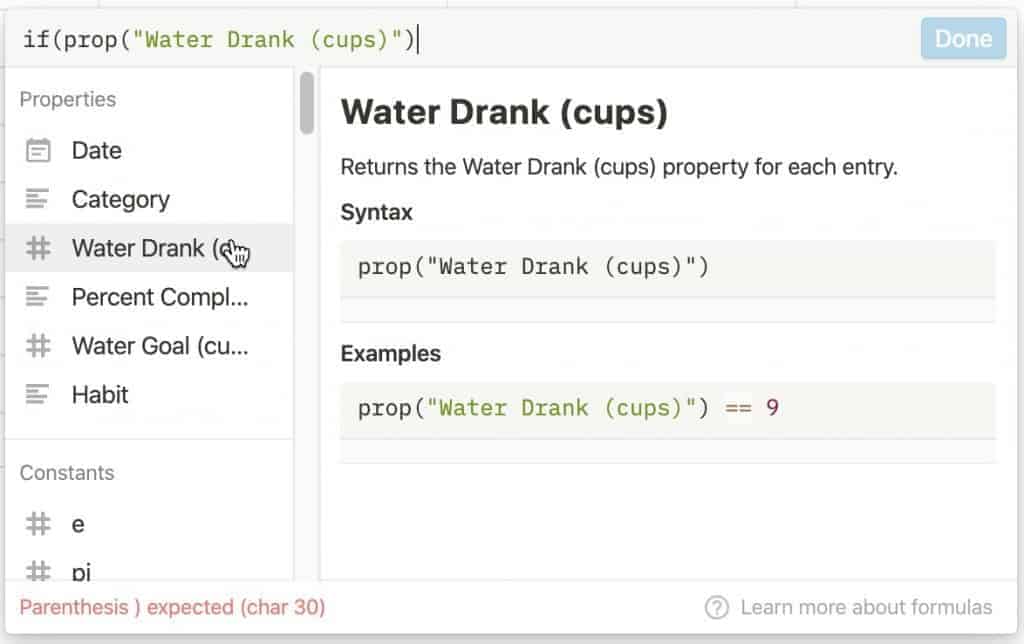
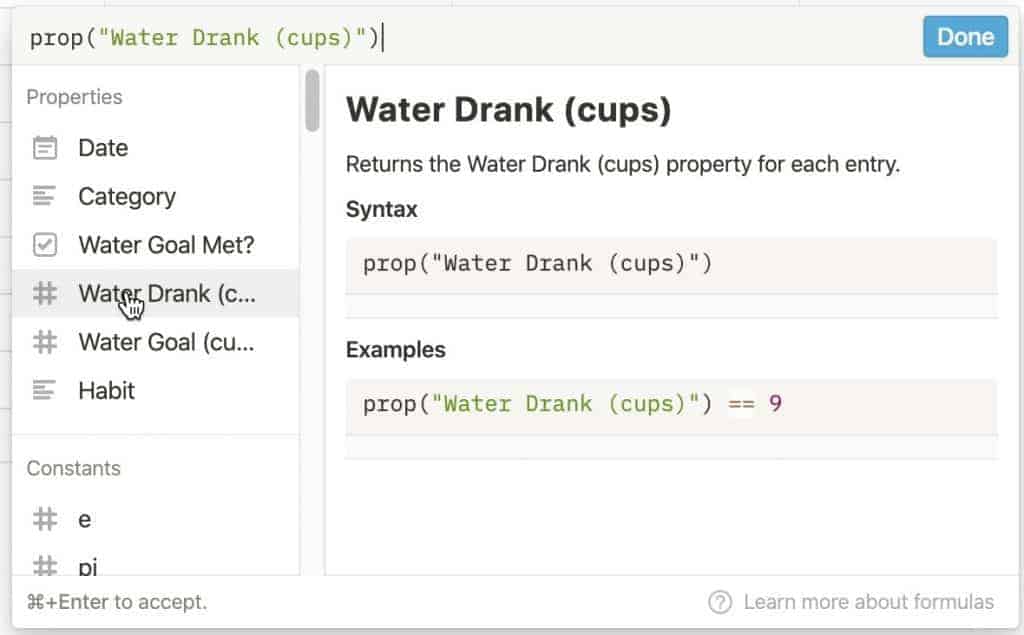
Next, in the left panel of the formula creation dialog, click on the “Water Drank (cups)” property. This will add this property to our formula.

Click in the text box after the “Water Drank (cups)” and type >=.
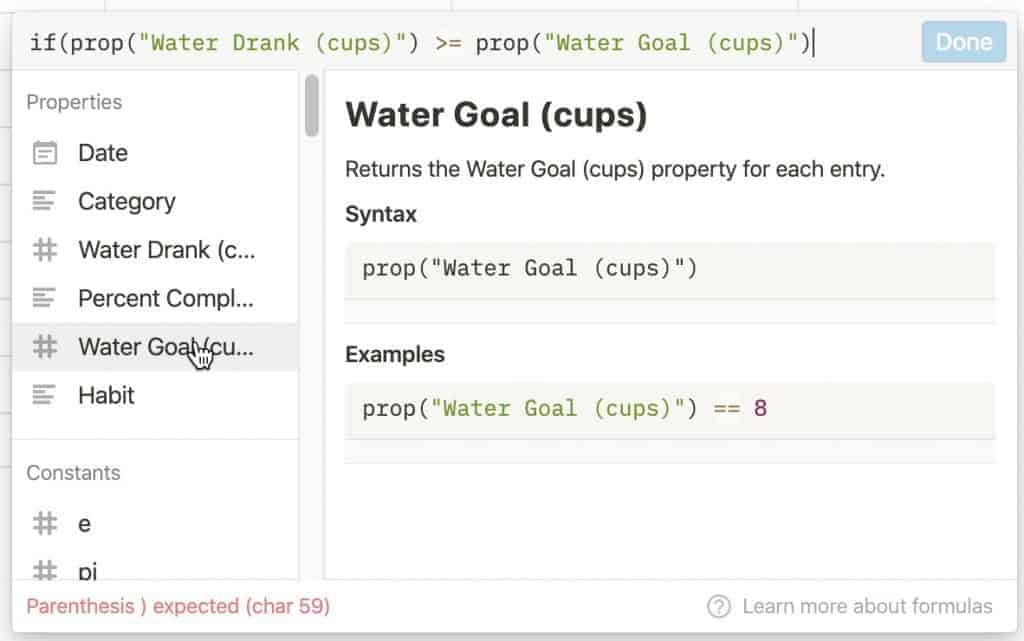
Next, click on the “Water Goal (cups)” property in the left panel.
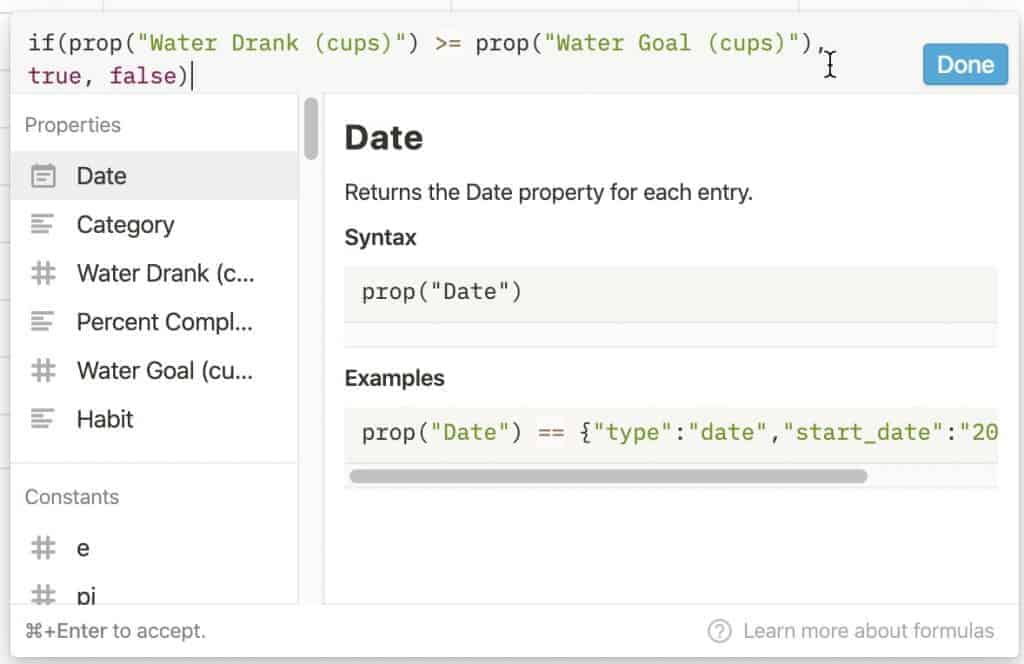
Finally, in the text box, type , true, false. This formula tells Notion to compare the “Water Drank” to the “Water Goal” column and if the value in the “Water Drank” column is the same as or greater than the “Water Goal” column, then this column should be marked true. This will put a checked checkbox in this column. If the “Water Goal” is greater than the “Water Drank” column, then this column cell is false and will have an unchecked checkbox. Click the “Done” button to save your formula to Notion.
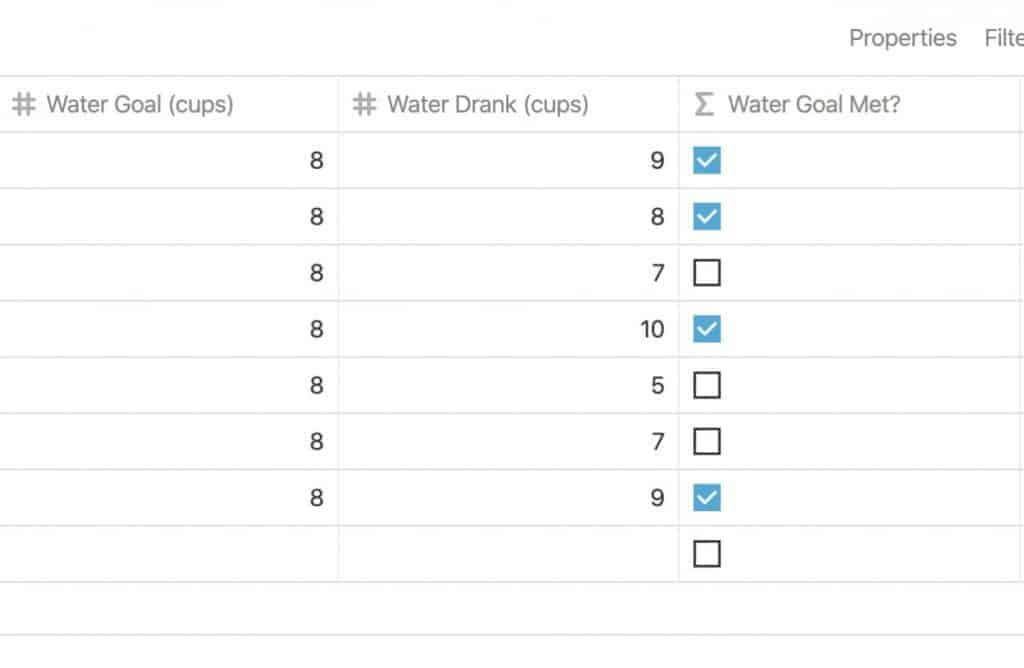
As you can see, there are checked checkboxes where the “Water Drank” is greater than or equal to the “Water Goal” column entry and an unchecked checkbox where it is not.
Creating a Percent Complete Column
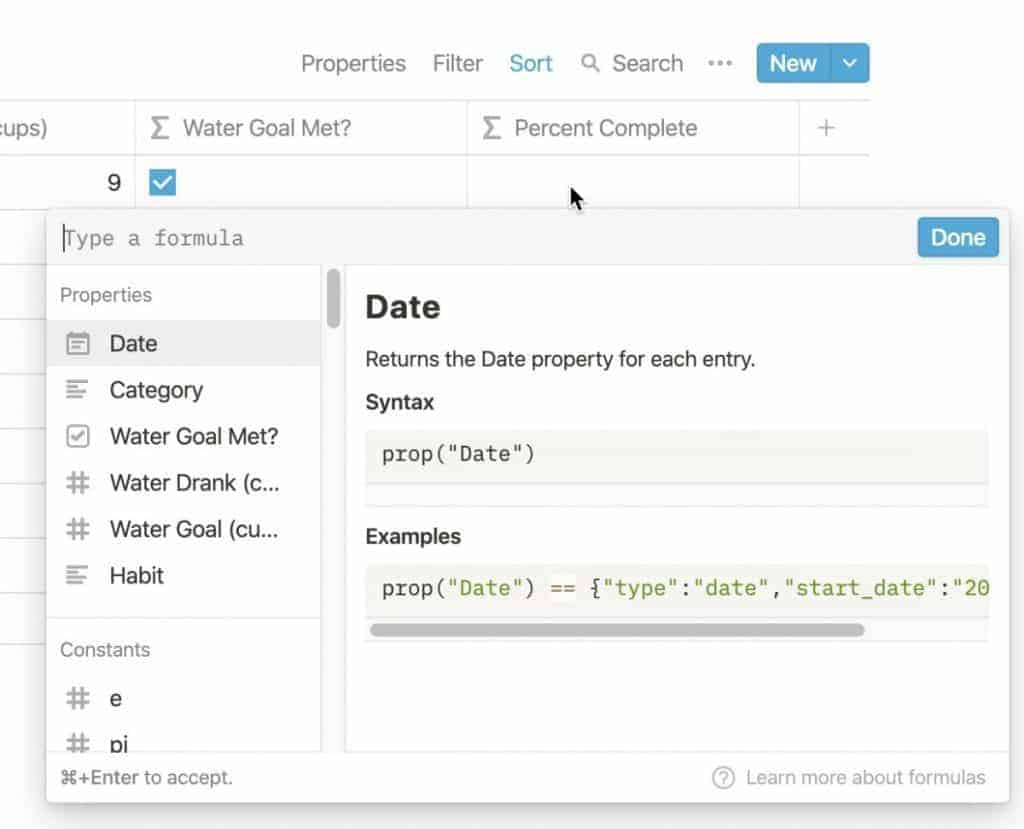
Click on any cell in the “Percent Complete” column to bring up the formula creation dialog.
In the left panel, click on the “Water Drank (cups)” property to add this property to the formula.

Next, type the divide symbol in the text box and click on the “Water Goal (cups)” property as shown above. This tells Notion to divide the “Water Drank (cups)” value by the “Water Goal (cups)” value. Click “Done” to save your formula.

You should now see numbers in your “Percent Complete” column. We need to convert these numbers to a percent. Fortunately, this is really simple to do.

Hover over any cell in the “Percent Complete” column and click on the “123” button that appears.

A number format chooser drop-down menu will appear as shown above. Select “Percent” from the menu.
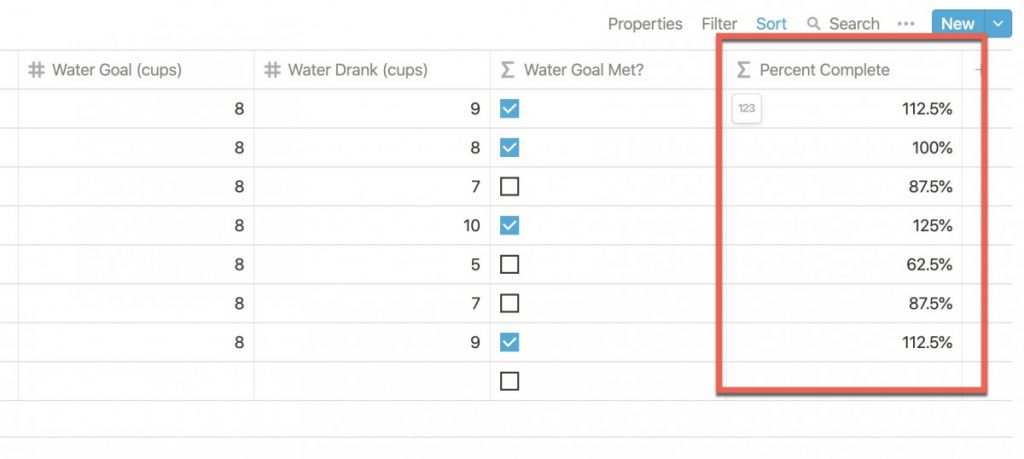
You should now see percentages in your “Percent Complete” column.
Create a Dashboard Page
Now that we have our habit table complete, let’s create a dashboard view using linked databases. Linked databases are basically customized views of existing Notion tables/databases. It sounds complicated but really easy to use.
Go back to your main Notion Habit Tracker page.
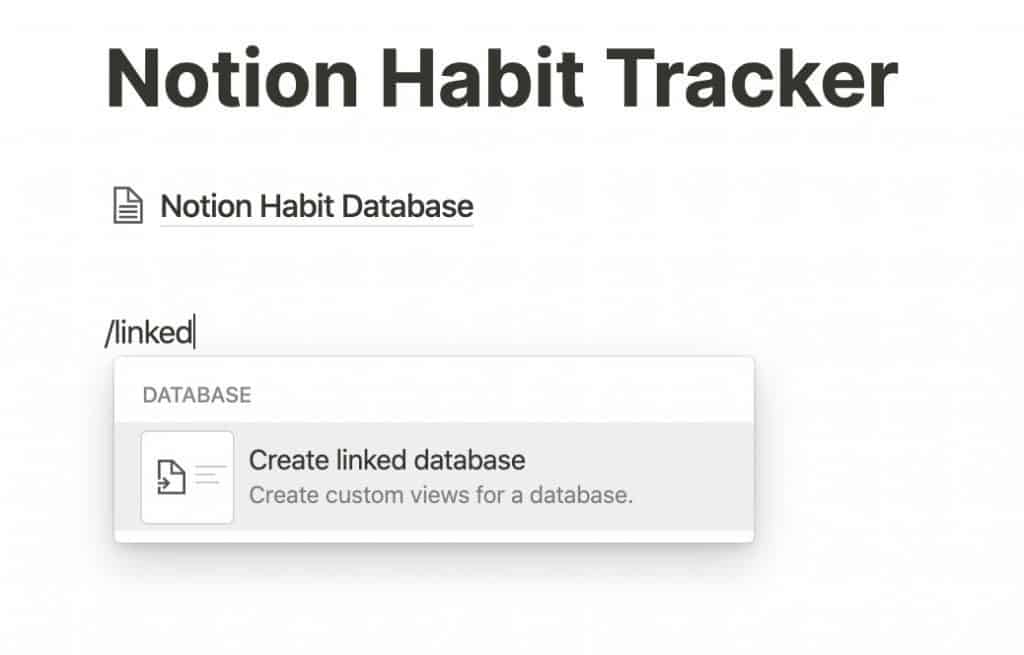
Click in the body of the page and type “/linked” and select “Create linked database” as shown above.

You should see a “Search for a database” menu appear like the one above.
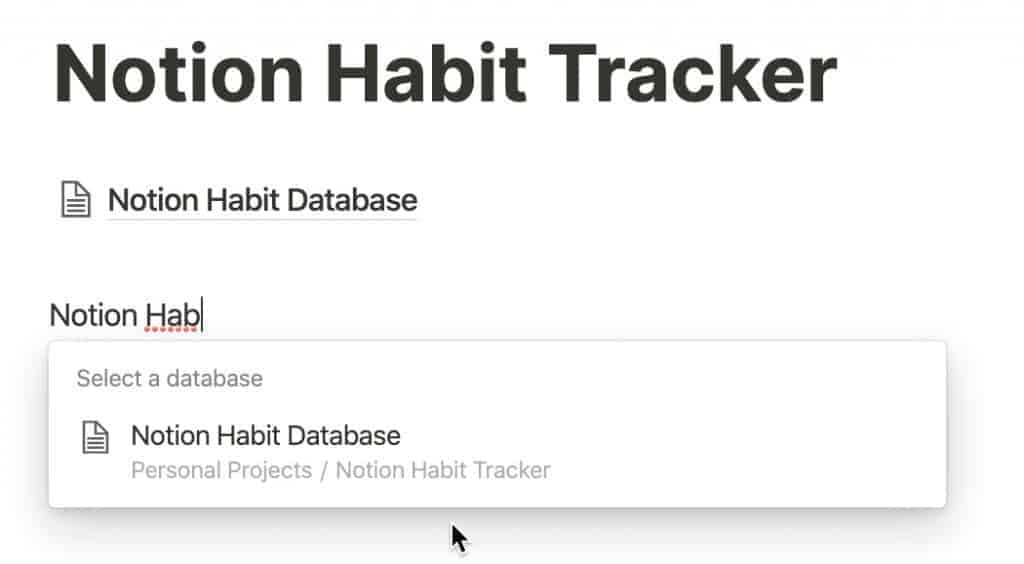
Start typing the name of your table (in our case, Notion Habit Database) and select it from the menu when it appears.

A view of your Habit table should appear as shown above. Let’s create a today view that only shows us items with today’s date.
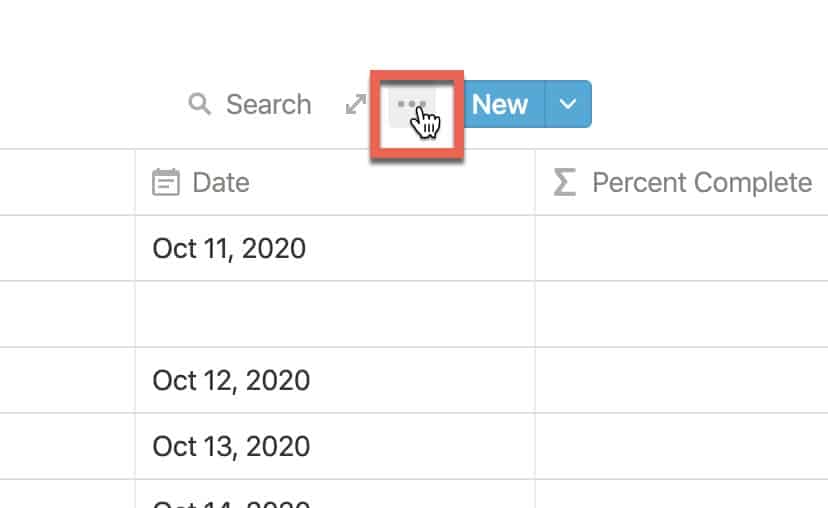
Hover your mouse over your table and click on the ellipsis (…) button that appears.

A menu of options will appear. Select “Filter” from the menu.
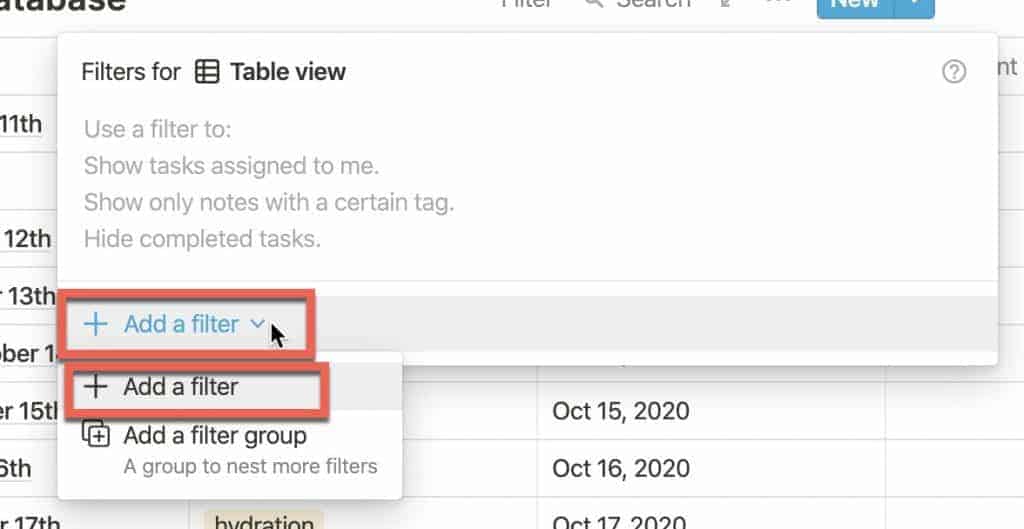
The filters menu will appear. Click on the “+ Add a filter” drop down button and then click on the “+Add a filter” button.
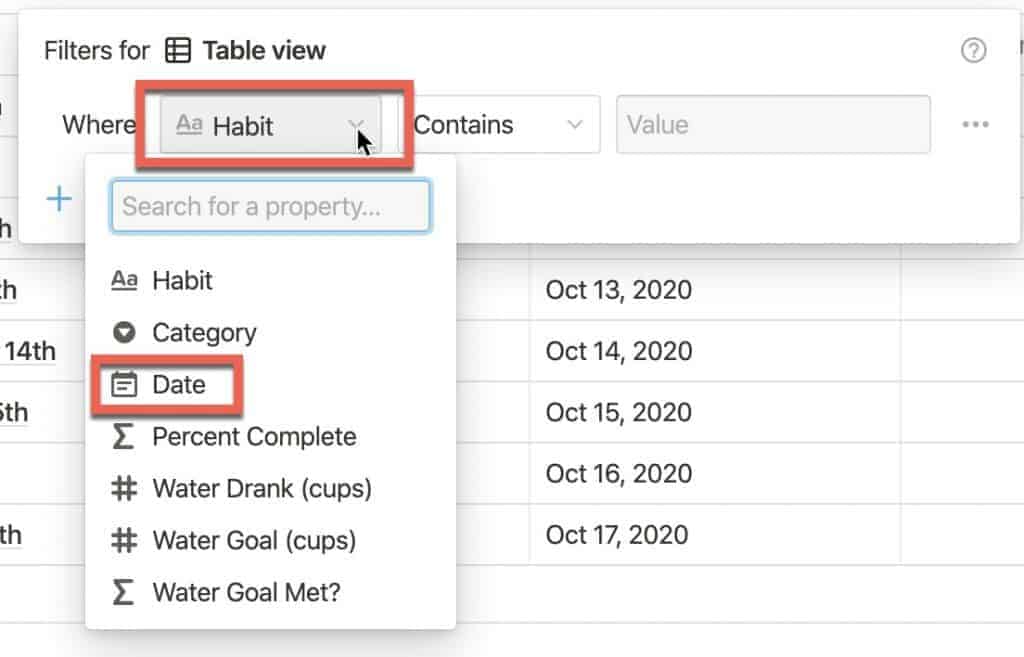
The filter configuration dialog will appear. Click on the “Habit” drop-down and select “Date” from the menu options.

Your filter menu should change to look like the above. Click on the “Exact date” drop-down and then select the “Today” option from the menu.

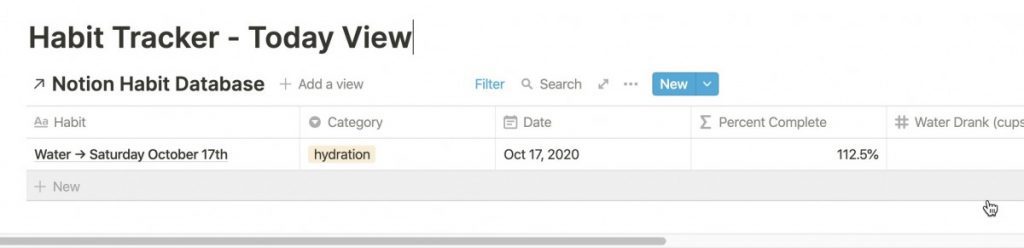
Your filter should now look like the screenshot above.

Your table should now only show entries with today’s date.
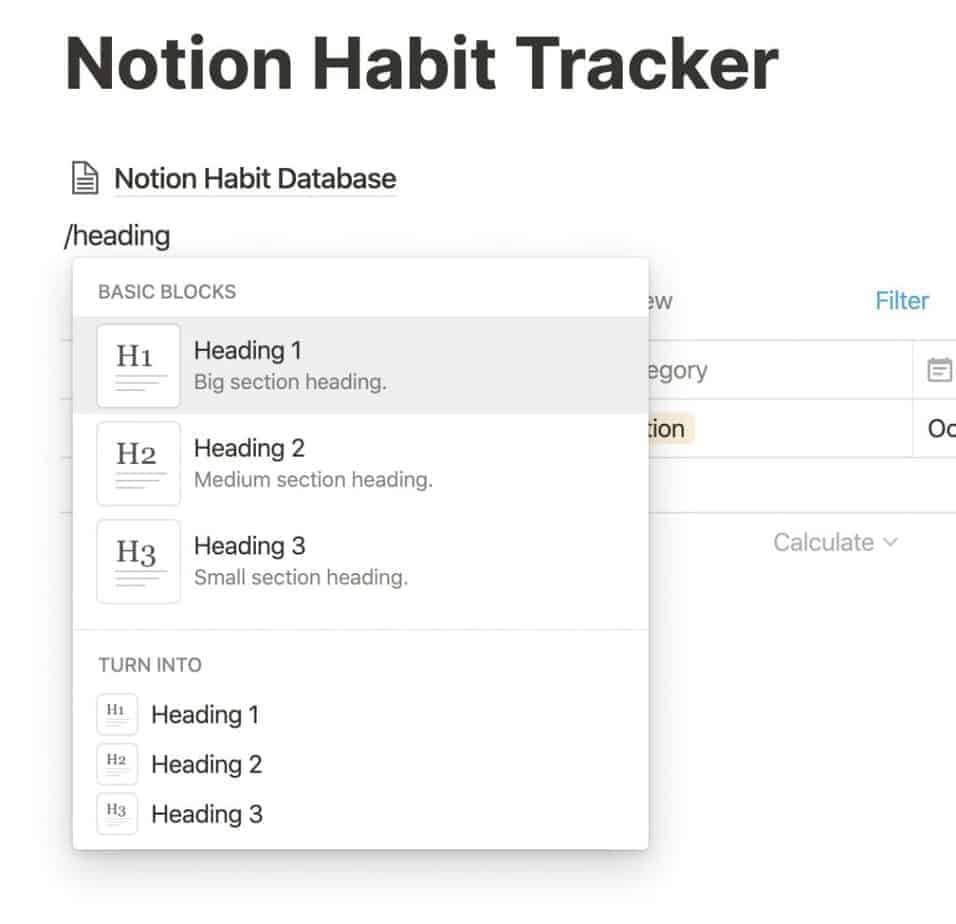
Give you today view a heading to identify it by clicking above the table and typing the slash key and then heading as shown above. Select “Heading 1” from the options.
Type in the title of your view, in our case “Habit Tracker – Today View” and press “Enter“.
You now have a functional habit tracker and a today view dashboard. Add more habits and views to meet your individual needs.
I hope this tutorial was helpful to you. Good luck!
Subscribe to Our Newsletter
If you like this article, subscribe to our newsletter. It contains tips and tricks to help you get things done.
Check out our Resources page
Check out our resources page for the products and services we use everyday to get things done or make our lives a little easier at the link below:
Check Out Our YouTube Channel!
We have a YouTube channel now and we are working hard to fill it with tips, tricks, how-tos, and tutorials. Click the link below to check it out!
Do You Ever Need to Edit or Annotate PDFs?
If the answer is yes, you should really PDF Expert! PDF Expert is my go-to app for editing and marking up PDF documents. It is easy to use, has a ton of features and is very cost effective compared to other options out there. For more information on PDF Expert, click the link below:
PDF Expert – Fast, robust and beautiful PDF editor
Looking to Get Started Blogging or on YouTube?
Getting started can seem daunting and scary (I know it was for me) but it doesn’t have to be. I was very lucky to find a program that that has helped me grow my blog to over 60,000 page views a month and a Monetized YouTube channel that is growing month-over-month.
Project 24 by Income School is the program that I have used. I have been a member for over a year now and just renewed my membership. I cannot recommend Project 24 enough! For more information on Income School, click the link below:
Project 24 byIncome School – Teaching You How to Create Passive Income from Blogs and YouTube