How To Lock Cell Size In Google Sheets – Complete Guide
Google Sheets is an amazing spreadsheet application that offers a wide range of features, making it the ideal choice for users who need to store and manage their data. One useful feature that Google Sheets offers is the ability to lock cell size to prevent others from modifying or deleting specific cells in your spreadsheet. But how do you lock cell size in Google Sheets?
Enclosed below are the steps required to lock cell size in Google Sheets:
- Select the cell to be locked.
- Click Data -> Protect sheets and ranges, and a pane on the right opens.
- Click Add a sheet or range and name the cell.
- Click Set permissions.
- In the Range Editing dialog box, restrict permissions.
- Click Done.
This tutorial will guide you through the steps necessary to lock the size of a cell in your Google Sheets document. Further, we can also look at ways to lock columns, rows, and sheets in Google Sheets.
How To Lock Cell Size In Google Sheets
There’s no direct method to lock the cell size in Google Sheets. It requires a few steps from your end to accomplish it. If you want to lock individual cells in Google Sheets, you should follow the steps below.
- Select the cell to be locked.
- Click Data -> Protect sheets and ranges, and a pane on the right opens.
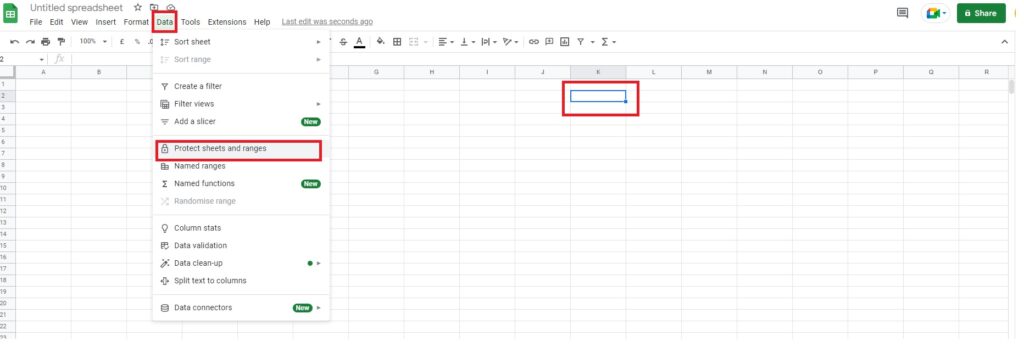
- Click Add a sheet or range and name the cell.

- Click Set permissions.

- In the Range Editing Permissions dialog box, restrict permissions.

- Click Done.
You can now understand that it’s easier to lock individual cells. However, there may be times when you’ve to change permissions and allow others to edit. Change to the “custom” option in the range editing permissions dialog box in such instances.
You can also use the Conditional formatting option to set specific dimensions.
Guess what? You can follow similar steps to lock rows and columns as well. There’s no limit to the number of rows and columns you can lock.
How To Unlock A Locked Cell In Google Sheets
Locking and unlocking cells in Google Sheets are quite the same. While you need to create a new range to lock the cell, unlocking has only a few steps.
- Open the sheet on Google Sheets.
- Select Data -> Protect sheets and range.
- A pane opens on the right, listing the locked range.

4. Click the Trash bin icon next to the range name, and it’s unlocked.

You can easily unlock any number of locked cells or rows/columns. Likewise, you can also change editing permissions in an instant.
Our Recommended Office Desk Tech
[amazon table=”17112″]
How To Lock Sheet In Google Sheets
Locking a sheet is another form of protecting large volumes of data. As Google Sheets allows any number of sheets to display on the bottom area, it’s important to ensure that not everyone accesses all sheets.
Here’s the exact procedure to lock the sheet in Google Sheets:
- Open the sheet on Google Sheets.
- Right-click on the sheet name at the bottom area and click Protect the sheet.
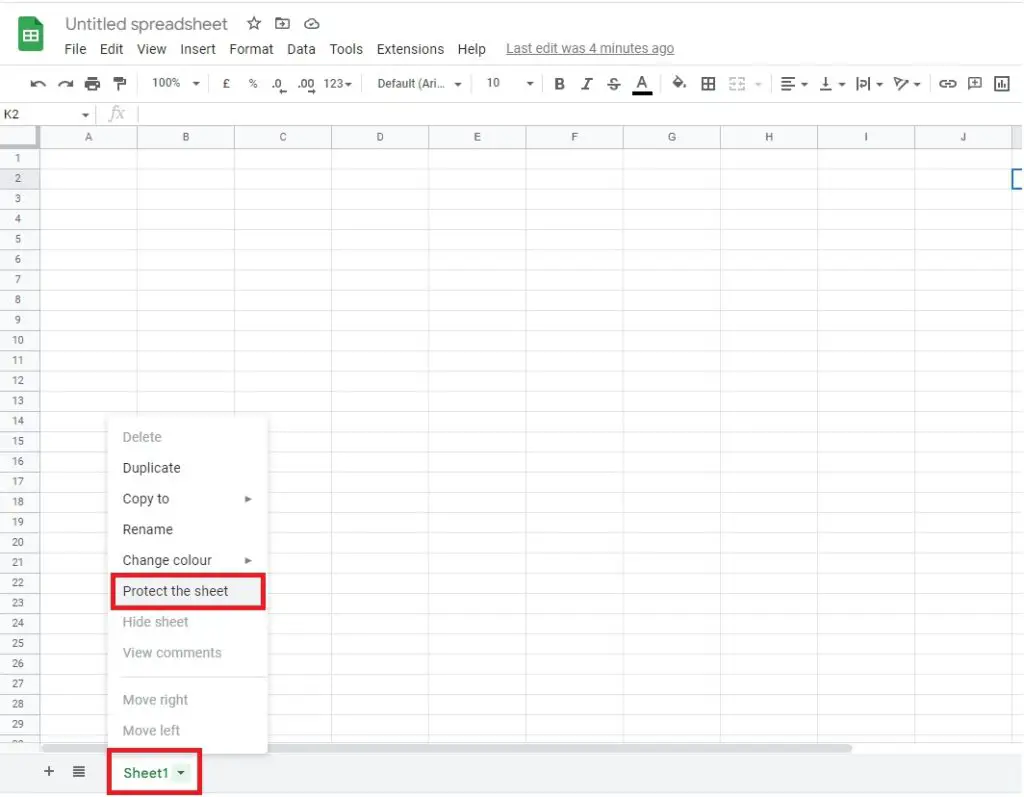
3. A new pane titled “Protected sheets and ranges” opens on the right.
4. Ensure that the sheet name is right and click Set Permissions.

As a rule of thumb, if you find the perfect way to lock a cell or row, you can easily do the rest as you know the exact function in play.
Final Thoughts
Locking the cell size in Google Sheets is an invaluable tool for organizing large amounts of data. It allows you to keep your spreadsheet organized and ensure that changes won’t disrupt your document’s layout. With this guide, you should know how to use the lock feature for both rows and columns and select a range of cells and lock them all at once.

