Essential Guide to Time Blocking (aka Timeboxing) in Notion
Time Blocking is a helpful time management method that involves dividing your day into separate blocks and assigning tasks in each block. Notion allows you to quickly and easily set up a time blocking system. This tutorial will teach you how to use Notion for time blocking.
Setting Up Notion for Time Blocking
Here are the steps required to get started time blocking in Notion:
- Open Notion
- Create a Page to hold your time blocking database
- Type “/table” to create a table block
- Select “inline” for the table type
- Give your table a name
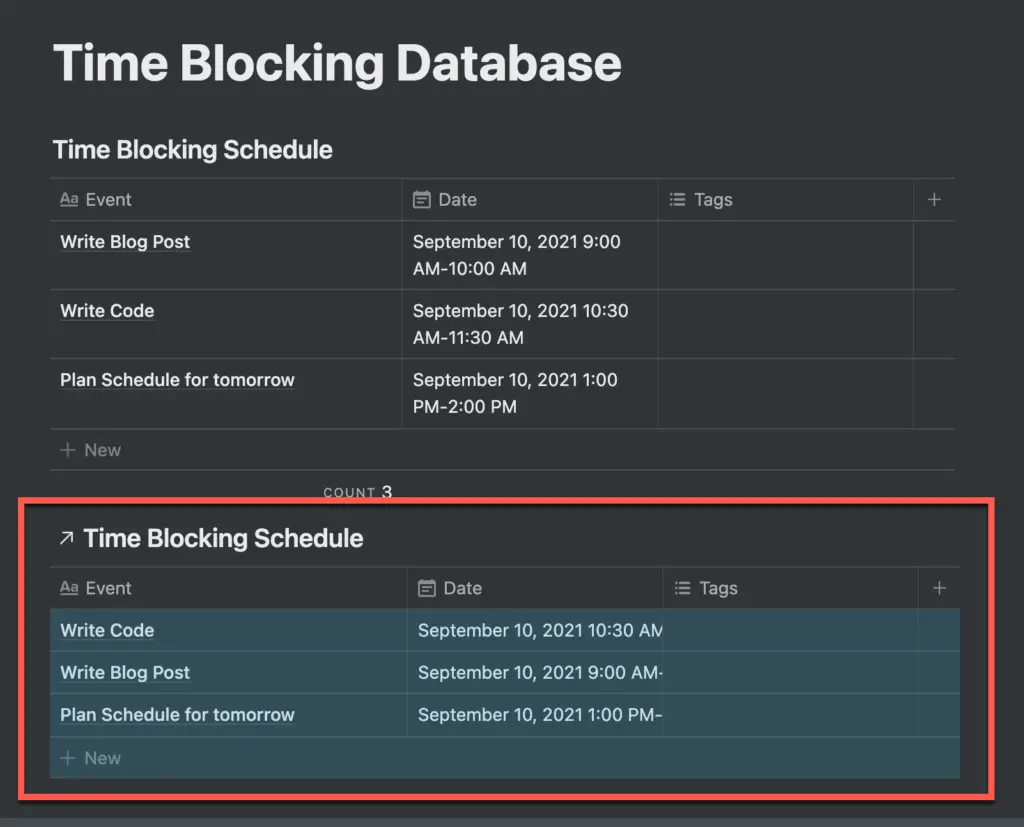
- Add a “date” column to your table
- Add tasks to your table
- Assign due dates to each of your tasks
- Add start and end times to each of your tasks
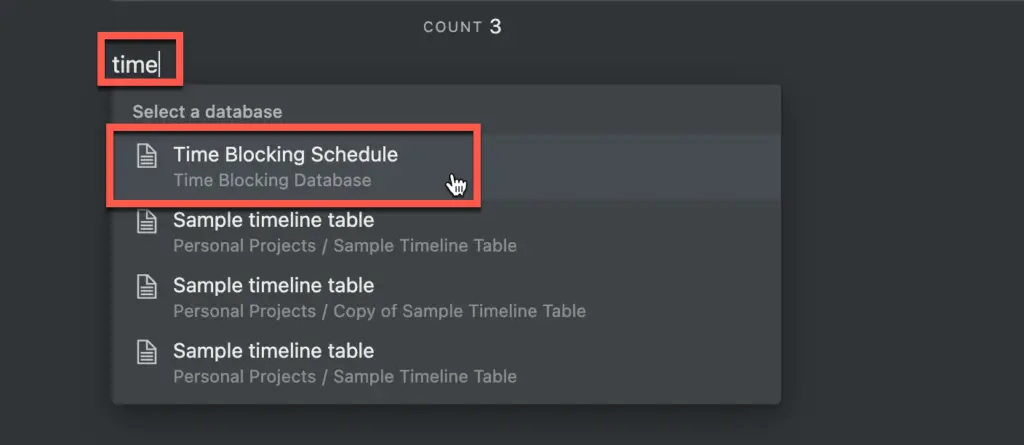
- Create a linked database by typing “/linked” and selecting “Create Linked Database”
- Start typing the name of your time blocking database and select it from the provided options
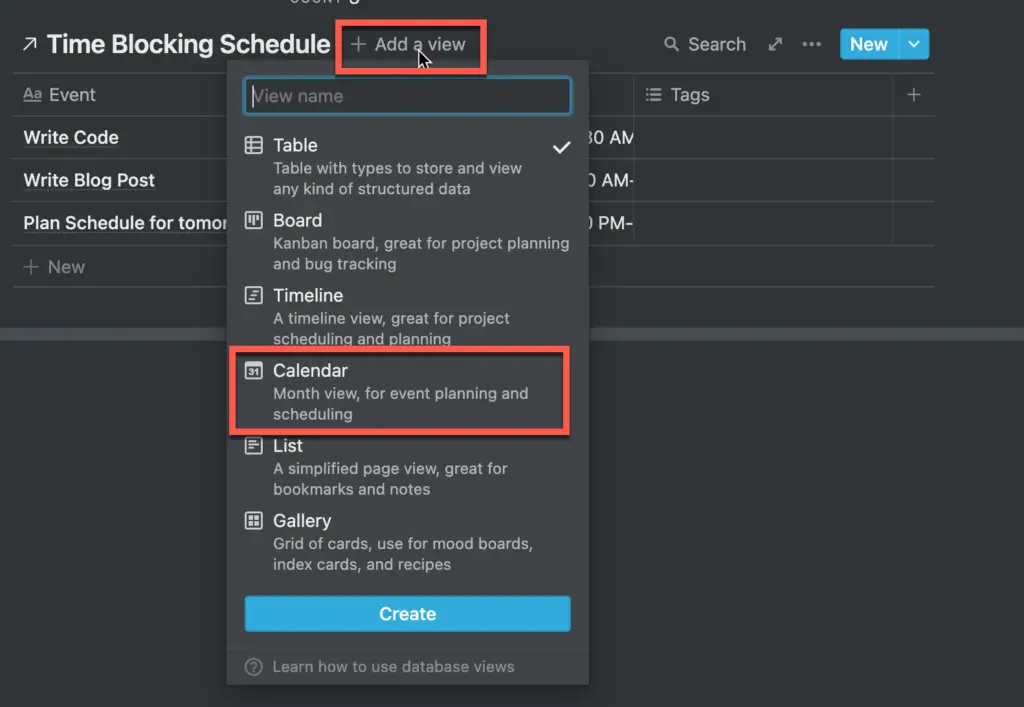
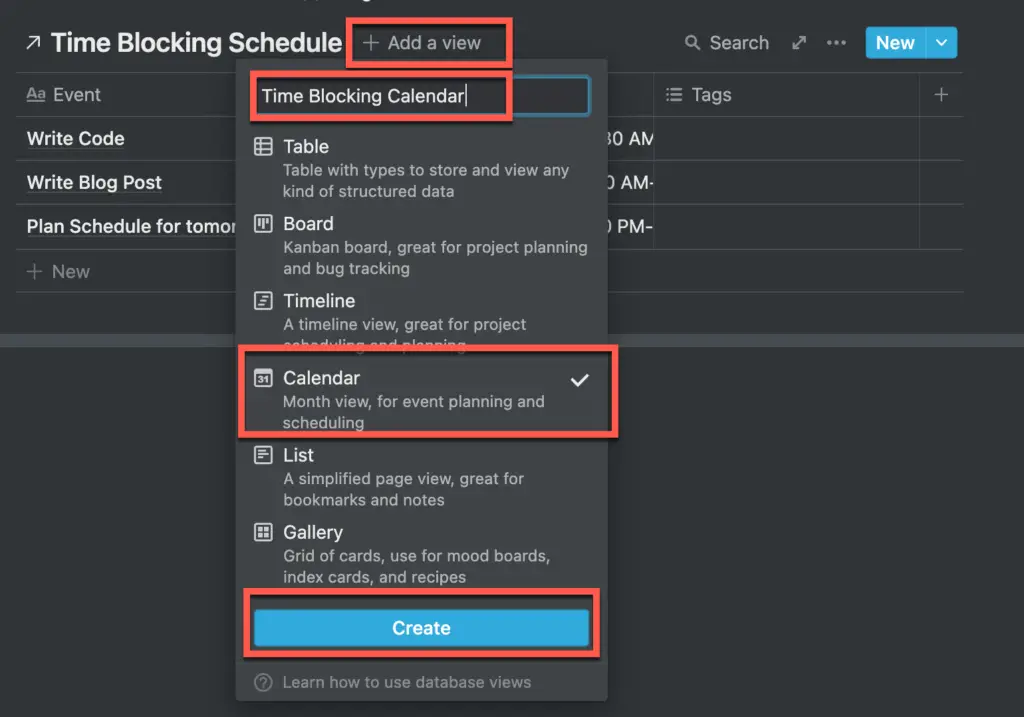
- Click the “Add a view” button
- Give your view a name and select “Calendar” from the available options and click the “Create” button
- Add a sort by hovering over the linked database, clicking the ellipsis and selecting “Sort”
- Click on the “Event” dropdown option and select your “Date” field and select “ascending” to show your tasks in chronological order
The rest of this article will elaborate on each of the steps listed above and will provide screenshots of each step. This will allow you to follow along and set it up with us.
If you are a Google Calendar user and want to use it to time block, check out our guide to time blocking in Google Calendar.
Why Use Notion for Time Blocking
- Notion is one of the best productivity platforms and note-taking apps on the market. It bills itself as an all-in-one workspace for maximizing productivity and for project management.
- Database blocks
- Notion users can create attractive and functional time blocking calendars. Notion allows you to manage your time blocks and re-order them with ease.
- Notion is a better method of creating time blocks than paper calendars
- Notion can endlessly amend databases.
- Notion is cloud-based, you can access your time blocking calendar from any device anywhere in the world.
- You can also attach files or videos to each task or even use entries to compose documents, study notes, and letters.
- Shared workspaces
- managers can amend individuals’ time blocks, making Notion a fantastic method for team management. You can share your calendars with colleagues or clients to share your current availability. Time blocks are also the perfect method for assigning appointments to customers or partners.
Are you just getting started with Notion or simply need to brush up on how to use it? Then you really need to check out my Beginner’s Guide to Notion with Screenshots and Video.
Creating a Time Blocking System in Notion
Let’s create a simple time blocking system in Notion. This will help provide a foundation for you to customize to your needs.
Create a Page to Host your Time Blocking System
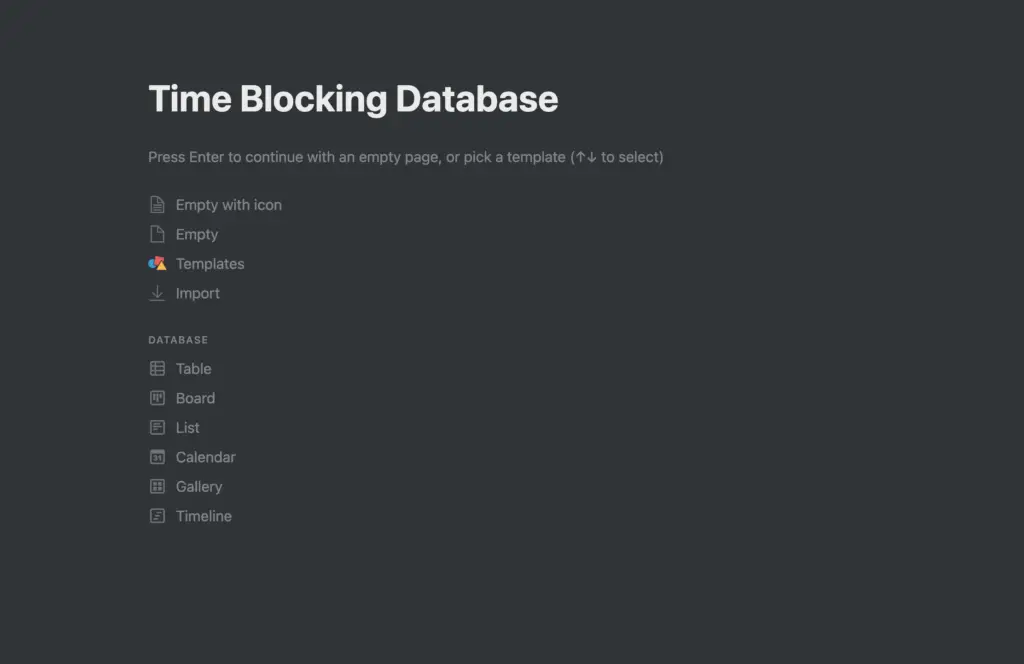
The first thing we need to do is to create a page where we will store our time blocking schedule. Create a new page in Notion and give it a title. Notion uses pages as the default content option as it is based on wiki-technology.
If you are unfamiliar with how pages work in Notion, check out our guide to creating and managing pages in Notion.
Add a Database Table to Your Time Blocking Page
Next, we need to add a database to our page that will hold all our tasks. Notion makes adding databases very simple.
Here’s how you add a database table to your Notion page:
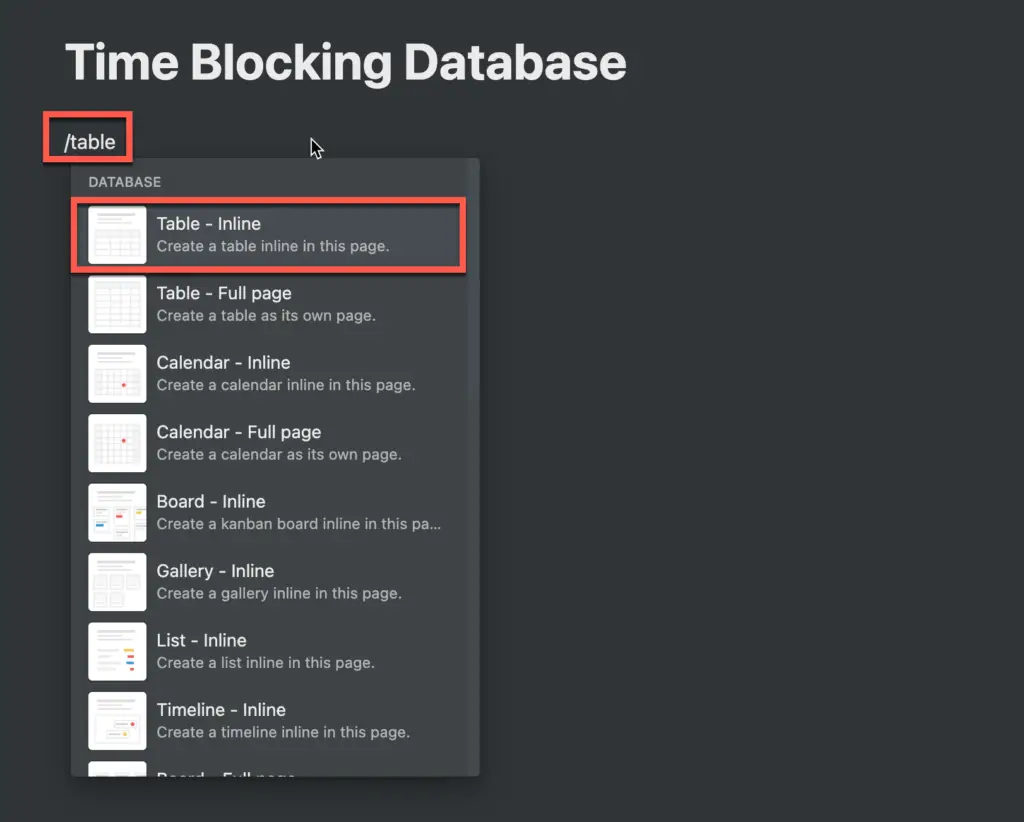
- Type “/table” to bring up the blocks menu filtered by table
- Select “Table – Inline” from the available options
- Give your table a name by double-clicking above the “Event” column and typing in your table title
Add a Date Column to your Time Blocking Table
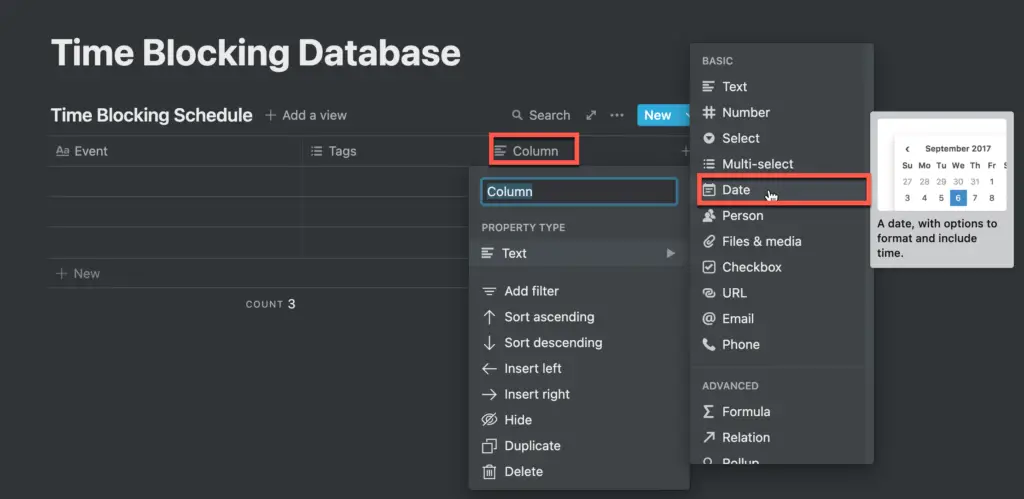
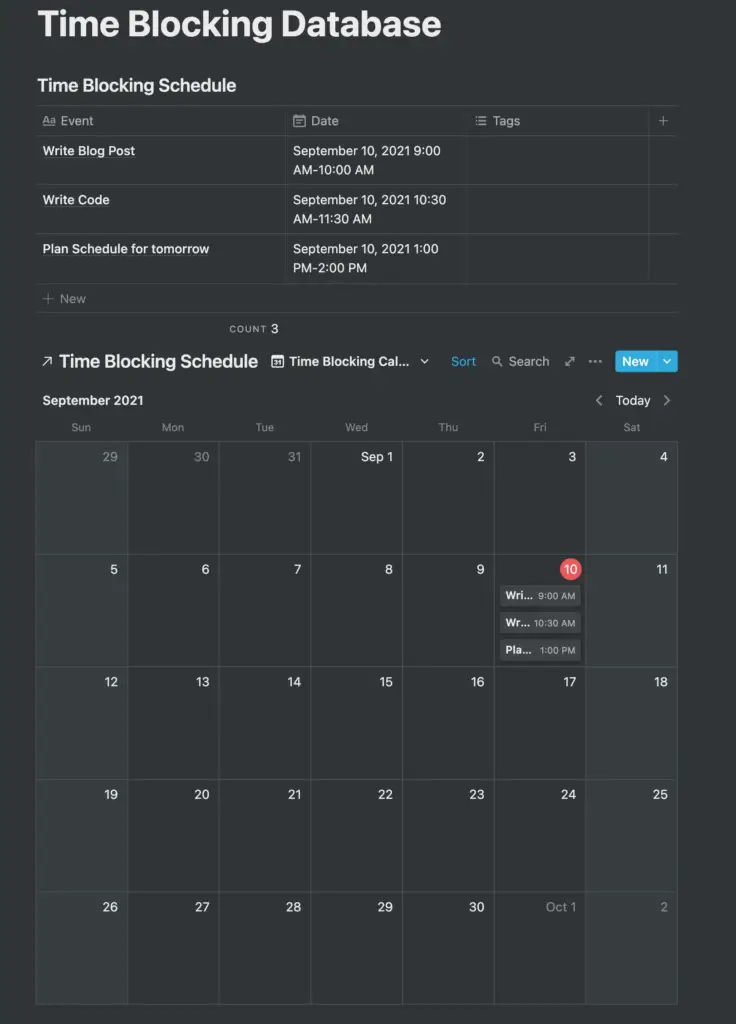
By default, your new table will have an “Event” column that you can use for storing the name of your task. However, you will need to manually add a “Date” column to your table.
Here’s how you add a Date column to your table:
- Either click on an existing column you want to change to a Date column or click the “+” button in the right-most column
- Type in a name for your column in the text box
- Click on the “Property Type” option and select “Date” from the available options as shown in the screenshot above
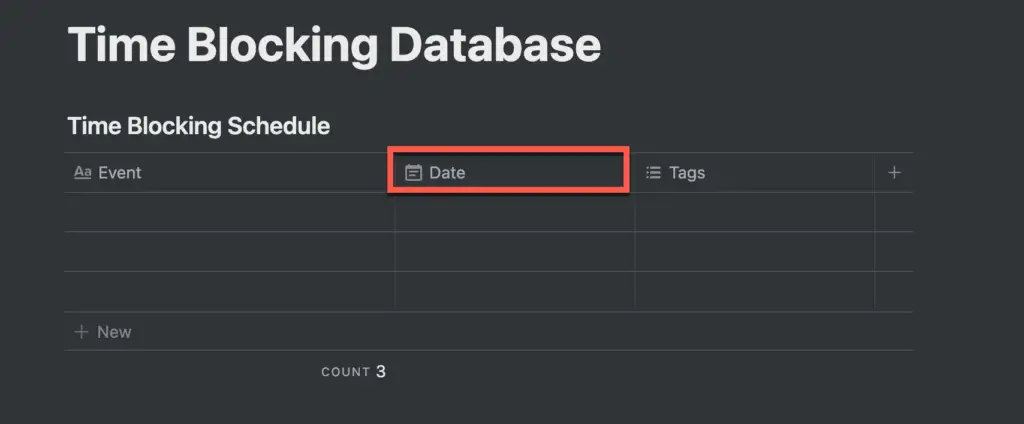
Your date column should be ready to go as shown in the screenshot above.
Add Task Entries to your Time Blocking Table
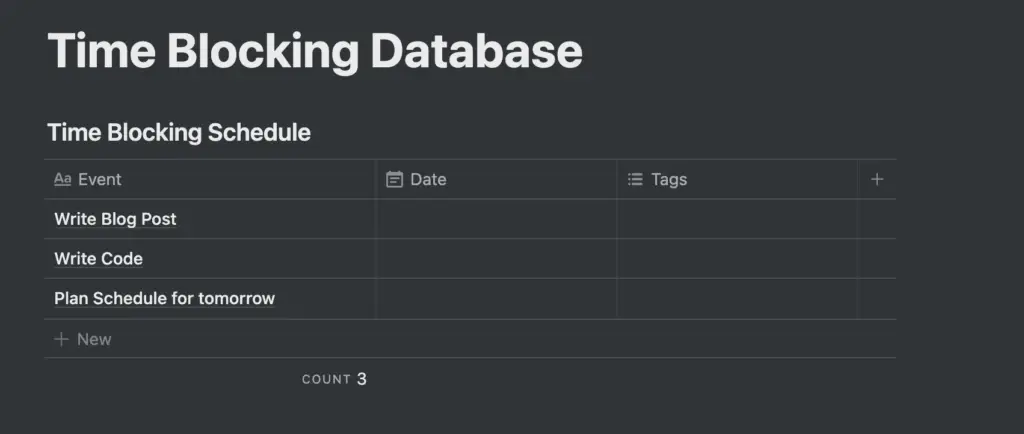
Our table is ready for some tasks! To add a task, simply:
- Click in an empty cell underneath the “Event” column
- Type in the name of your task
Repeat this process until all the tasks you want in the table are there.
Adding Dates and Length of Time to our Tasks in Our Time Blocking Database
Once you have all your tasks entered into the table, the next step is to add dates and the length of time (i.e. time block) for working on each task.
Here’s how to assign dates and length of time to complete our tasks to our tasks:
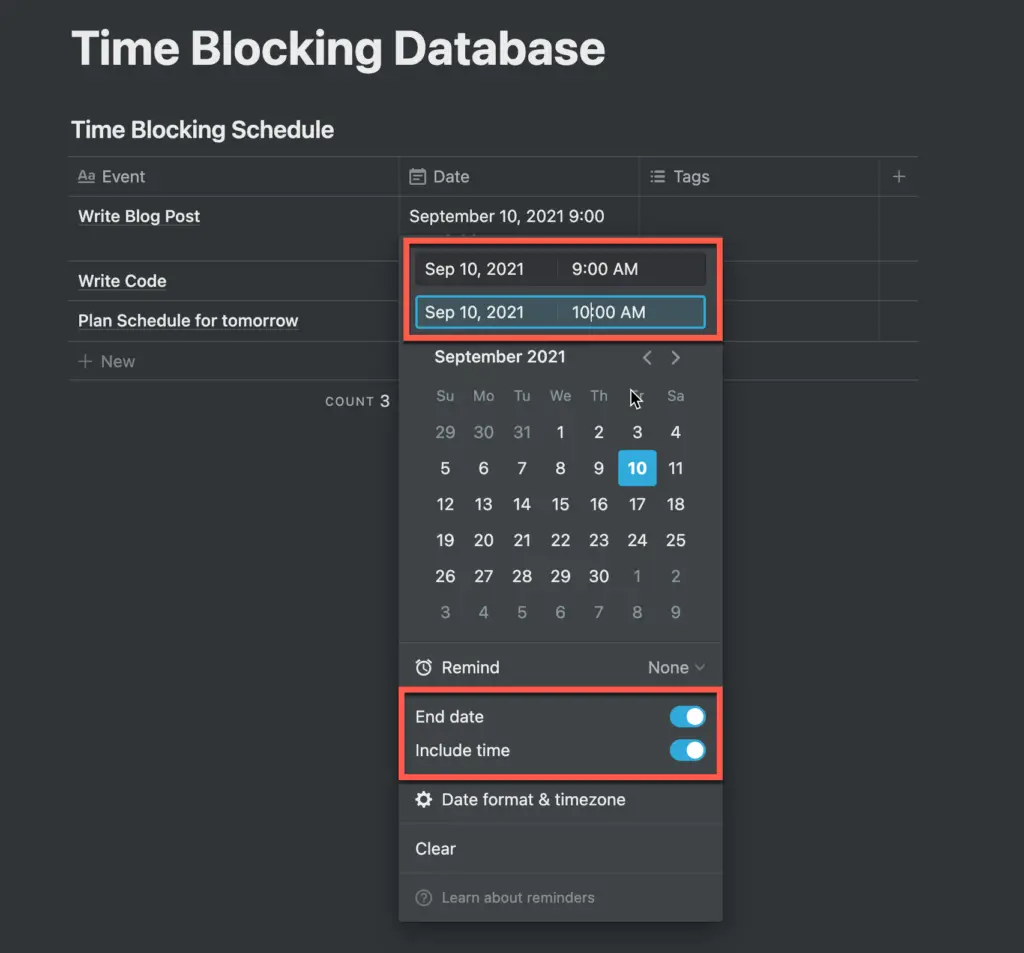
- Click in the “Date” cell for the task you want to add a time block to
- In the calendar menu, click on the date you want to do this task
- Next, toggle on the “End time” and “Include time options
- At the top of the calendar menu, enter start and end times as shown in the screenshot above
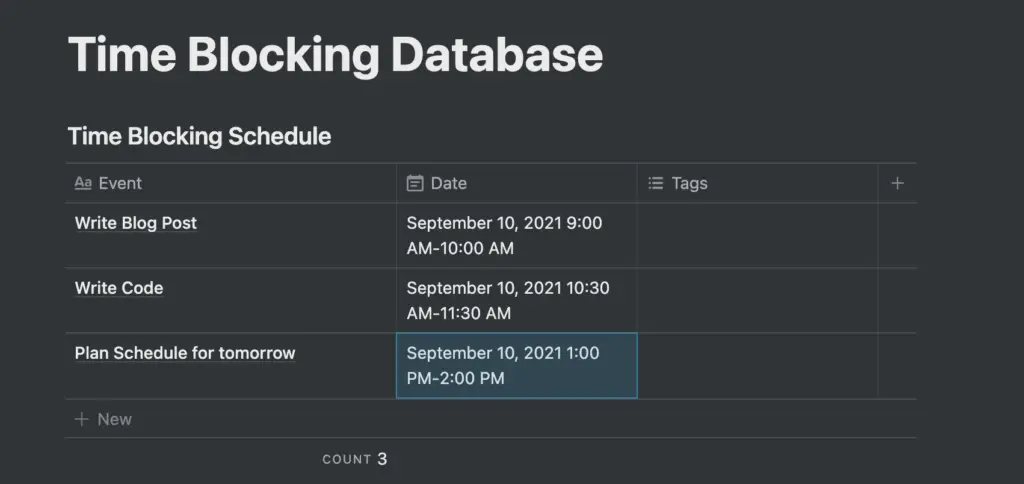
Your task(s) should now have time blocks assigned to them. Next, we should create a calendar view using a linked database.
Create a Linked Database Calendar View of Your Time Blocking Database
Linked databases allow you to create custom views of your existing databases. For our purposes, we will create a custom Calendar view of our time
Here’s how you create a custom calendar view of your time blocking table:
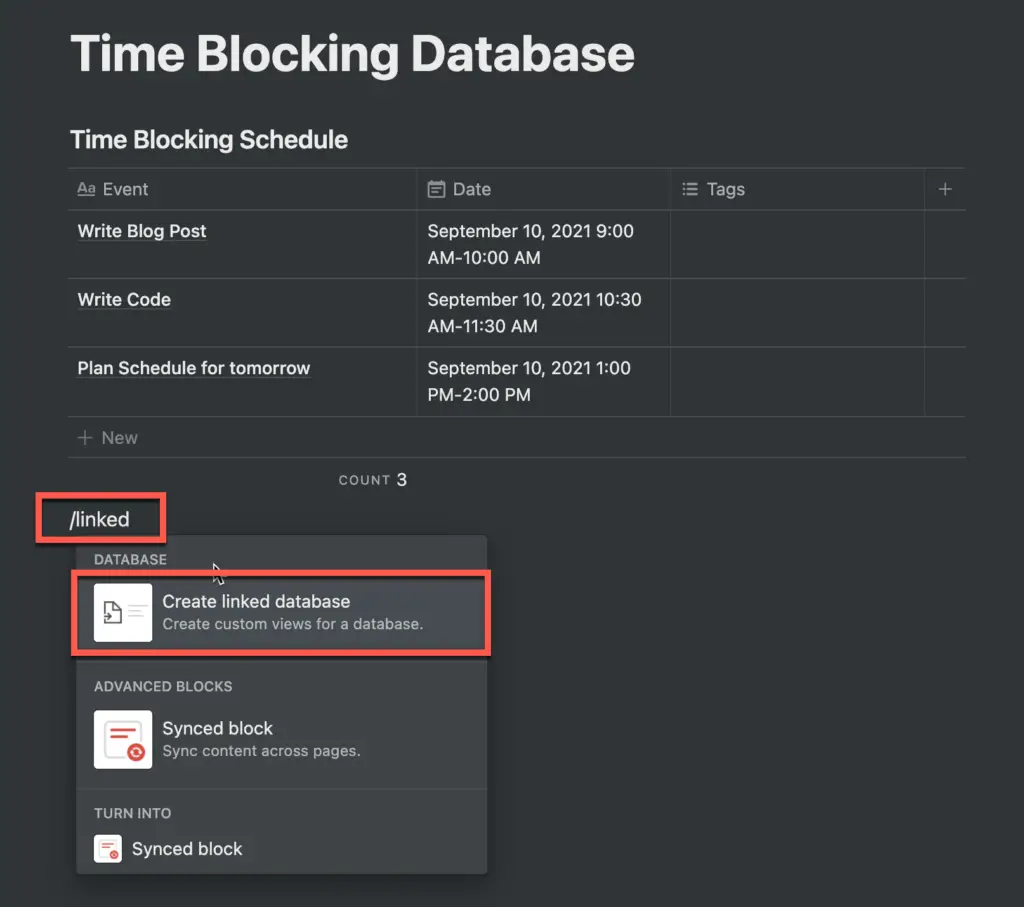
- Click where you want your custom calendar view to appear (doesn’t have to be on the same page as your time blocking database)
- Type “/linked” to bring up the blocks menu filtered for linked
- Select “Create linked database” from the available options as shown in the screenshot above
- Start typing in the name of your table and select it from the available options as shown in the screenshot above
Your linked database should appear. For more information on how to master linked databases, check out my detailed guide to using linked databases.
Now we need to change it to a calendar view.
If you are interested in learning how to implement a Zettelkasten system in Notion, check out our Complete Guide to Zettelkasten in Notion.
Add a Calendar View to Your Linked Database
Let’s add a calendar view to our linked database.
Here’s how you add a calendar view to a linked database:
- Hover your mouse over your linked database
- Click on the “Add a view” button as shown in the screenshot above
- Give your view a name by clicking in the text box and then select “Calendar” from the available options
- Click the “Create” button to create your calendar view
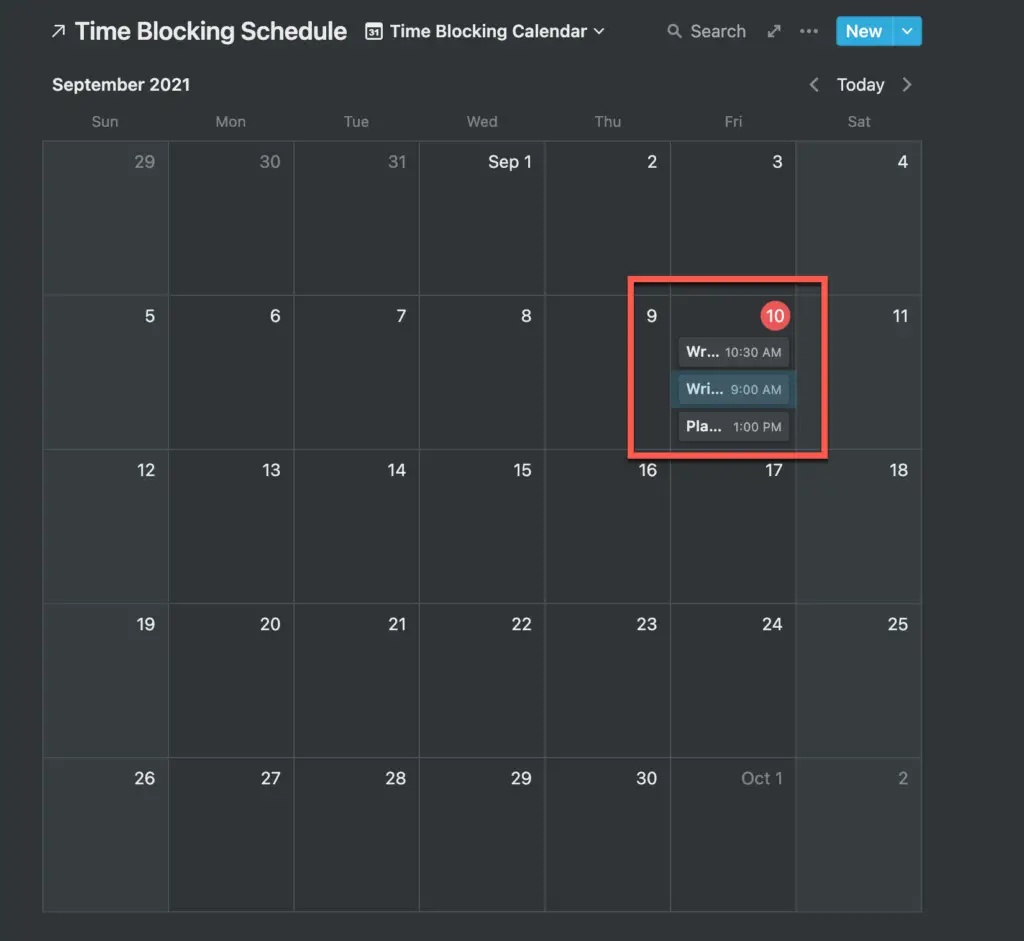
Your calendar view should appear on your page. However, your time blocks may be out of chronological (time) order.
Let’s fix that!
Sort Your Tasks By Time
Here’s how you sort your daily tasks by time in chronological order:
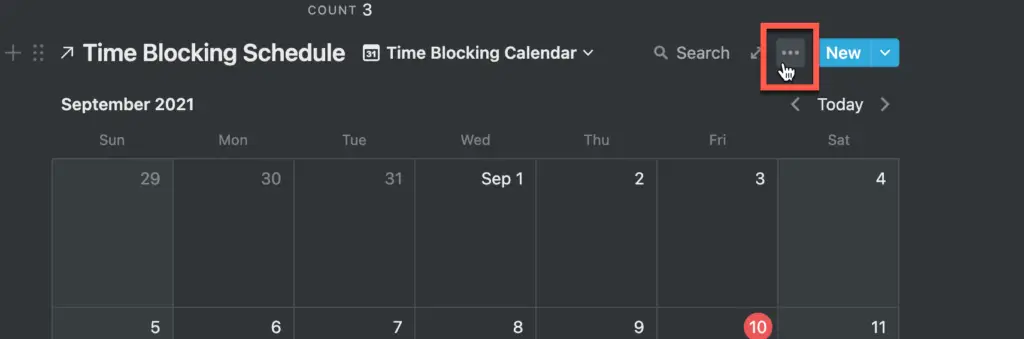
- Hover over your calendar view and click on the ellipsis (…) button
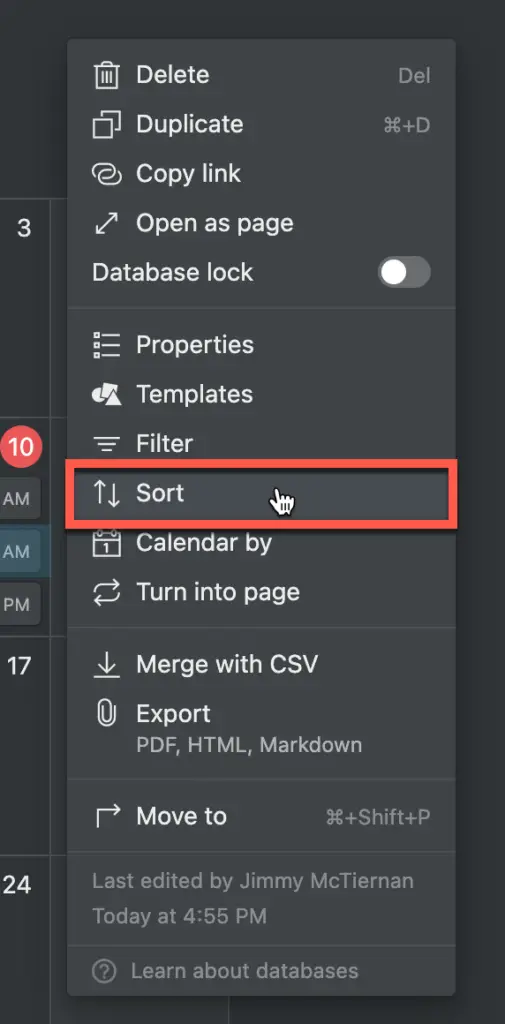
- From the menu, select “Sort” as shown above
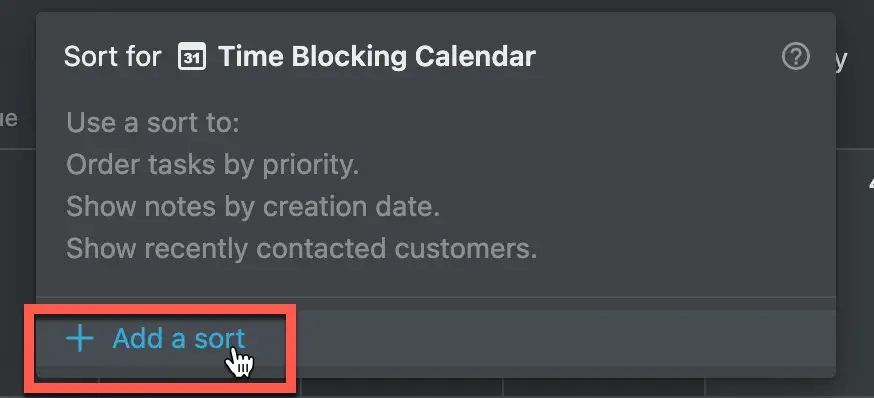
- Click the “Add a sort” button to bring up the sorting options dialog box
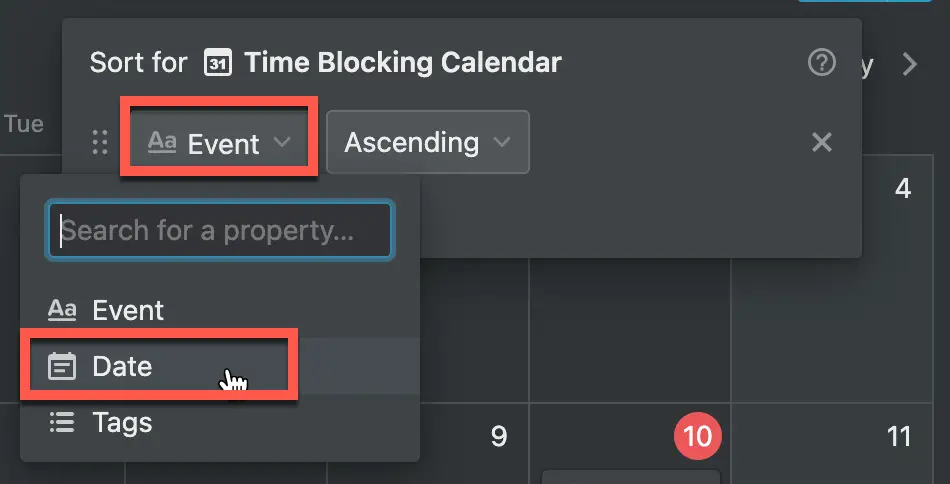
- Click on the “Event” dropdown and select your “Date” option as shown above.
Make sure that the sort is “Ascending” to ensure that your tasks are sorted earliest to latest.
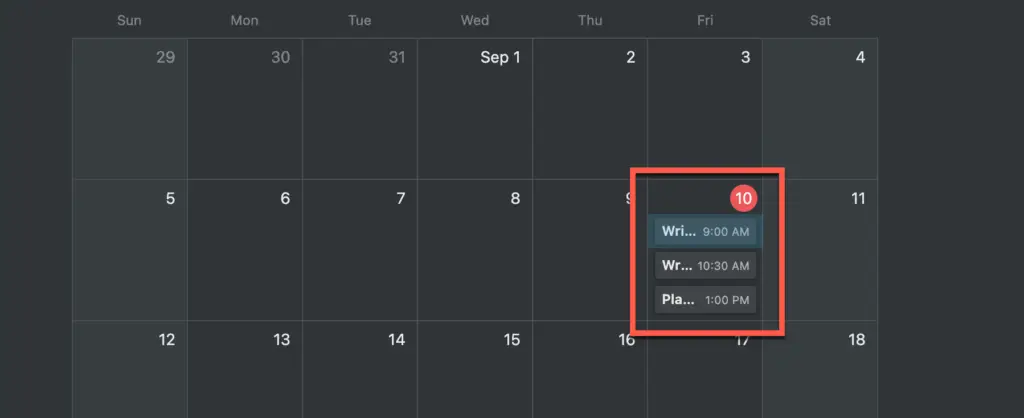
Your tasks should now appear in chronological order.
What is the Optimal Time Block Length?
For the time blocking to be effective, it’s helpful to keep each “block” short. The brevity of the activity reduces the chance of you getting distracted.
Your attention span should dictate this. Research shows that we can only focus on a single task for 52 minutes, and then we tend to get distracted. However, this can vary from person to person, with some staying productive for more extended periods.
An easy way to figure out your most suitable task length is to time yourself during work.
- Start a stopwatch when you begin an intensive task and continue working until you feel your own productivity dropping or when you feel like you really need a break.
- Stop the timer when you hit this point. This is your optimum task duration. You should roughly match your time blocks to this duration.
The Pomodoro technique developed by Francesco Cirillo in the late 1980s suggests that these task lengths should be at 25 minutes with a 20–30-minute break every four tasks.
For more information on how to use the Pomodoro Technique, check out our guide to the Pomodoro Technique.
If you are looking to learn on the go, Audible is for you. Audible has a huge library of audiobooks on a variety of topics and listening to audiobooks is a great way to learn on the go. Audible includes podcasts and Audible Originals as well. For more information on Audible, click the link below to get your first 30 days on Audible for free:
Audible – Your First Audiobook is On Us
Who should use Time Blocking?
Time Blocking is perfect for people who:
- Have to handle multiple responsibilities in which they struggle to complete all their tasks needed in a given day or week.
- Struggle with common and random distractions like co-workers or dealing with emails or phone calls during the day
Students can take advantage of time blocking to make sure their revision and study time is best utilized to cover all their subjects, courses, or modules.
As time blocking can help you feel less overwhelmed with work, not only does it better balance your work-life but also reduces the stress and burden that occupies your day even when you aren’t working.
President Benjamin Franklin was one of time blocking’s early adopters, using the process not only to manage his work but also to set out his personal & leisure time. Another famous advocate for the method is Twitter CEO Jack Dorsey.