How to Use TickTick for MacOS Guide
TickTick is a task manager service. TickTick is cross-platform and is supported on all the major platforms (Android, iOS, MacOS, Windows and Web). It contains all of the features you would expect out of a task manager plus a couple that you don’t typically see but are welcome additions.
This guide will teach you how to use TickTick step-by-step with screenshots showing you exactly how to get the most out of TickTick. Enclosed below is a list of the things we will cover in this guide:
- Creating Tasks in TickTick
- Managing Tasks in TickTick
- Adding Attachments to a TickTick Task
- Using Reminders in TickTick
- Using Tags in TickTick
- The Inbox
- Lists
- List Folders
- TickTick Themes
- TickTick Pricing
- TickTick Premium Features
Before we get started with the tutorial, if you are looking to learn more about apps like Notion, Todoist, Evernote, Google Docs, or just how to be more productive (like Keep Productive’s awesome Notion course), you should really check out SkillShare. Skillshare is an online learning platform with courses on pretty much anything you want to learn. To learn more about Skillshare and its vast library of courses and get 30% off, click the link below:
SkillShare – Online Learning Platform
Protect your Mac from malware, phishing and viruses with Norton 360. Norton 360 is the end-to-end software solution to protect your Mac from threats. For more information, click the link below:
Norton – Multiple layers of protection for your Cyber Safety
If you are looking to keep your mac running at it’s best, check out CleanMyMac X by MacPaw. I have been using CleanMyMac for years it keeps my Mac running optimally by:

- Removing unnecessary files and junk from my mac
- Running optimizations to improve performance
- Easy to use app uninstaller to remove apps cleanly
- Malware removal
For more information on CleanMyMac X, click the link below:
CleanMyMac X – The Ultimate Cleaner for Your Mac
How to Create a Task in TickTick
Creating a task in TickTick is easy. To create a task in TickTick, do the following:
- Open TickTick
- Either go to File -> Add Task or use keyboard shortcut Command N
- Type in the task in the text box and press Enter
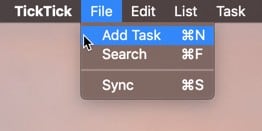
This will create the task.
How to Add a Due Date to a Task in TickTick
Once you have you task created, you likely will want to assign a due date to it. There are a couple of ways to assign a date to a task.
Assigning a Date to a Task using Main Menu Options or Keyboard Shortcuts

In the TickTick main menu under Task, there are the following due date options:
- Set Today (keyboard shortcut Command 1)
- Set Tomorrow (keyboard shortcut Command 2)
- Set Next Week (keyboard shortcut Command 3)
To assign a date to your task using the main menu, do the following:
- Select your Task
- Go to Task -> and select one of the options listed
Conversely, you could also simply use the keyboard shortcut for the dates by simply selecting the date and entering the respective keyboard shortcut. For example, if you wanted to set the due date for your task to tomorrow, you would select the task and press Command 2.
Assigning a Date to a Task using Due Date button
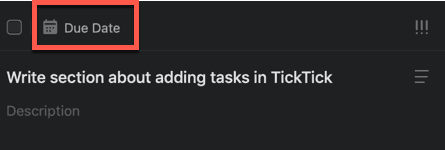
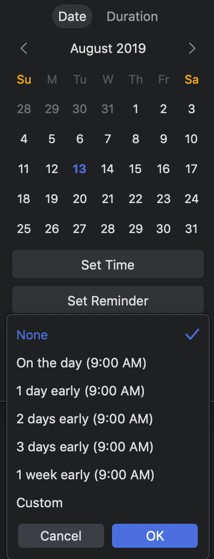
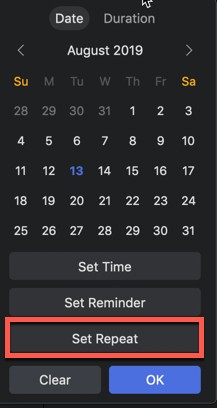
If you want to assign a custom due date, you will need to use the “in task” due date button. To set the due date, do the following:
- Select your Task
- Click the Due Date button
- Select the date you want and click Ok to save it to the task
Assigning a Date to a Task using Right-Click
You can also select the date for your task by right-clicking on it. Simply right-click on the task and select one of the following options:
- Today (Sun icon)
- Tomorrow (Sun with Arrow on Top icon)
- Next Week (Calendar icon with +7 on it)
- Custom (Calendar icon)
Selecting today, tomorrow or next week adds the respective day to the task. Choosing Custom brings up the custom display dialog where you can set the day you want the due date to be.
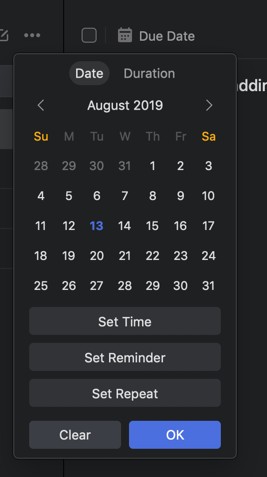
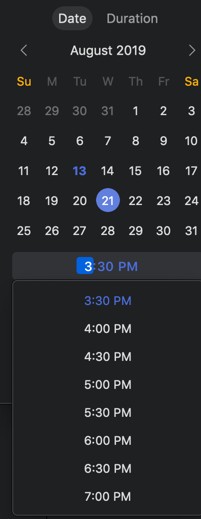
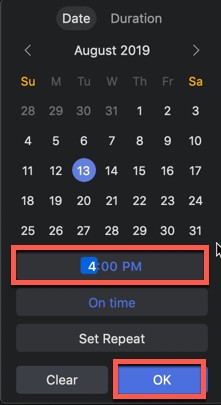
Setting a Time that Your Task is Due in TickTick
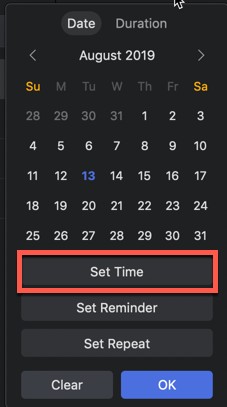
In addition to setting a due date, you can also set a specific time on that day that the task is due to be completed. To set a due time for your task, do the following:
- Select your Task
- Click the Due Date button
- Select the date you want
- Click Set Time button
- A drop-down menu will appear with a list of times. Select the time you want and click Ok
How to Add a Reminder to a Task in TickTick
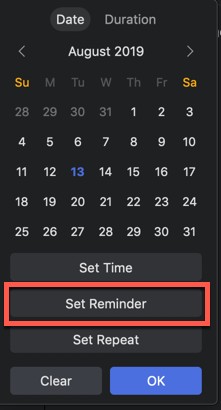
You can also set a reminder for your task. There are a handful of preset options and a custom reminder option. Enclosed below is a list of the reminder options:
- On the day (9:00 am)
- 1 day early (9:00 am)
- 2 days early (9:00 am)
- 3 days early (9:00 am)
- 1 week early (9:00 am)
- Custom
To set a reminder for your task in TickTick using a preset reminder date, do the following:
- Select your Task
- Click the Due Date button
- Select the date you want
- Click the Set Reminder button
- Select one of the presets and click Ok
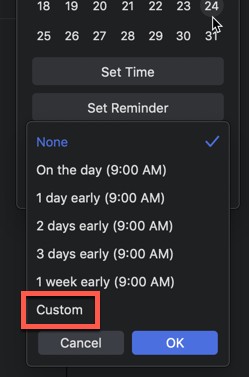
If you want to set a custom reminder date, do the following:
- Select your Task
- Click the Due Date button
- Select the date you want
- Click the Set Reminder button
- Click on Custom
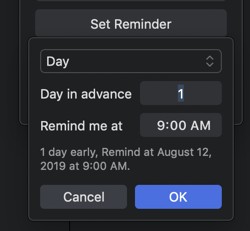
When you select Custom, a drop-down window will appear that will have the following:
- A drop-down selector that allows you to pick either Day or Week
- A Days in advance section that lets you pick how many days in advance you want to be reminded
- A Remind me at section that lets you pick a specific time to be reminded
For example, let’s say I want to be reminded 4 days before my task is due at 11:00 am. That setup would look like the screenshot below:
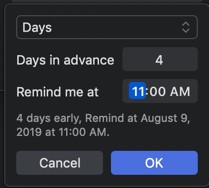
Once you have set your custom reminder, click Ok to save it to the task.
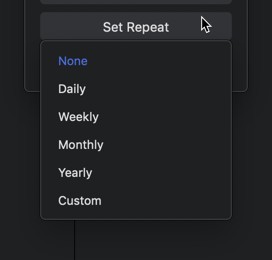
How to Set a Repeating Task in TickTick
TickTick supports repeating tasks. TickTick offers the following repeating options:
- None
- Daily
- Weekly
- Monthly
- Yearly
- Custom
To set a task to repeat in TickTick using a preset, do the following:
- Select your Task
- Click the Due Date button
- Click on Set Repeat button
- Select the preset and click Ok
If you want to set a custom repeat schedule for your task, do the following:
- Select your Task
- Click the Due Date button
- Click on Set Repeat button
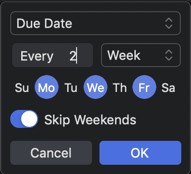
The custom window will appear and it contains the following configurable options:
- Drop-down selector that allows you to pick either the Due Date or the Completion Date
- A frequency selector option that allows you to pick the frequency (i.e. a number) and the interval (day, week, month) your task will repeat
- A day of week selector for which day(s) of the week your task will repeat
For example, if I wanted to have my task repeat on Monday, Wednesday and Friday every 2 weeks, I would set it up like the screenshot below:
Once you have set your repeating task interval, click Ok to save it to your task.
Using Smart Dates in TickTick
TickTick understands date context. This means that you can type the following in the task text box:
August 30 4pm

And TickTick will understand that you mean August 30th at 4pm. To set a smart date simply type your task, hit space then type the date in the following format:
MONTH DAY TIME[AM/PM]
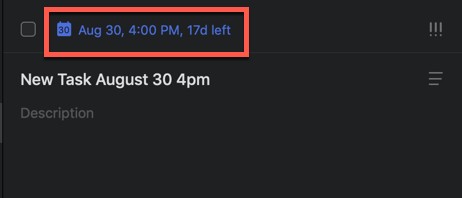
Examples include March 1 1pm, February 12 10am, etc.
Do you have an M1 Mac Mini or Mac Studio and want to get the best accessories for it? Check out my Mac accessories guide here.
How to Set a Task’s Priority in TickTick
TickTick is very flexible and allows you to assign a priority to each of your tasks. There are four levels of priority in TickTick:
- No priority
- Low priority
- Medium priority
- High priority
There are four different ways you can set the priority of a task.
Setting the Priority of a Task via Main Menu Selection
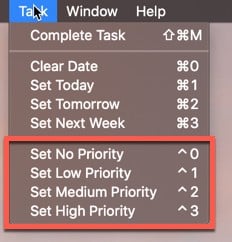
To set the priority of a task from the main menu, do the following:
- Select your Task
- Go to Task and select the priority level
Setting the Priority of a Task using Keyboard Shortcuts
The keyboard shortcuts for setting the priority of a task are listed in the table below:
| Priority | Keyboard Shortcut |
|---|---|
| No Priority | Control 0 |
| Low Priority | Control 1 |
| Medium Priority | Control 2 |
| High Priority | Control 3 |
Setting the priority using keyboard shortcuts is as easy as selecting the task and inputting the keyboard shortcut. To set a task to high priority I would click on the task to select it and press Control 3.
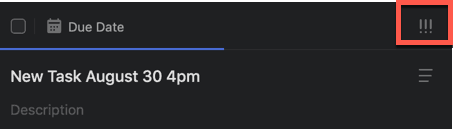
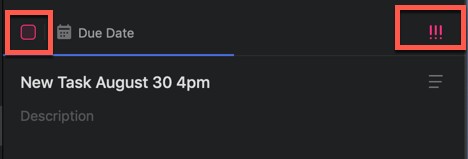
Setting the Priority of a Task using the Priority Button
You can also set the priority of the task inside the task itself. To set the priority of a task, do the following:
- Select your Task
- Click on the !!! button in the task panel
- Select the priority you want
Your task should now have a color assigned to the priority button and to the task checkbox as seen below:
Setting the Priority of a Task via Right-Click
You can also simply right-click on the task and select the priority. The priorities are represented in the pop-up dialog box in the following way:
- High Priority – Three Pink Exclamation Points
- Medium Priority – Two Yellow Exclamation Points
- Low Priority – One Blue Exclamation Point
- No Priority – Three Gray Exclamation Points
Click on the priority you want and it will populate the task appropriately.
How to Add a Tag to a Task in TickTick
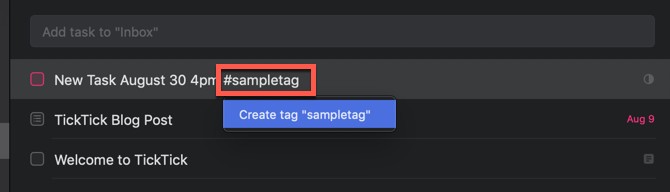
Tags are pieces of metadata you can attach to your tasks that can make your tasks more sortable and searchable. To add a tag to a task, do the following:
- Select your Task
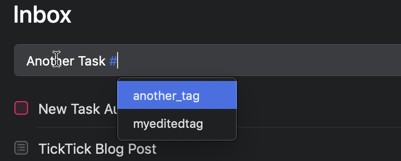
- In the task text box, type the hashtag symbol # and the name of your tag
- A dialog will appear below your potential tag Create tag “[TAGNAME]”. Click it to create your tag.

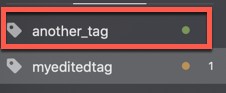
In the left panel, there is a Tags section. Click on Tags and you should see your new tag. You can edit your tag to either change the name of the tag or to assign the tag a color. To edit your tag, do the following:
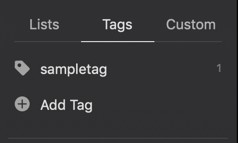
- In the left panel, click on Tags
- Right-click on the tag you want to edit and select Edit
- A pop-up dialog will appear where you can edit the name of the tag and/or assign the tag a color. Edit your tag and press Save

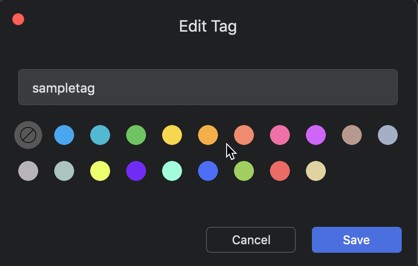
TickTick will make the changes to your tag and to any tasks that have that tag.

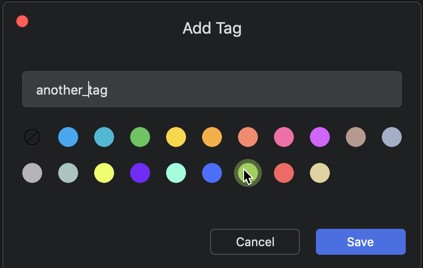
If you want to create a tag before adding it to a task, do the following:
- In the left panel, click on Tags
- Click on Add Tag button
- In the pop-up dialog, type in the name of your tag and assign a color (optional) and click Save
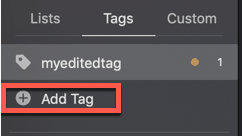
Your tag will now be saved in the Tags section in the left panel. To assign your new tag to a task, click on the task. Type the # and a pop-up list of tags should appear including the one you just created. Select it and it will be assigned to your task.

Adding an Attachment to a Task in TickTick
You can upload a file attachment to your task in TickTick. To upload a file attachment to your task, do the following:
- Select your Task
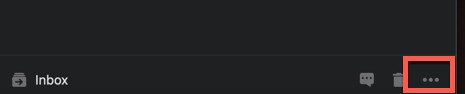
- In the right hand task panel, click on the ellipsis … button on the bottom right corner of the TickTick window
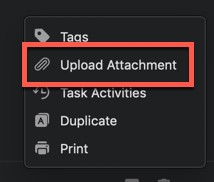
- Select Upload Attachment from the pop-up menu dialog
- A file browser dialog box will appear. Navigate to the file you want to upload. Select it and click Open
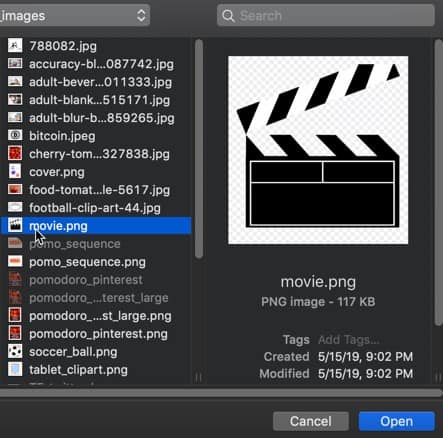

Your file will now be attached to the task.
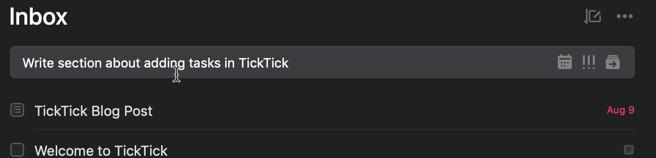
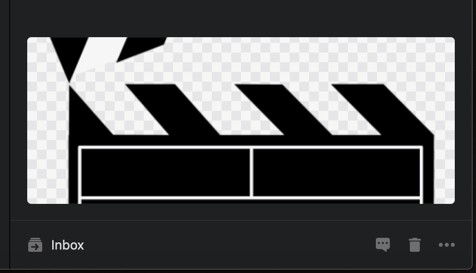
The TickTick Inbox
The TickTick inbox is essentially the default list of TickTick. When you create a task in TickTick that is not assigned to a list, it will show up in the inbox. Think of the inbox as a catch-all bucket for your tasks.
Using Lists in TickTick
Lists in TickTick are a grouping of related tasks.
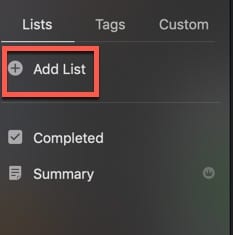
Creating a List in TickTick
To create a list in TickTick, do the following:
- In the left panel, click on Lists
- Click Add List
- A pop-up dialog will appear. Enter the name of the list.
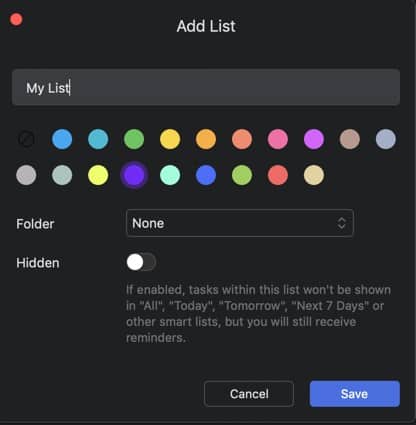

There are a couple of options you can configure for your list. The first is you can assign a color to the list. You can also assign the list to a folder (we will cover folders later in this blog post) and you can set your list not to appear in smart lists (we will cover these as well later).
Make your selections and press “Save” to save your list.
Using List Folders in TickTick
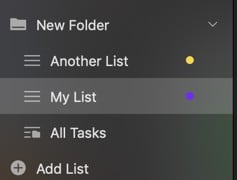
List Folders allow you to group lists together. This makes sense if the lists are related to a larger project, as an example. To create a list folder, do the following:
- In the left panel, click on Lists
- Drag one of your lists onto another list and release the mouse button
- You should see your two lists under a folder.
- Type in the name of your folder in the folder text box and press Enter
Pomo Timer
Perhaps the most unique feature of TickTick is the pomodoro timer functionality. TickTick has a fully customizable pomodoro timer system built into TickTick and it is available for free users. TickTick calls this functionality Pomo Timer and you need to enable it in settings.
To enable the Pomo Timer functionality, do the following:
- Go to TickTick -> Preferences and click on the Pomo tab
- Click the Enable Pomo Timer toggle button to enable the functionality
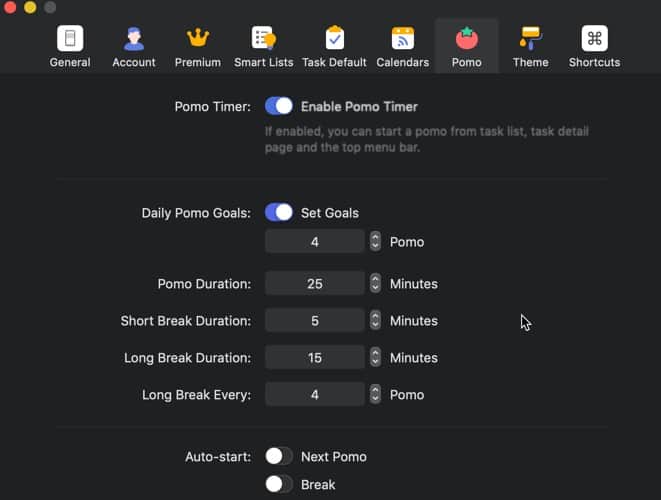
As I mentioned earlier, you can customize how your Pomo Timer works including:
- Setting how many Pomos you want to do per day
- How many minutes per Pomo (25 is the default)
- How long should your short and long breaks be?
- How often should you have a long break?
- Whether the next Pomo and your breaks auto-start
If you don’t know much about how the Pomodoro Technique works, check out our blog post on the Pomodoro Technique at the link below:
link to Pomodoro Technique blog post
How to Use the Pomo Timer in a Task
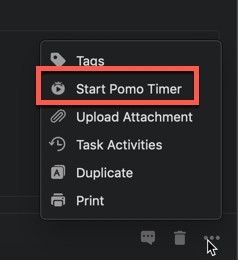
There are two ways to start the Pomo Timer for a task:
- Right-Clicking the task and selecting Start Pomo Timer
- Clicking the ellipsis … button in the bottom-right corner of window and selecting Start Pomo Time
Once you start the Pomo Timer, the Pomo Timer will start in the top menu bar. To view it simply click the icon and a pop-up display will appear with the timer and an Exit button as shown below:
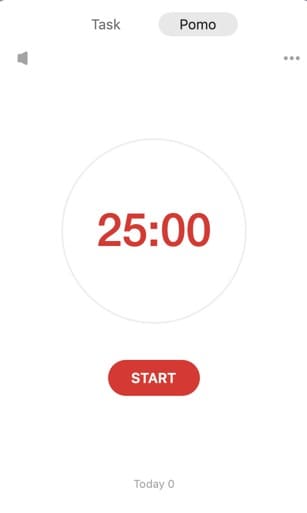
As the timer runs, the border of the circle icon starts to fill. To stop the timer, either right-click on the menu icon and select Exit or click on the icon and click the Exit button in the pop-up display.
TickTick Themes
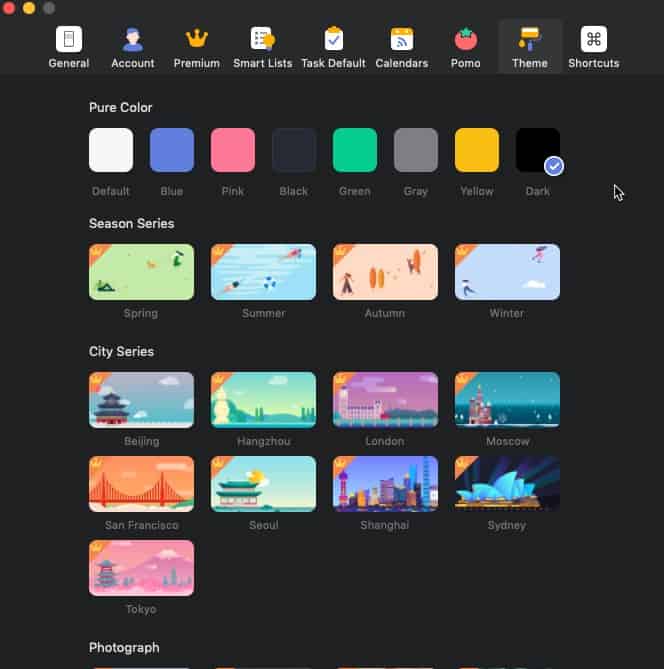
One of the cool features of TickTick are the themes. With the free version of TickTick, you can pick from the following background colors:
- White (default)
- Blue
- Pink
- Black
- Green
- Gray
- Yellow
- Dark (aka Dark Mode)
If you sign up from a premium subscription to TickTick, you get access to 18 other themes based on the following categories:
- Season Series
- City Series
- Photograph
To access the themes, go to TickTick -> Preferences and click on the Theme tab.
TickTick Pricing
TickTick, like many services, runs on a “Freemium” model where some of the features are included in the free account while the advanced features are part of the paid subscription. TickTick Premium is the paid account and costs the following:
$2.99 US per month or $27.99 US per year
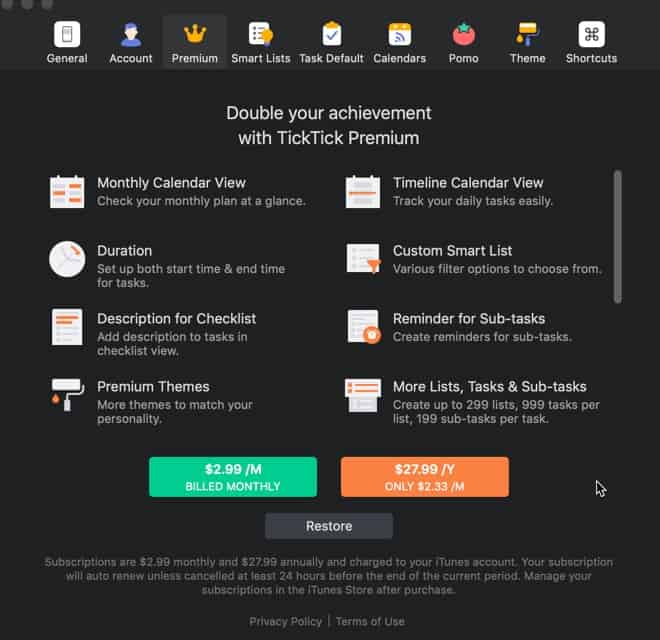
TickTick Premium Features
TickTick has an impressive list of features in its Premium offering. Enclosed below is a list of feature available in the Premium subscription:
- Monthly Calendar View
- Time Duration
- Descriptions for Checklists
- Premium Themes
- Timeline Calendar View
- Custom Smart List
- Reminder for Sub-tasks
- Expanded capacities for Lists, Tasks, Sub-tasks and Attachments
- Windows client
- Summary view
- Estimated Pomos
- Historical Statistics for Tasks
- Change History of Tasks
- Duplicate List
- Filters
Let’s take a look at one of the key premium features: Smart Lists and Filters.
Smart Lists and Filters
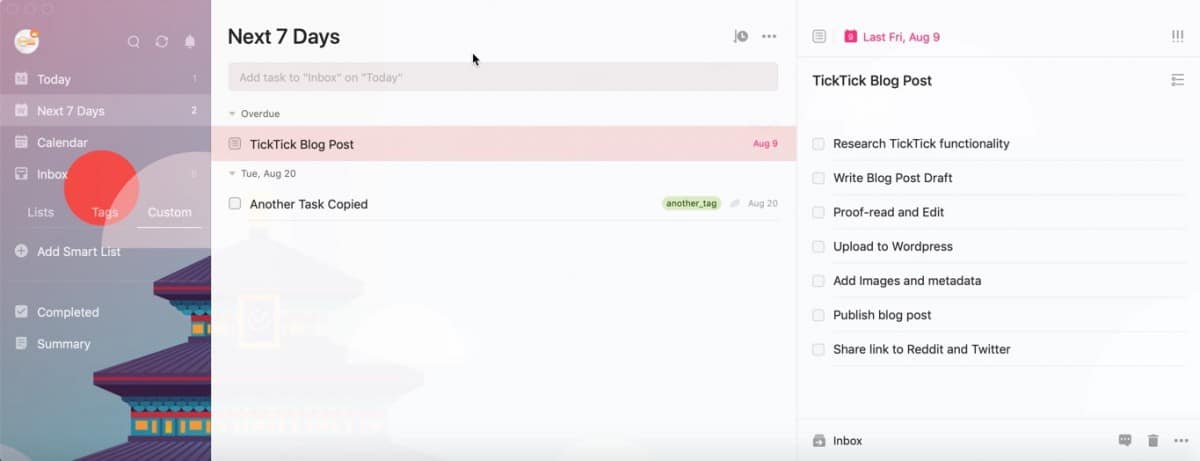
Smart Lists are essentially saved searches. They allow you to define search criteria to parse your tasks and lists. To use a smart list, do the following:
- In the left panel, click on the Custom tab
- Click Add Smart List
- A pop-up window should appear. Type in the name of your smart list in the text box
The pop-up window that has two tabs:
- Normal
- Advanced
The normal tab contains the following filter criteria:
- Lists – Allows you to select a list or lists to include in your filter
- Tags – Allows you to select a tag or tags to include in your filter
- Dates – Allows you to select one or more dates to include in your filter
- Priority – Allows you to select one or more priorities to include in your filter
- Assignee – Allows you to use the assigned person(s) in your filter
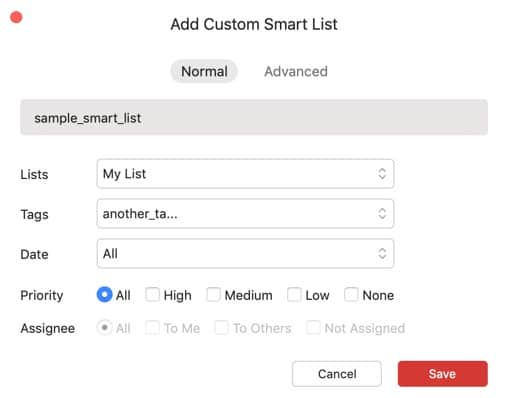
For example, you could create a filter like the one below:
The advanced tab is a little more, well, advanced. Creating a smart list filter in the advanced tab is more flexible. To create a smart list in the advanced tab, do the following:
- In the left panel, click on the Custom tab
- Click Add Smart List
- Click on the Advanced tab
- Type in the name of your smart list in the text box
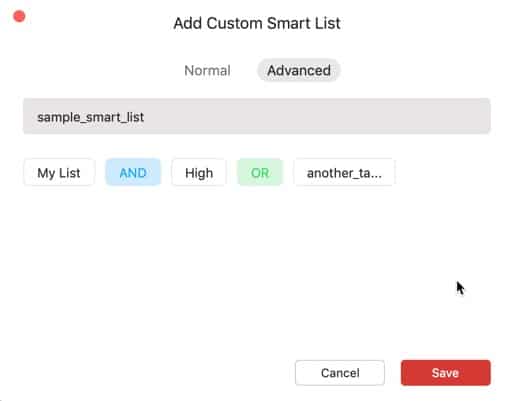
The advanced tab offers filters and logic. Filters contain the following:
- Lists
- Date
- Tags
- Priority
Logic uses the conditional statements AND/OR. So, for example, you could create a filter that selected the highest priority tasks from a selected group of lists.
Summary
TickTick is a very flexible, feature-rich task management service. It’s cross-platform availability and good free option allows users to start with the service effectively. The premium option offers a nice list of features, especially smart lists and filters, that allow power users to leverage the service.
How about over 150 Mac Apps for less than $10 a month?
Setapp is the service for you. It offers access to over 150 of the best Mac applications out there for only $9.99 per month. This is a steal given some of the great applications in the Setapp service. Some of my personal favorite apps offered by the service include the following:
- CleanMyMac X
- PDFpen
- Ulysses
- MindNode
- 2Do
- BetterTouchTool
- BusyCal
- DropZone
- Marked
- MarsEdit
- RapidWeaver
- Gemini
- iStatMenus
- Screens
- Bartender
If you were to buy two or more of these apps, Setapp pays for itself. Plus you don’t have to worry about buying upgrades when you are subscribed to Setapp. You get the upgrades as part of the monthly subscription price. You can install and use as many of the apps as you want and you just pay $9.99/month. If any of the applications in the list above appeal to you, you really should try Setapp out. Go to the link below to get started:
Want More Tips and Tricks? Subscribe to our Newsletter!
If you haven’t already subscribed, please subscribe to The Productive Engineer newsletter. It is filled with tips and tricks on how to get the most out of the productivity apps you use everyday. We hate spam as much as you do and promise only to send you stuff we think will help you get things done.
Check Out Our YouTube Channel!
We have a YouTube channel now and we are working hard to fill it with tips, tricks, how-tos and tutorials. Click the link below to check it out!
Check out our Resources page
Check out our resources page for the products and services we use everyday to get things done or make our lives a little easier at the link below:
Helpful Links
link to TickTick Guide on TickTick website
link to How to Upgrade to TickTick Premium
Other Articles You Might Be Interested In
The Pomodoro Technique – Why the Pomodoro Technique Works
link to Pomodoro Technique blog post
How to Use Things for Mac
link to How to Use Things for Mac
How to Create a Template in Todoist Guide
link to How to Create a Template in Todoist Guide
How to Organize Todoist Guide
link to How to Organize Todoist Guide