How to use Zettelkasten in Notion – A Complete Guide
Zettelkasten is a powerful note-taking and personal knowledge management method for those looking to master their productivity. Notion can help enable you to use Zettelkasten digitally. This tutorial will teach you how to set up a Zettelkasten system in Notion.
What is the Zettelkasten Method?
Zettelkasten is German for ‘box of cards’ and focuses on the connections between ideas. In a Zettelkasten, notes have tags that describe the key aspects of that piece of information, and they may reference other notes in the slip box.
This method was popularised by the German sociologist Niklas Luhmann who used his Zettelkasten to pen nearly 400 academic articles and more than 70 books over his lifetime, covering law, economy, politics, art, religion, ecology, mass media, and love. His secret to navigating his vast web of personal knowledge was the use of his Zettelkasten.
This method aims to prevent ideas from becoming isolated. Think of how you would structure class notes in folders. The traditional process of creating folders for each class or subject leads to information being locked away as the index is arbitrary instead of ideas being connected naturally.
How does Zettelkasten Work?
Luhmann’s method consisted of creating two slip boxes:
- Reference Box
- Main Box
The reference box is for reference detail and brief notes about the content and information you’re trying to lock away. The main box is where you can explore these short ideas more, make arguments, and establish links between individual ideas.
When you come across new information in reading, use an index card to take literature notes. If you come across information you’d like to remember, write this down in your own words in 2-3 sentences. Reference notes consist of grouping information, organizing ideas into categories, and creating tags so you can find linked ideas later.
The main box is the home of the permanent notes. To create effective permanent notes, you must consider literature and reference notes and assess how they are linked together, informed by your thinking and research. These notes aim to add value to existing notes by creating arguments and providing analysis and thoughts to your knowledge.
If you are looking for a deep-dive on Zettlekasten, check out our Complete Guide to Zettelkasten.
As referenced earlier, there are two types of slip boxes in Zettelkasten:
- Reference box
- Main box
There are several ways to attempt to replicate these boxes in Notion, but we will show you two different ways:
- Zettelkasten System using Backlinks
- Zettelkasten System using Relations
Creating a Zettelkasten System in Notion using Backlinks
Enclosed below are the steps required to implement a Zettelkasten system in Notion using backlinks:
Create a New Page in Notion
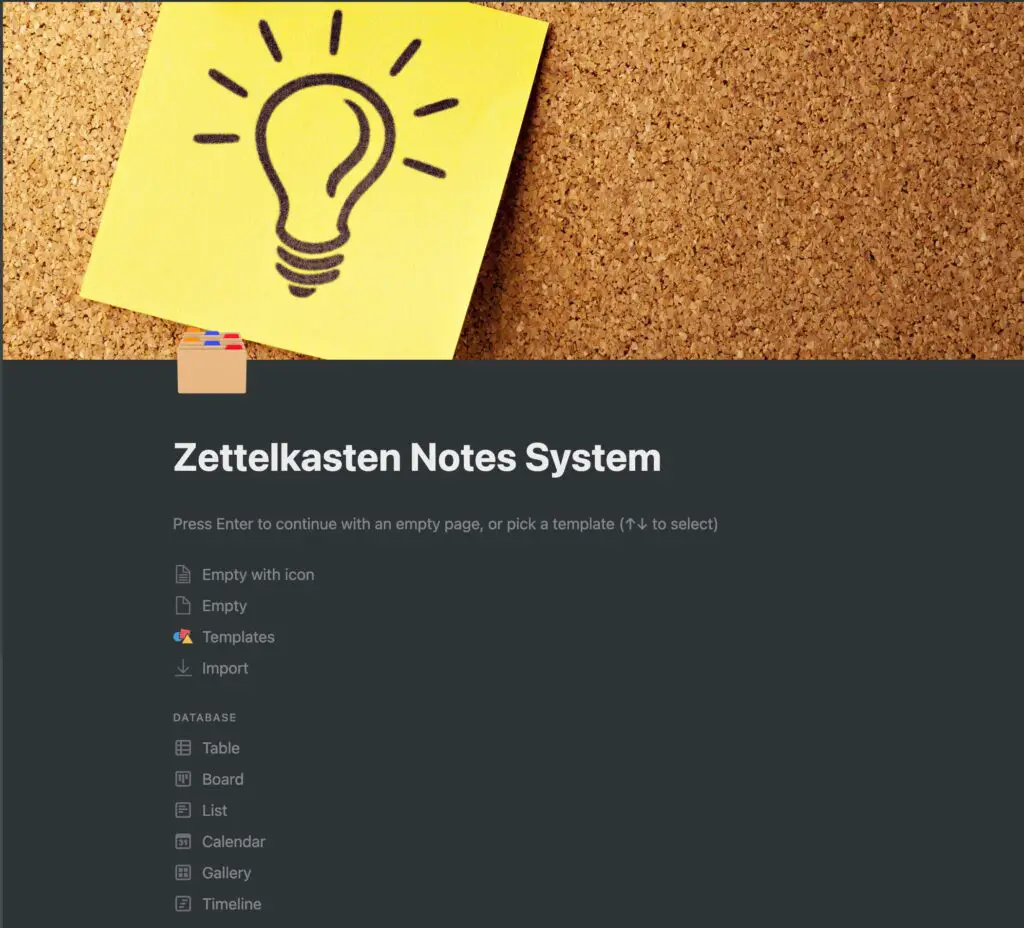
Open up Notion and create a new page to hold the Zettelkasten system we are going to setup. Feel free to get creative with an icon and cover image!
Create a Table to Hold our Notes
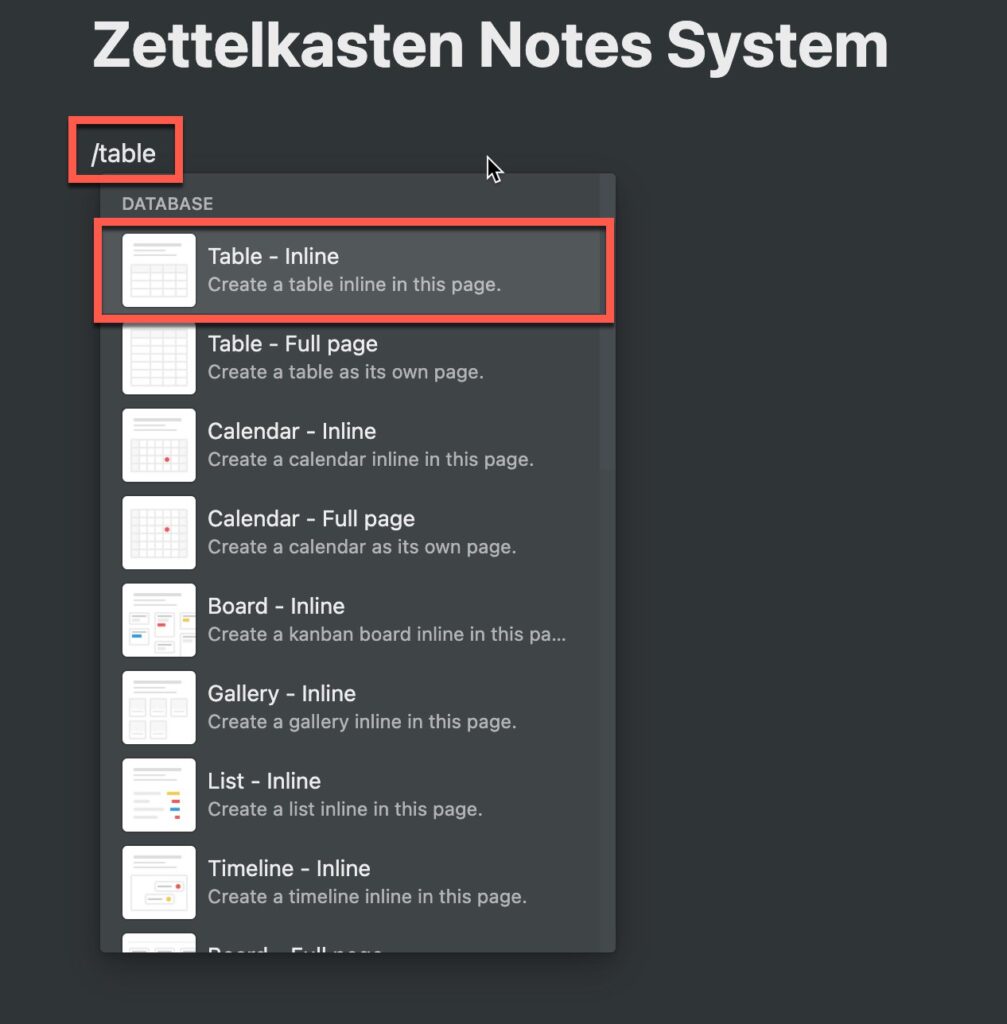
Create a new table to hold our notes by clicking in the body of the page and typing “/table“. Select “Table – Inline” from the available options.
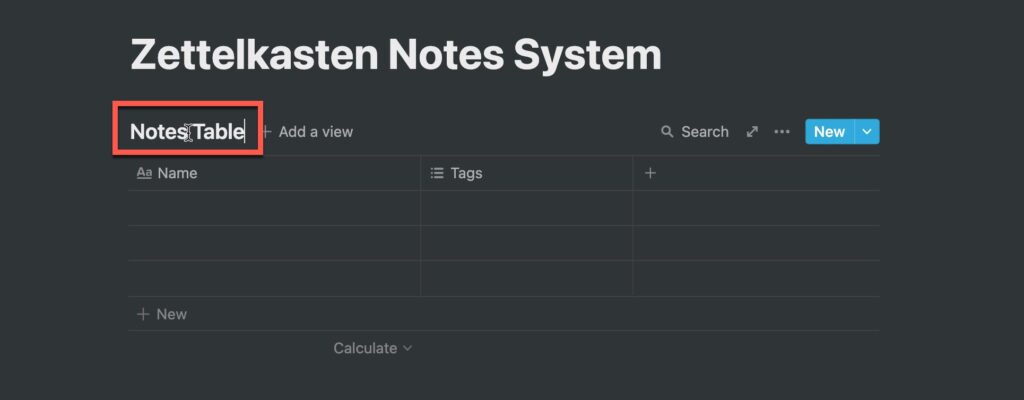
Give your table a name by double-clicking where it says “untitled” and typing in the name you want for your table. In our case, we will use Notes Table.
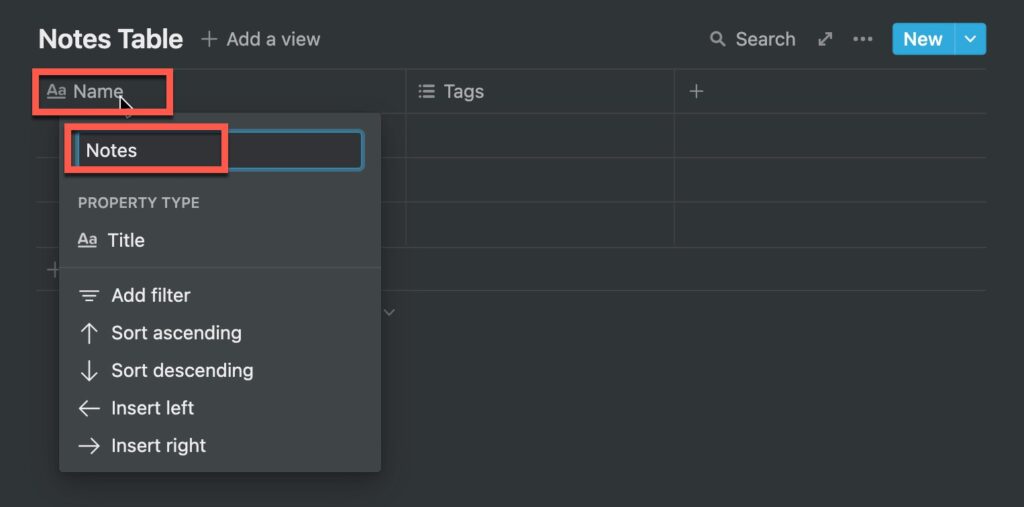
Your table should now be visible. Click on the “Name” column title and type in “Notes” as shown in the screenshot above.
Change the Tags Column to Note Type
This table is going to hold both our main (aka slip) and reference notes so we need a way to distinguish between them. The way we will do this will be by setting up a “Select” column we will call “Note Type”.
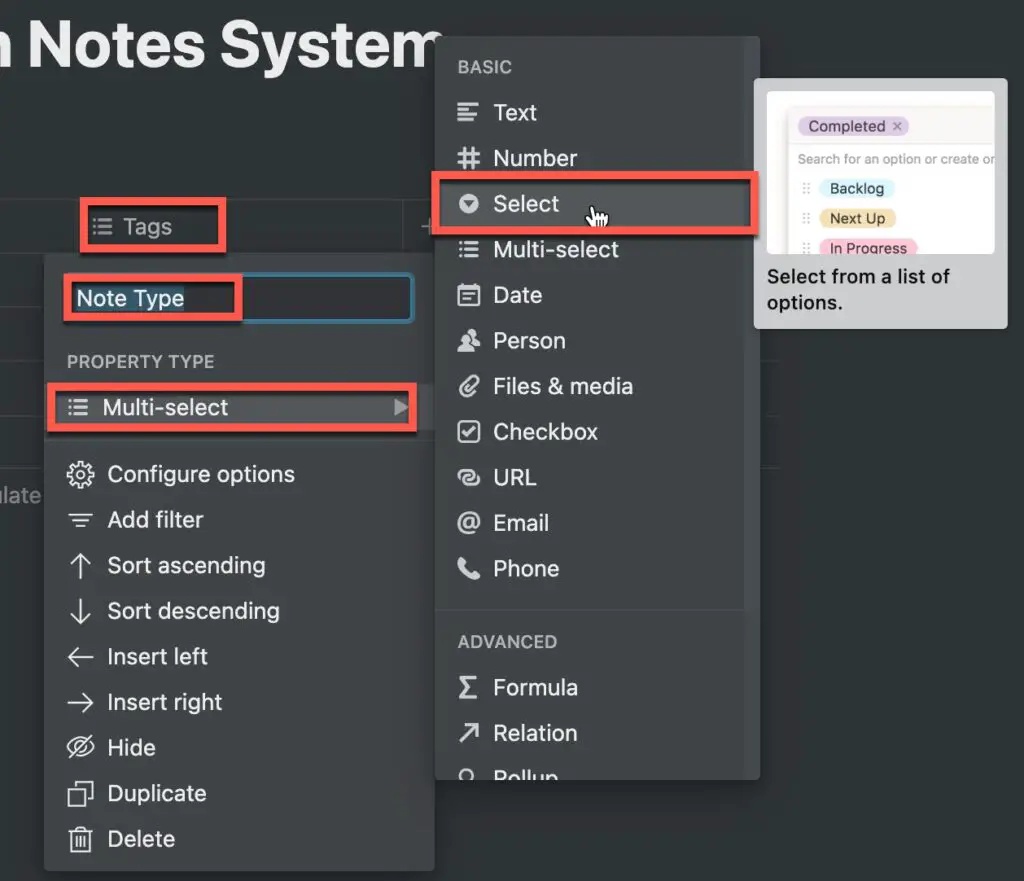
To do this, click on the “Tags” column header. Give your column a new name (like Note Type). Then, change the property type from “Multi-Select” to “Select“ as shown in the screenshot above.
Create a “Date Added” Column
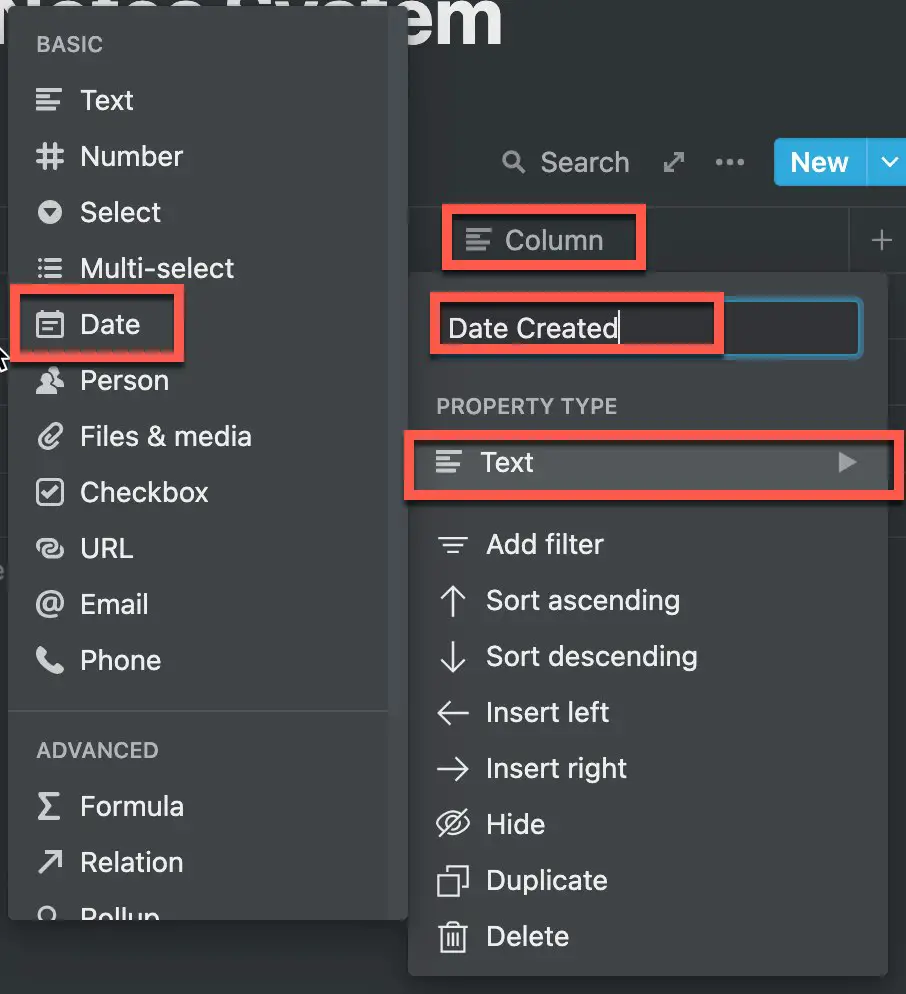
Next, let’s create a Date Added column to keep track on when we created the note. To do this:
- Click on the “Column” column header
- Click on “Text” under “Property Type“
- Select “Date” as shown in the screenshot above.
- Click on the text box and type in the name you want for this column.
For this tutorial, we will name the column “Date Added”.
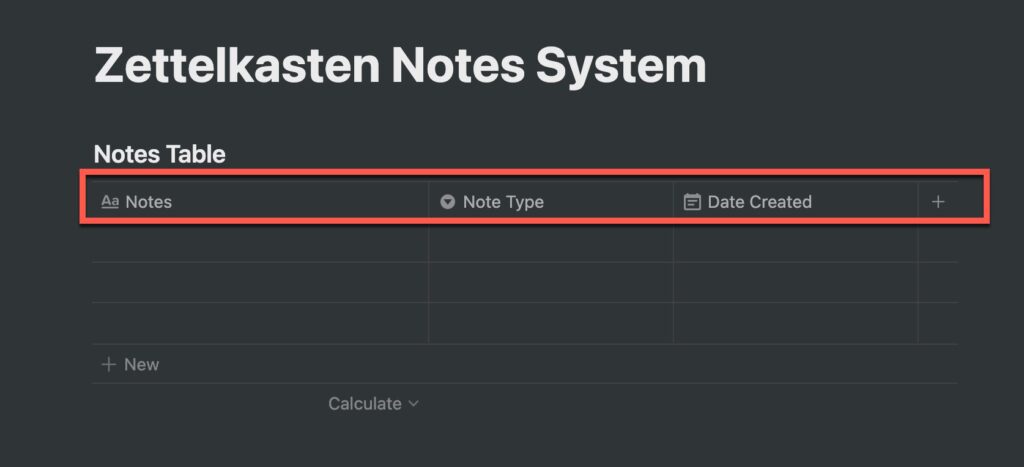
You should now have a table like the one shown in the screenshot above.
If you want to learn more about the power of tables and databases in Notion, check out our Definitive Guide to Using Tables in Notion.
Add a Note to Your Table
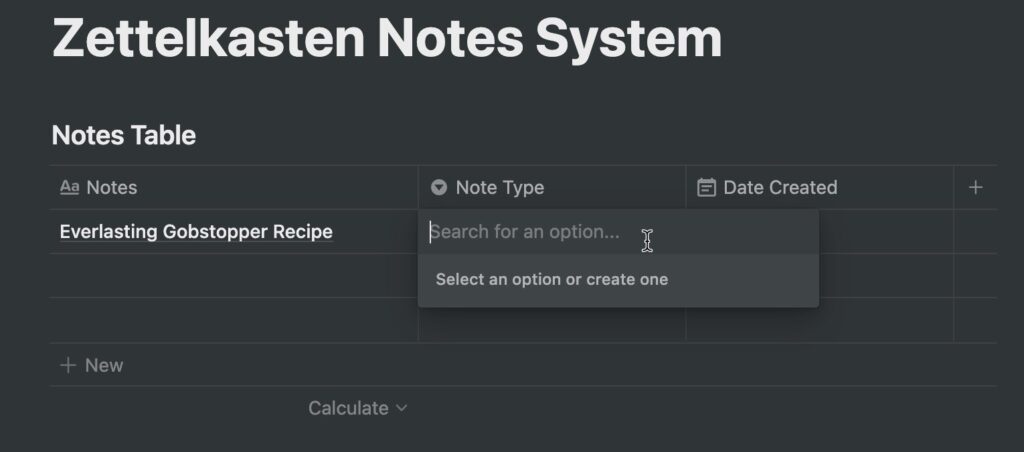
Now let’s add a new note to our table.
- Click on the first cell under the “Notes” column
- Type in the name of your note.
- Next click on the cell underneath the “Note Type” column header as shown above.
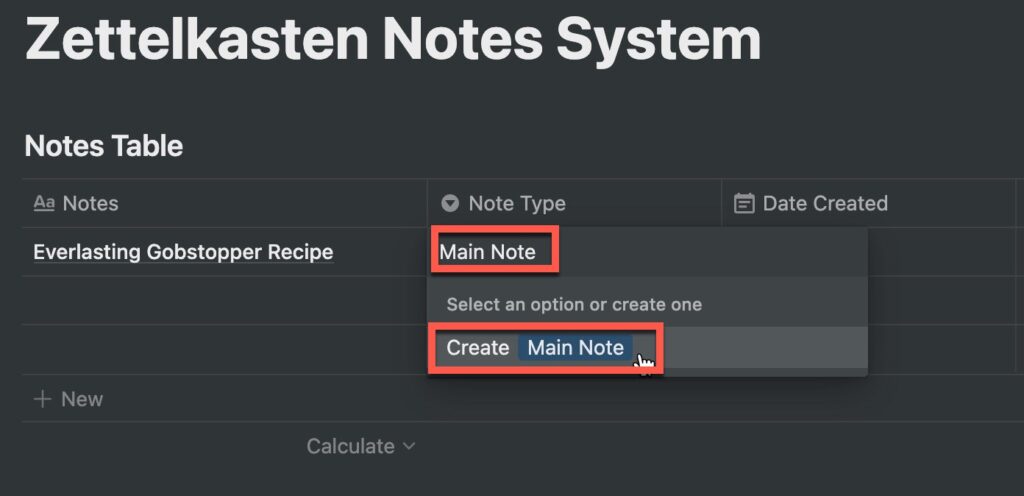
- Start typing in the name you want for your Slip or Main Note category (we used Main Note). Click on Create Main Note as shown in the screenshot above.
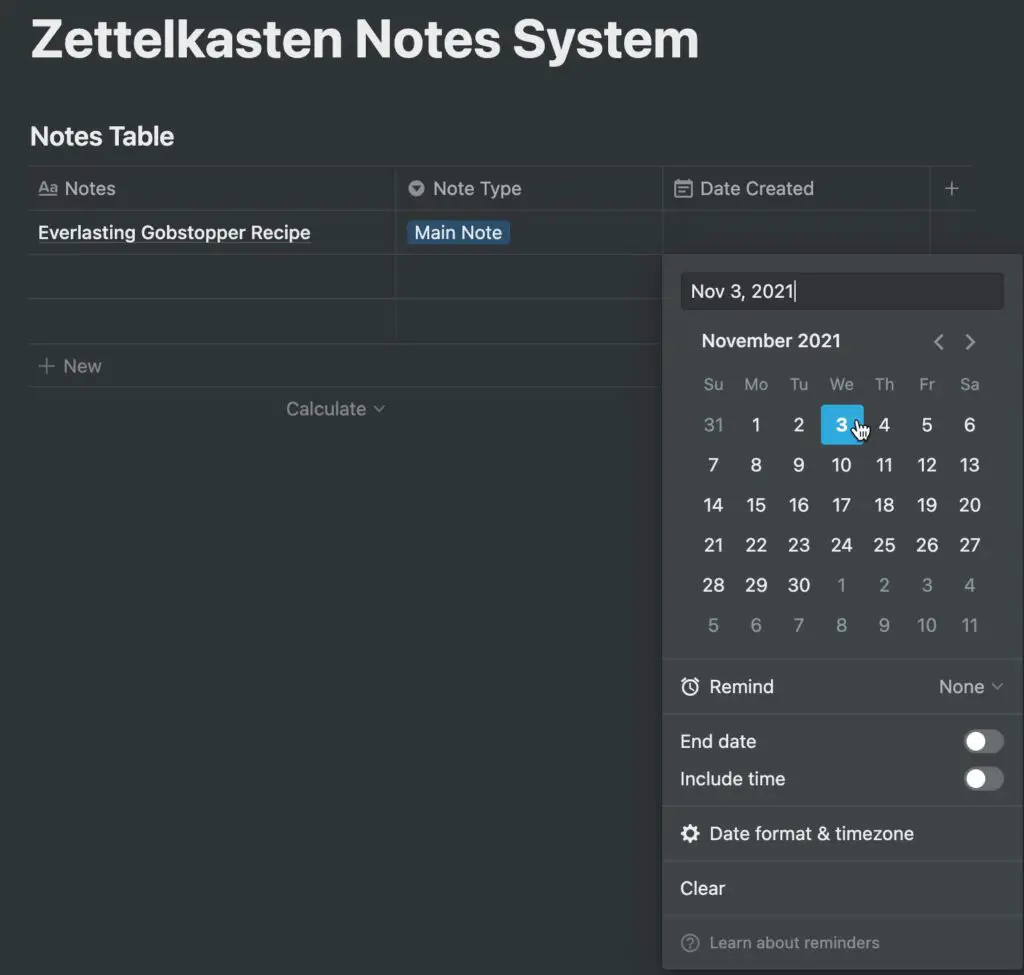
- Assign your note a date created date by clicking on the cell in the “Date Created” column and selecting a date as shown in the screenshot above.
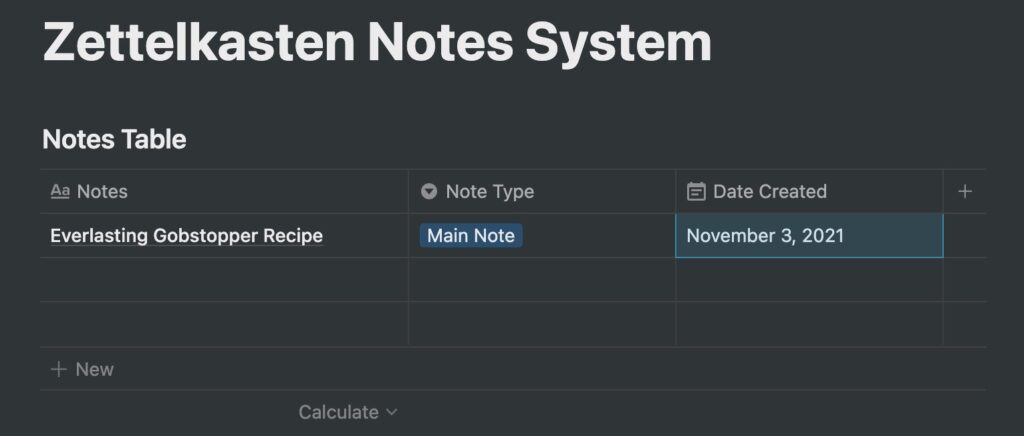
Your note should now look roughly like the screenshot above.
Add a Reference Note(s) to Your Notes Table
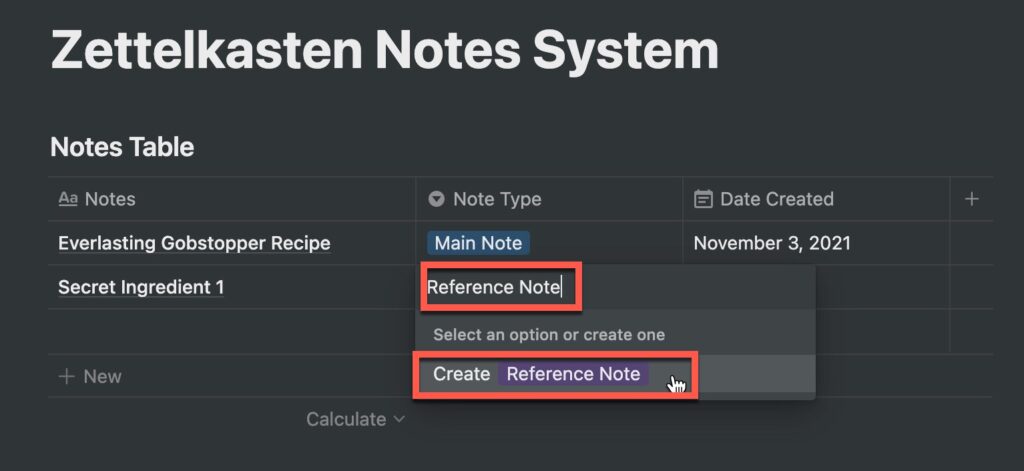
Let’s add a reference note to our table. This follows the prior step almost exactly with one notable exception. After giving your note a title, click in the cell in the “Note Type” column. Type in “Reference Note” and click “Create Reference Note“ as shown in the screenshot above.
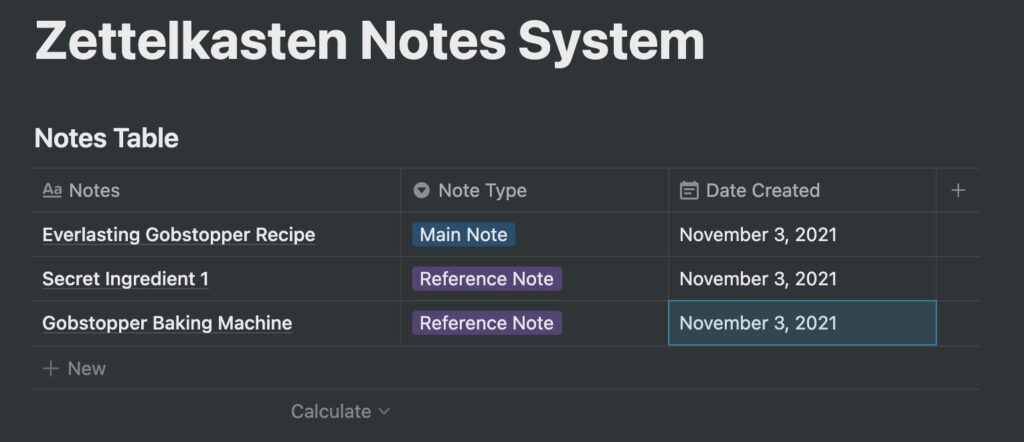
Give your note a date. Your table should now have a main note and at least one reference note (we created two just to show you what it would look like) as shown above.
Open Up Your Main Note
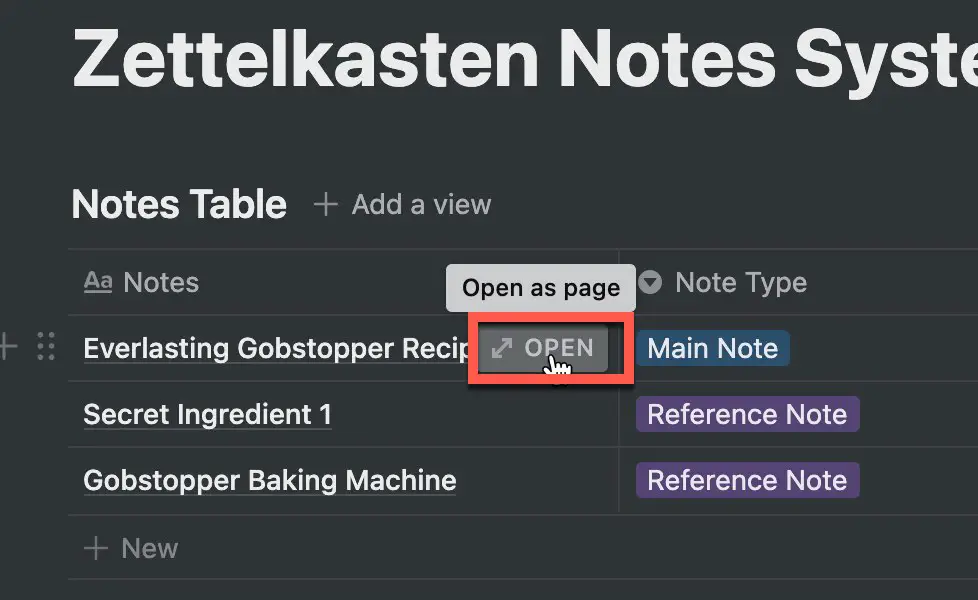
Hover over your main note and click the “Open” button as shown above.
Add a Backlink to a Reference Note
Now we get to finally add a backlink! Backlinks are bi-directional link that does two things:
- Defines a relationship between two different pages (or in our case notes)
- Provides a quick way to access referenced resources in the main page or note
To create a backlink in Notion, do the following:
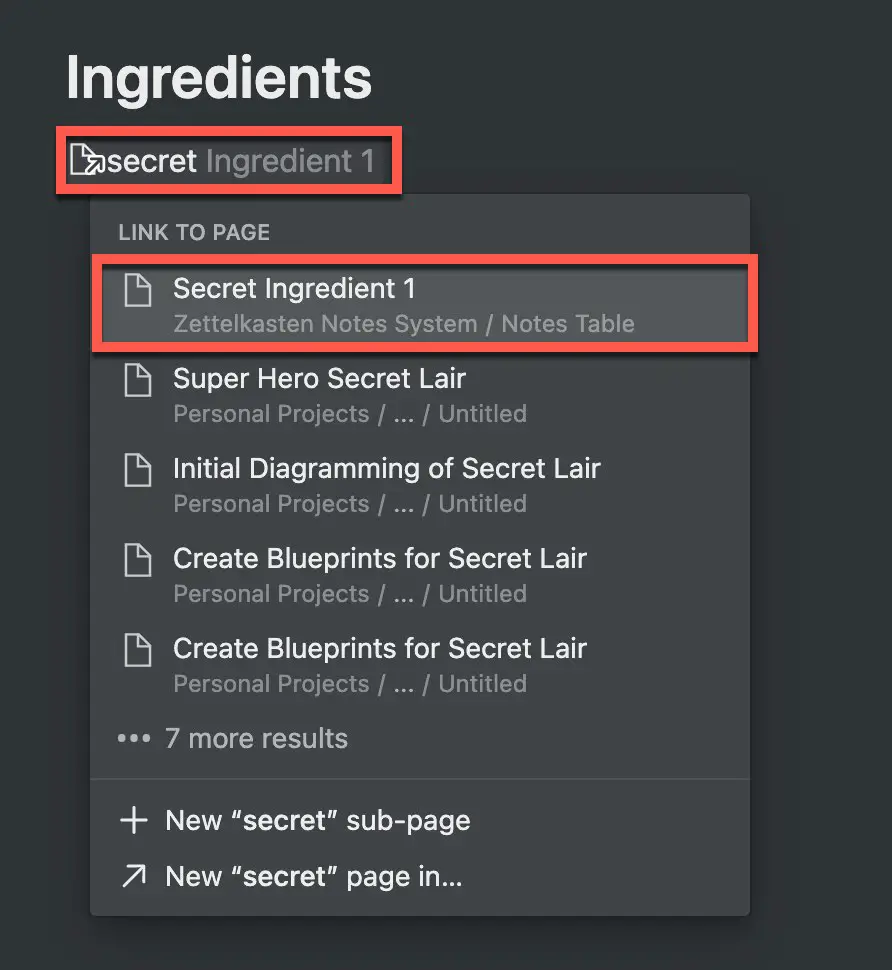
- click in the body of the page where you want the backlink to appear
- type [[ to bring up the backlink dialog
- start typing in the name of the page you want to create a backlink to
- once visible, select the page from the available options as shown in the screenshot above
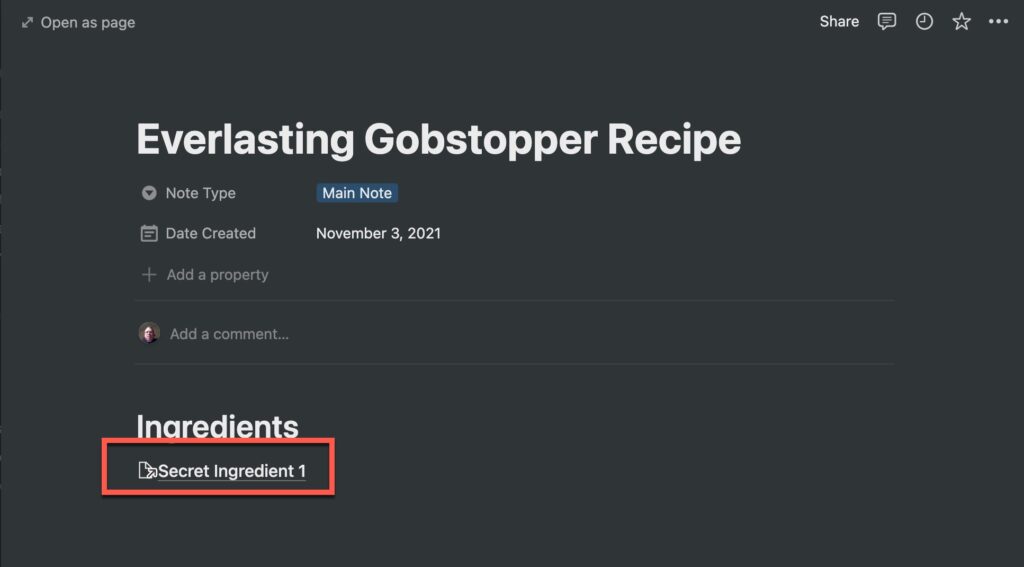
Your backlink should now appear as shown above. Click on the link to go to the reference note page.
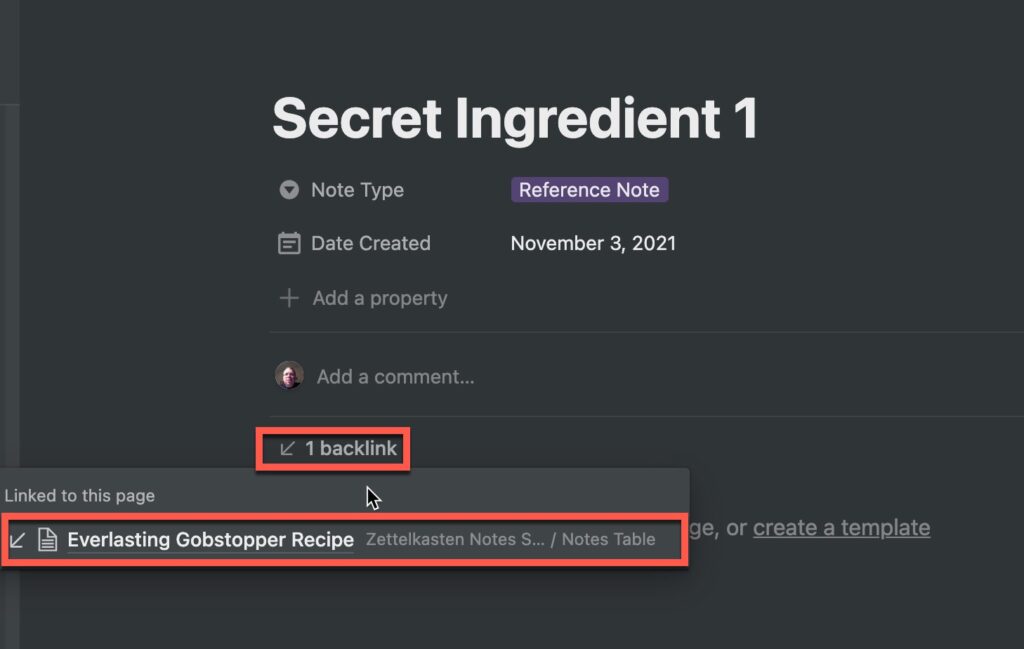
You should now be on the reference note page. Notice the “1 Backlink” reference on your page? Click on it and you will see a list of all the pages that have backlinks to this page. Pretty cool, huh.
If you want to learn more about how backlinks work in Notion, you should really check out my Guide to Backlinks in Notion.
Click on the backlink to go back to the main note page. Now let’s add another backlink to a different reference note.
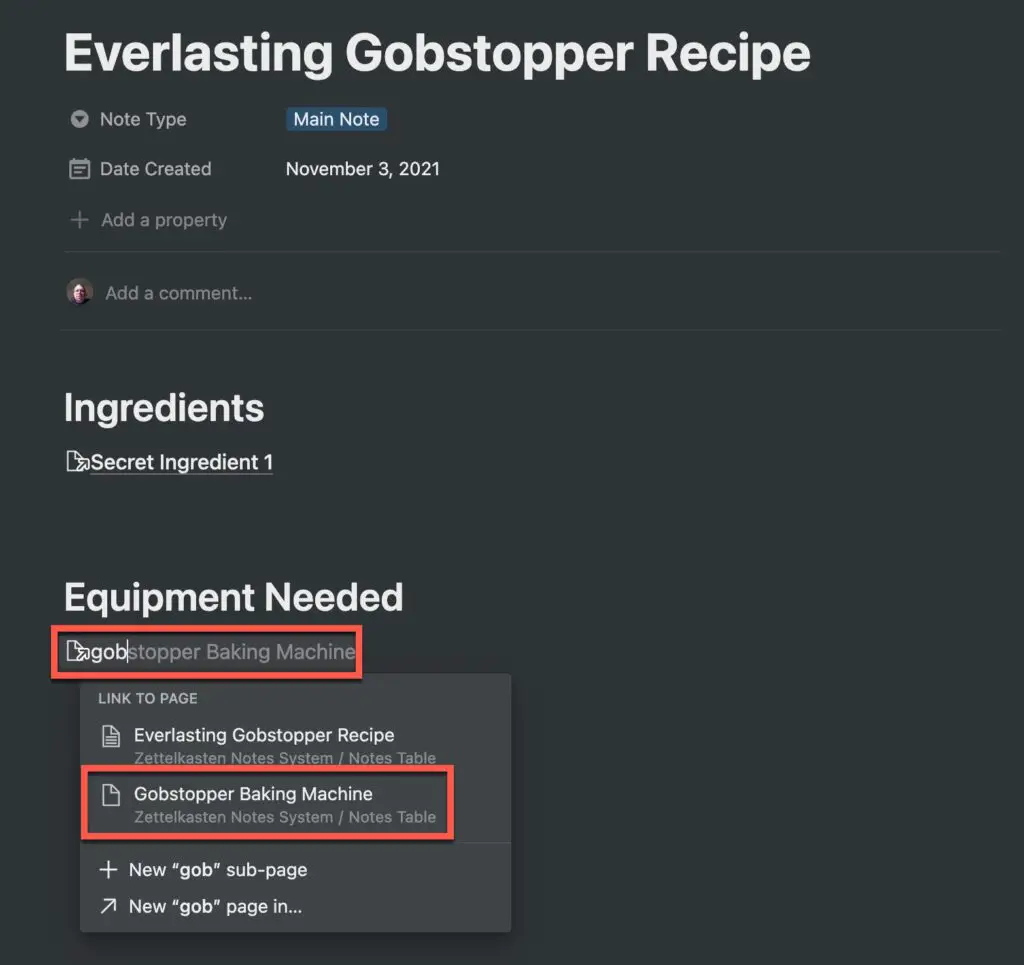
For our example, we added a section section of our page called “Equipment Needed” to differentiate between ingredients and equipment.
To add your backlink to another reference note in Notion, do the following:
- Click in the body of your note
- Type [[ to bring up the backlink dialog box
- Start typing in the name of the page you want to create a backlink to
- Once it appears as an option, click on it
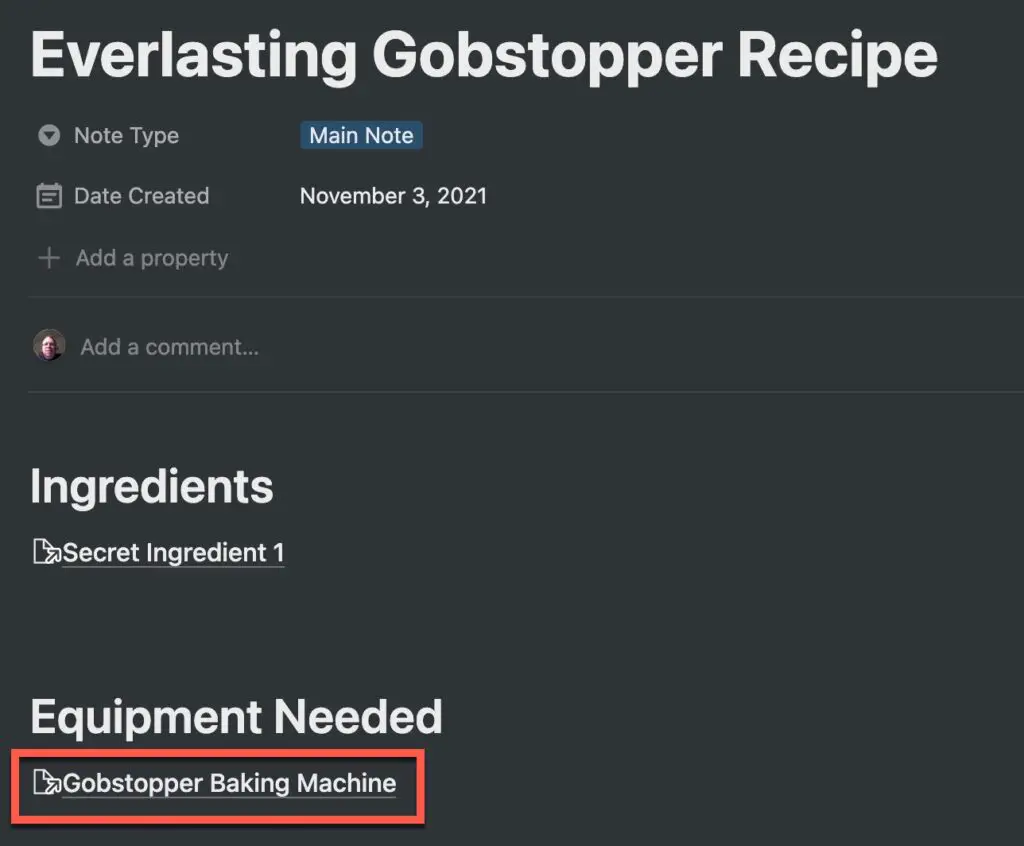
Your backlink should now appear on your page as shown in the screenshot above. Click on the backlink.
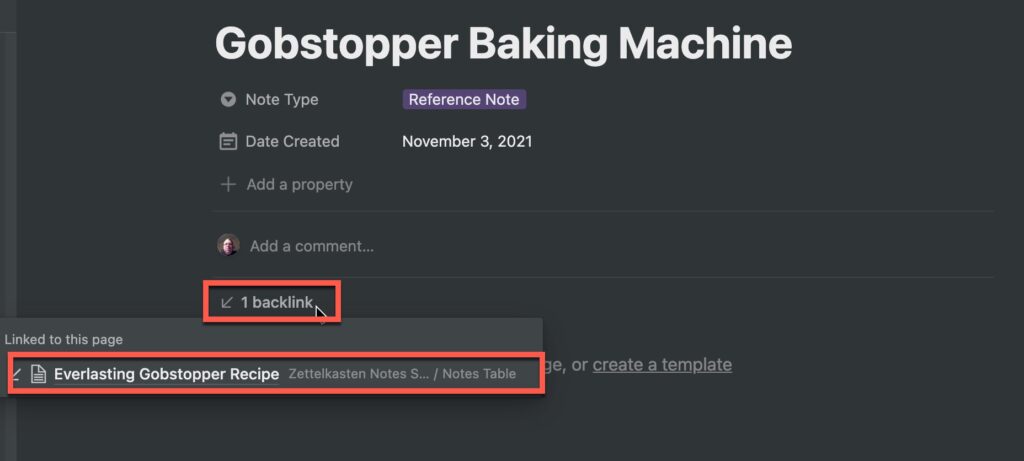
You should now see your reference page. Click on the “1 backlink” text as shown above and you should see a reference to your main page.
Populate your Notes Table with More Main and Reference Notes
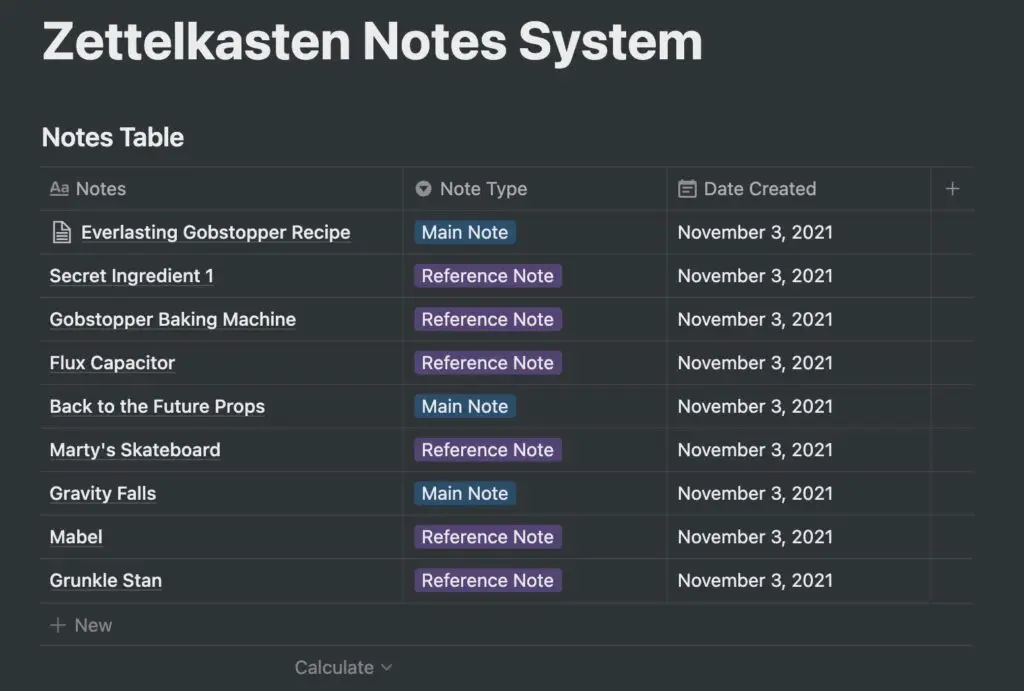
Now, go back to your Notes Table and fill it with more reference and main notes as shown in the screenshot above.
Wouldn’t it be great to have dedicated views for your main notes and your reference notes. We can do that by create linked databases for each view, which we will do next.
Create a Linked Database Showing Only Your Main Notes
Linked databases allow you to create a custom view of an existing table. The main advantage is that any changes you make in the main table will automatically update the linked database and vice versa.
To create a linked database containing only your main notes, do the following:
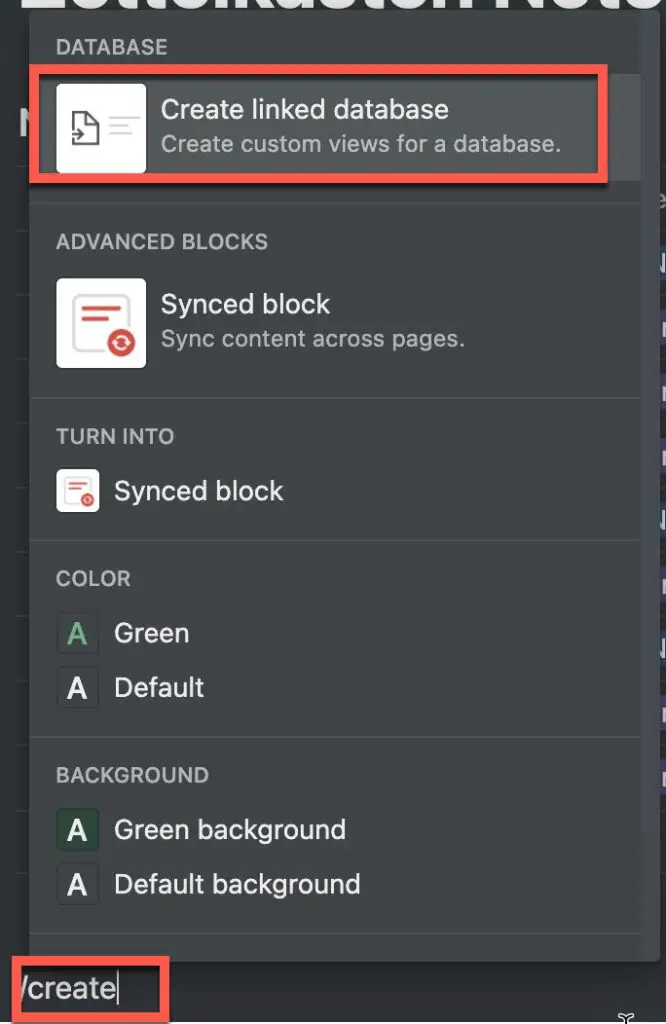
- Click in the body of your Zettelkasten System page
- Type “/create” to bring up the block menu
- Select “Create Linked Database” as shown in the screenshot above
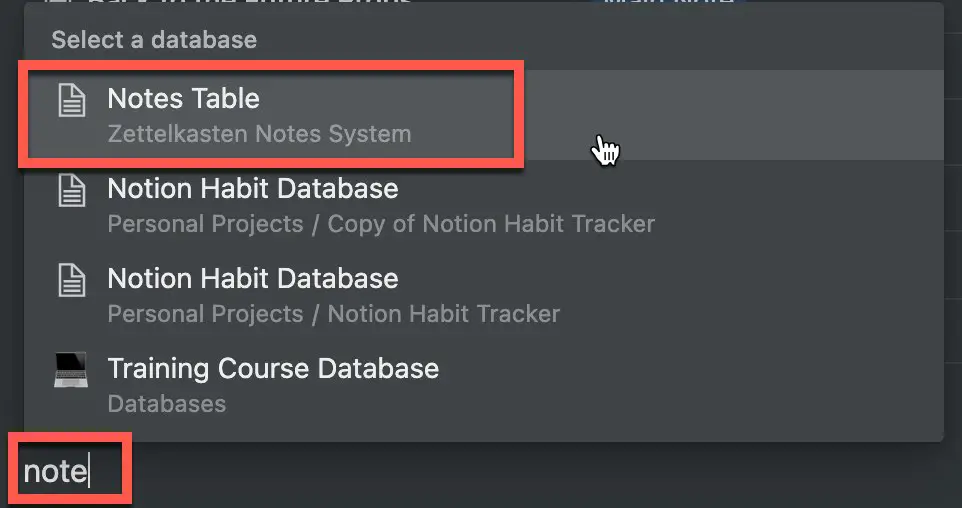
- Once the linked database selection dialog appears, start typing the name of our main table
- Once the main table appears, click on it to select it
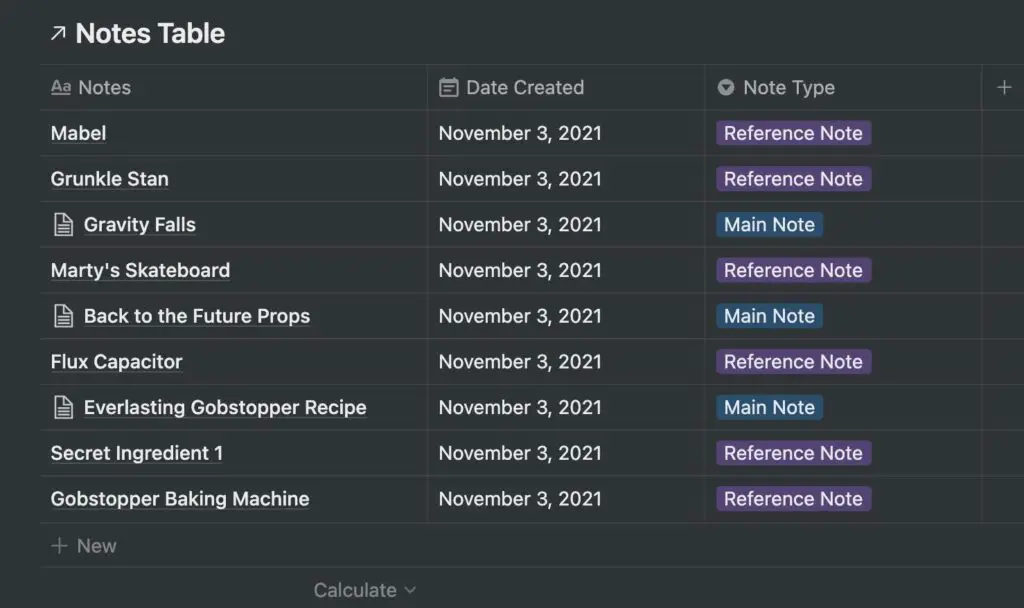
Your linked database should now appear on your page. We need to setup a filter to only shown the main notes, do the following:
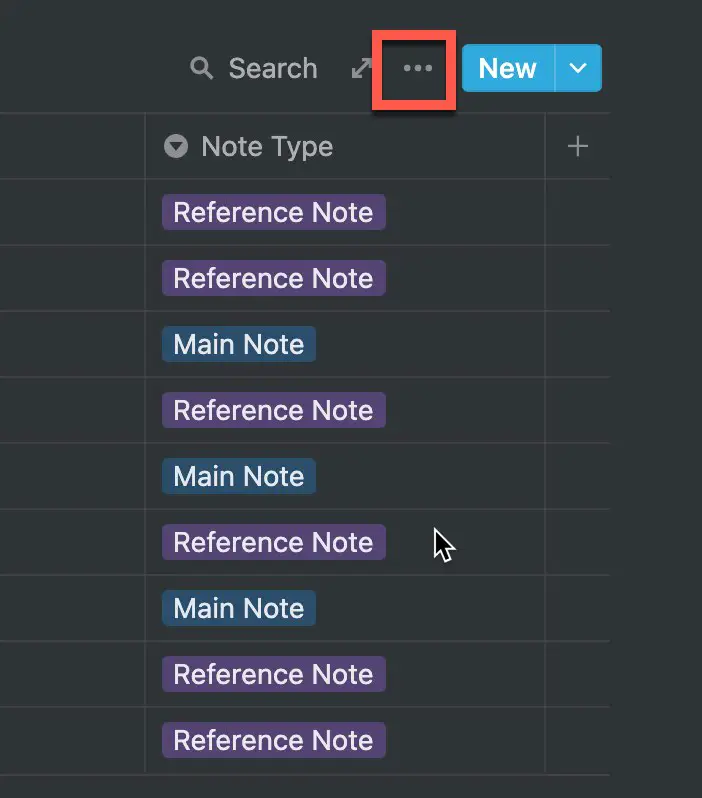
- Hover over your table and click on the ellipsis as shown in the screenshot above
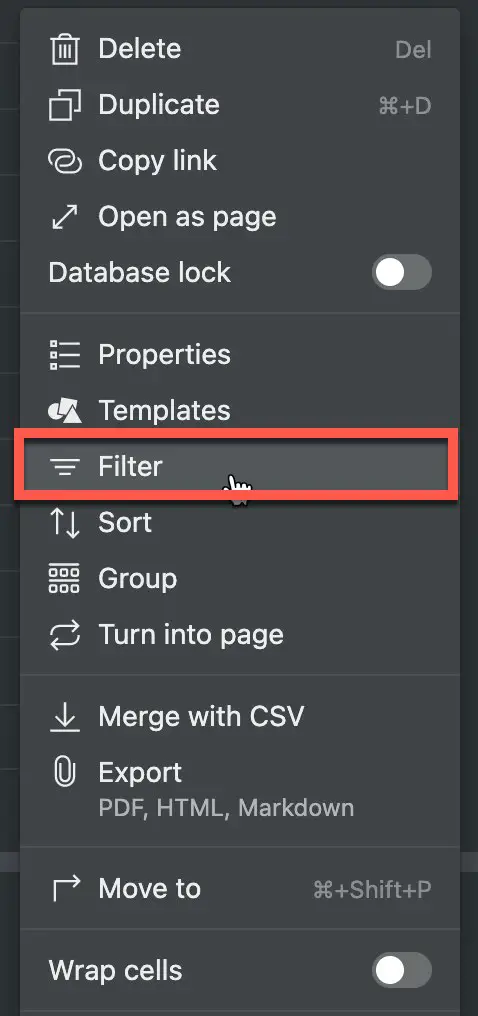
- Select “Filter” from the menu
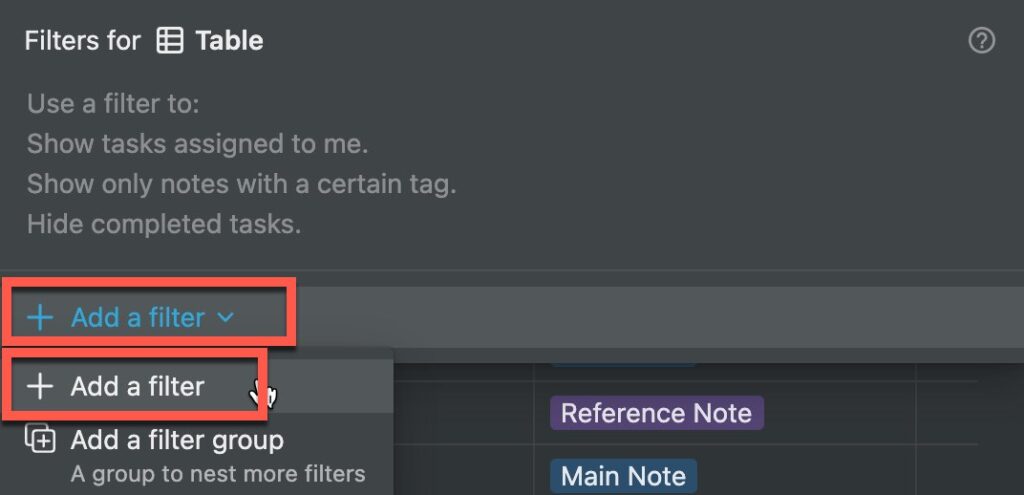
- Click on the “+ Add a filter” drop-down button and select “+ Add a filter” from the options as shown above
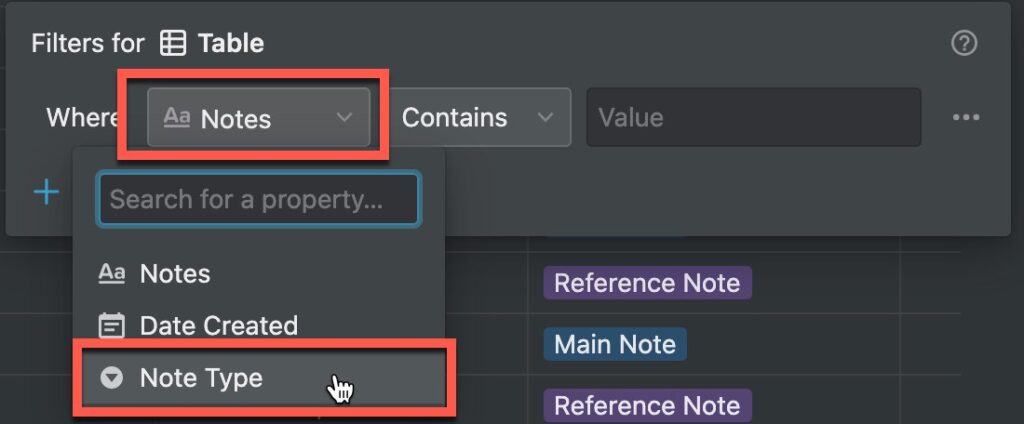
- In the filter criteria menu, click on “Notes” and select the column you set up for note type as shown above
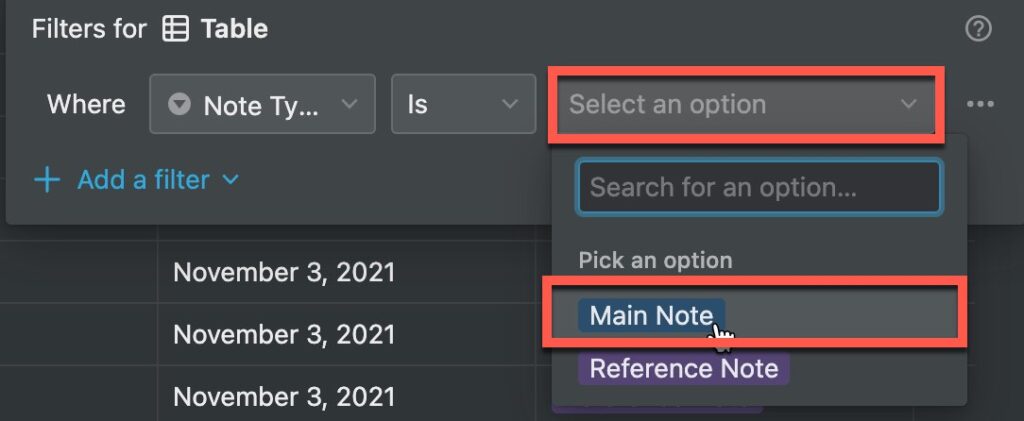
- Click on the last option in the filter criteria and select your main note option as shown above
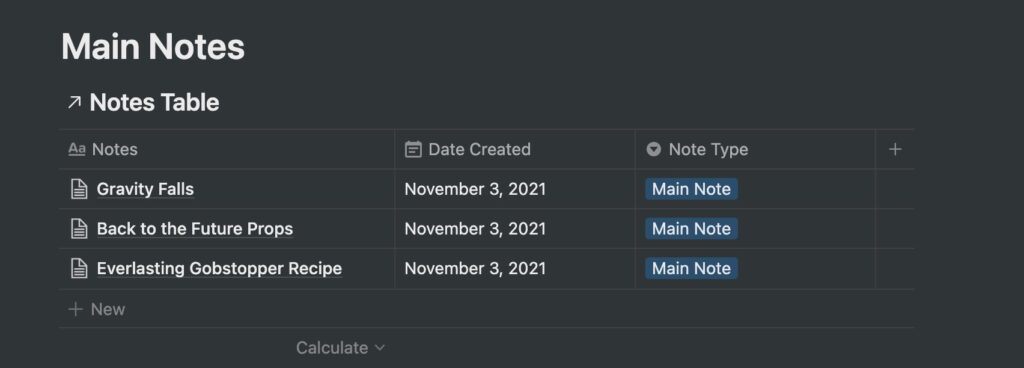
You should now see your linked database that only shows your main notes.
Now let’s set one up that only shows our reference notes.
Create a Linked Database Showing Only Your Reference Notes
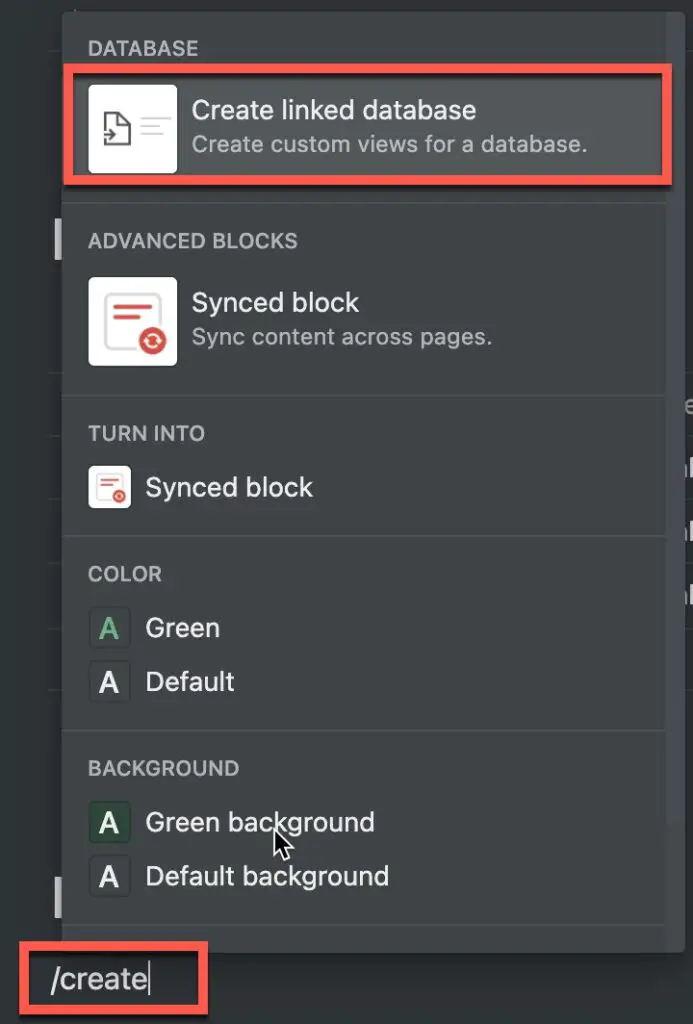
- Click in the body of the page and type “/create”
- Select “Create Linked Database” from the available options

- Start typing in the name of your notes table
- Once you see it as an option, click on it to select it
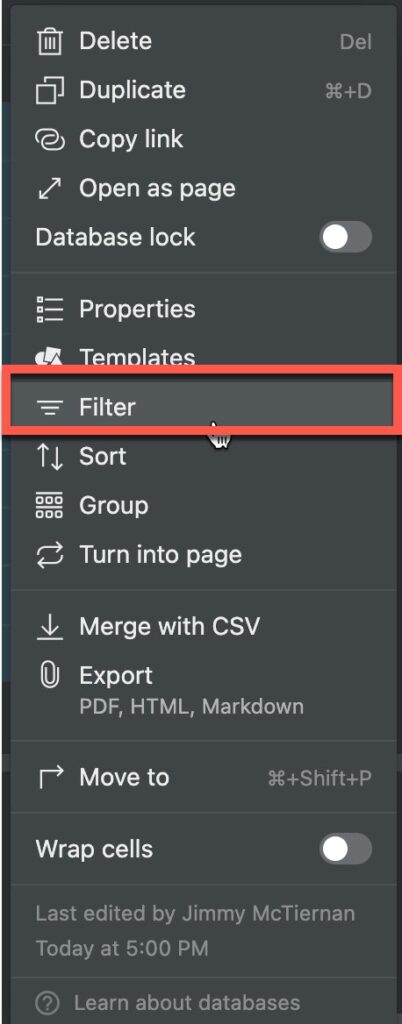
- Select “Filter” from the menu
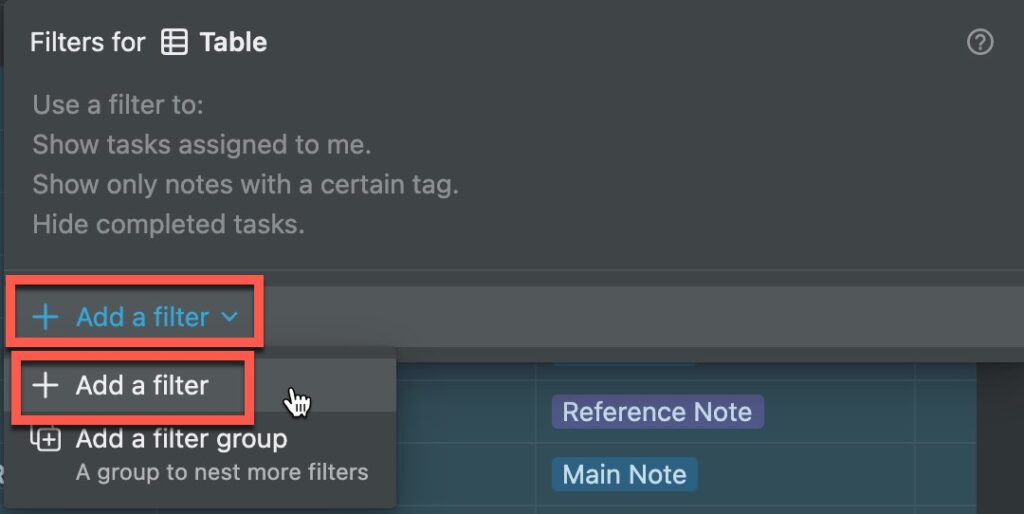
- Click on “+ Add a Filter and select “+ Add a filter” from the options provided

- Select your Note Type option, select “Is” and then select your reference note option as shown above
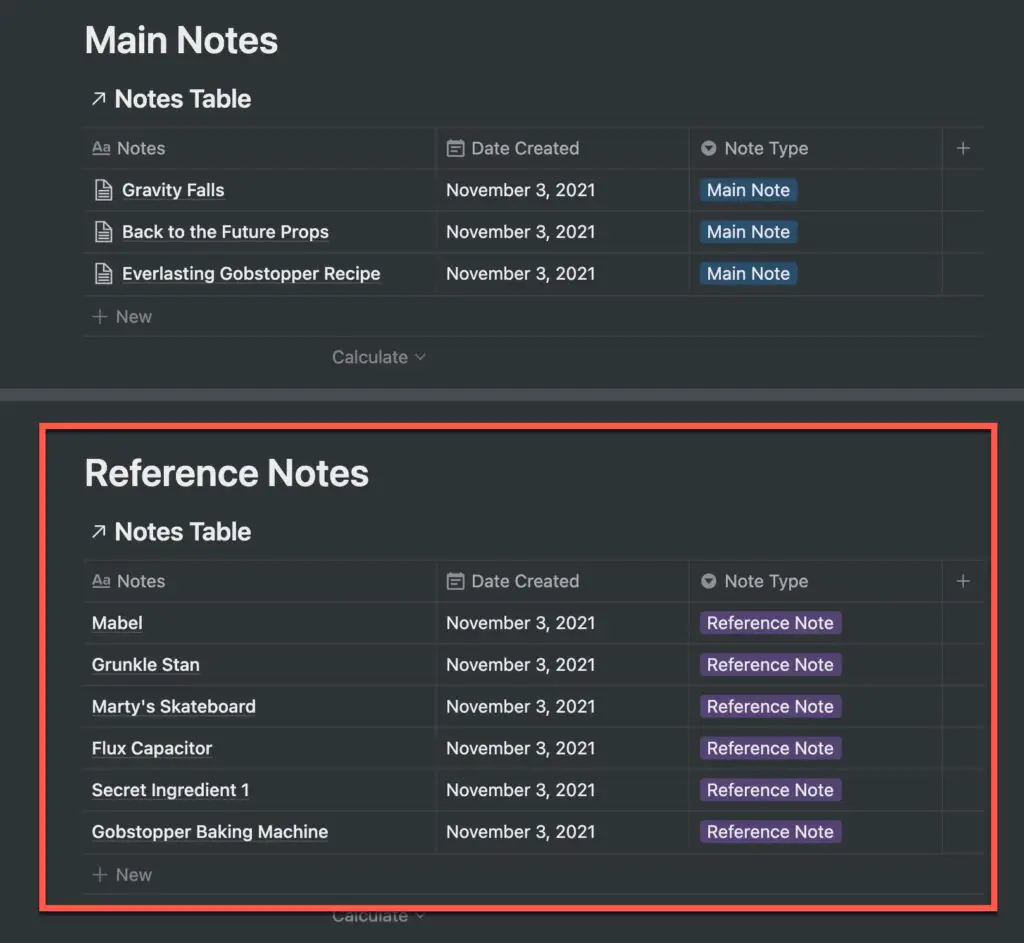
Your new linked database should appear and only show reference notes as shown in the screenshot above.
If you want to learn more about how to use linked databases in Notion, check out our Complete Guide to Using Linked Databases in Notion
Creating a Zettelkasten System in Notion using Relations

Enclosed below are the steps required to implement Zettelkasten in Notion:
- Create a New Page to hold your Reference and Main Boxes
- Create a new page in Notion to hold your reference slip box database
- Click in the body of the page and type “/table” and select “Table – Inline” from the available options
- Give your table a name by double-clicking “Untitled” and typing in your table title
- Add columns to your reference box table
- Underneath your Reference Box, type “/table” and select “Table – Inline” from the available options
- Give your table a name by double-clicking “Untitled” and typing in your table title
- Add a Date Created Column to your Main Table
- Click on the + button to add another column
- Click on the Column header and go to “Property Type” -> “Relation“
- Click on the “Select a database” drop-down menu and start typing in the name of the reference box database
- Click on the reference box database and click the “Create relation” button
- Populate your Reference Notes with quick notes
- Populate your Main Notes database with Main Notes
- In the Main Notes Database, click in the cell in the Relation column we created
- Start typing in the name of the reference and click on it when it appears
- You Main Note now references a Reference Note
- Repeat the prior step for all the rest of your Main Notes
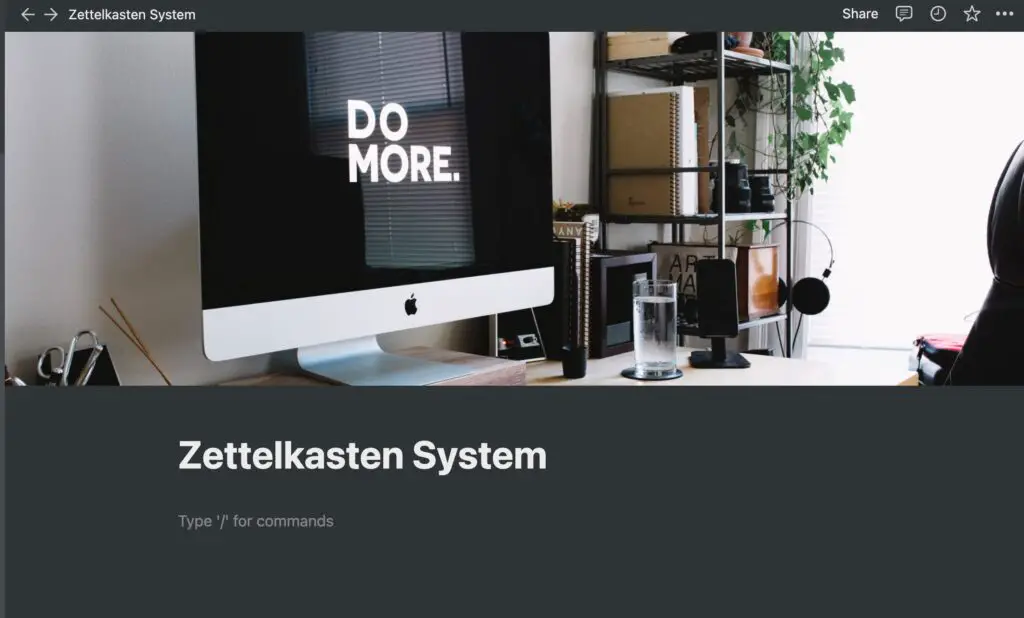
Create a New Page to Hold Your Zettelkasten System

Open up Notion and create a new page by clicking on the + button in the left panel under “Private”.
Create a Table to Hold Your Reference Notes
The next thing we want to do is create a database to hold our reference notes. As explained earlier, reference notes are quick notes or details referencing something specific. Typically, reference notes will then be added or referenced by main notes, which we will cover later in this tutorial
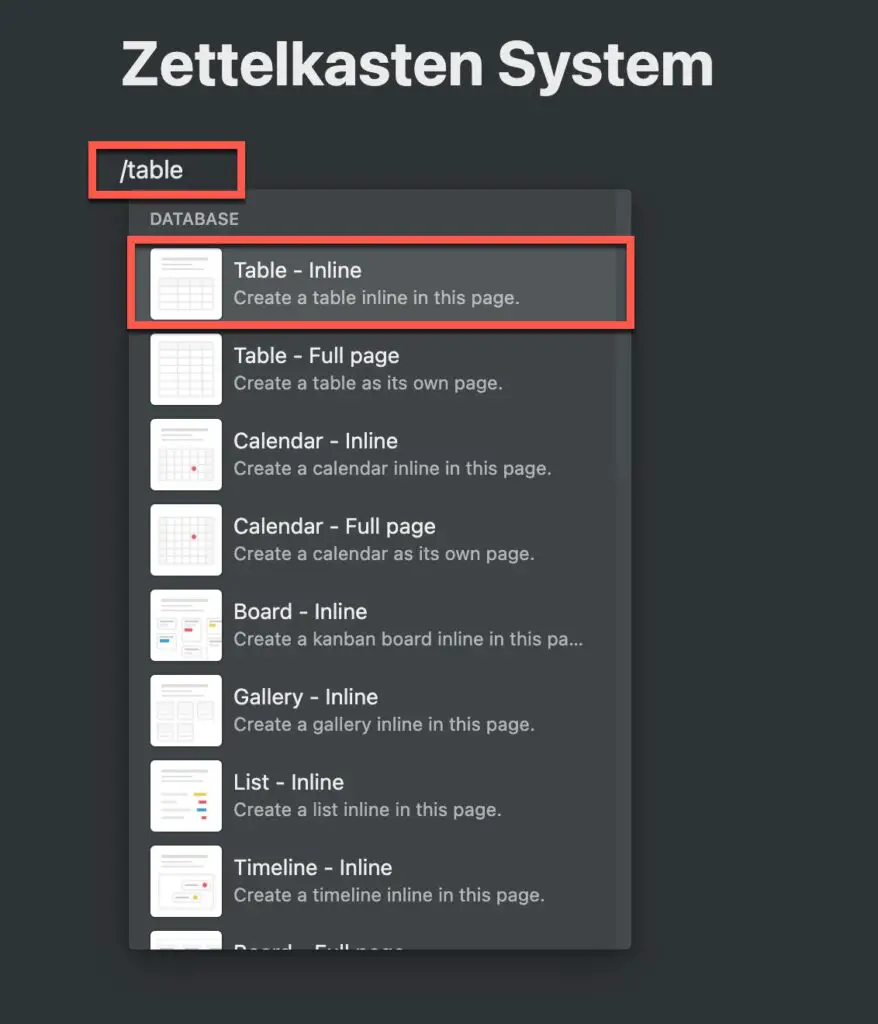
To create a table in Notion, simply click in the body of the page you just created and type “/table” without the quotation marks. Select “Table – Inline” from the available options. This will create a new table on the page.
Give Your Table A Name
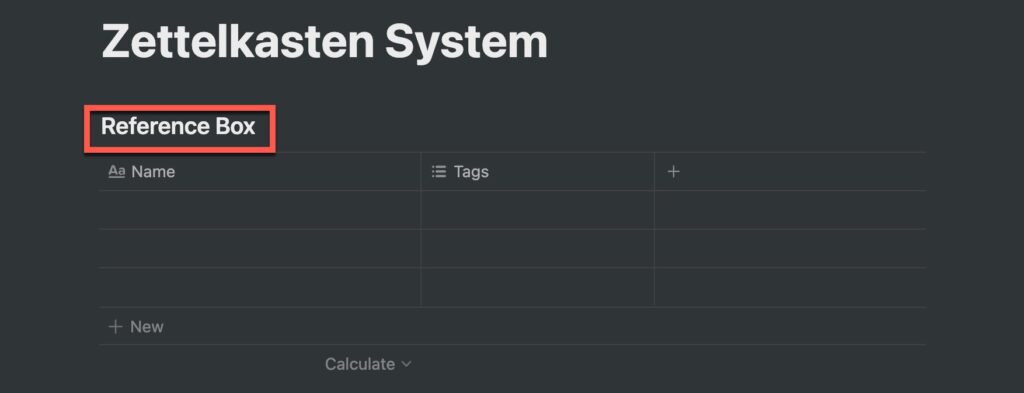
Double-click where it says “untitled” and type in the title you want your table to have. For this tutorial, we will use “Reference Box” to indicate that this table will hold our Reference Notes.
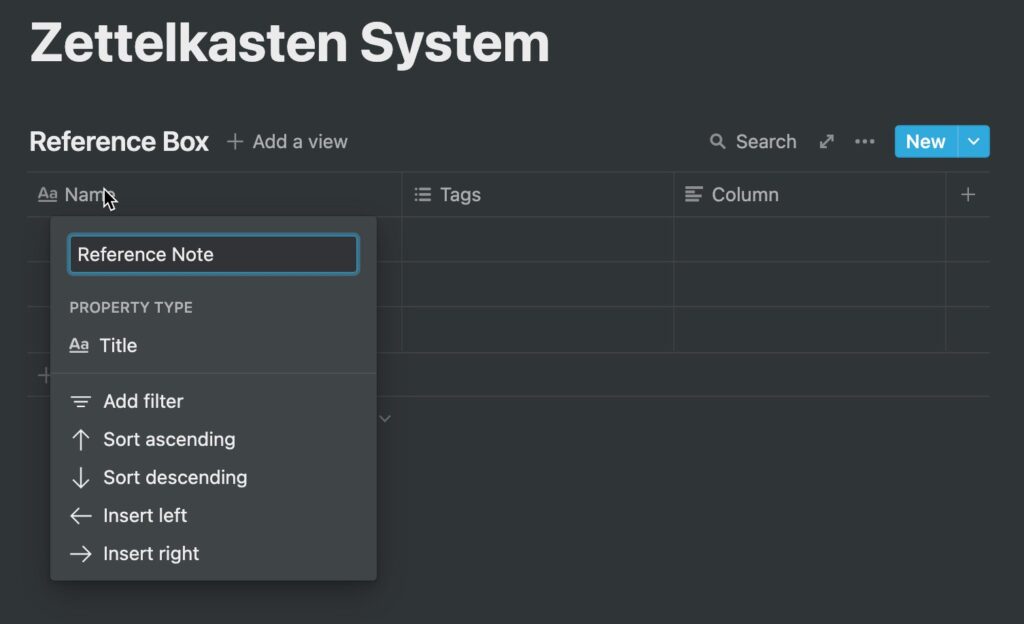
Let’s rename the “Name” column to “Reference Note” so that it’s clear this column holds reference notes.
- Click on “Name“
- Delete the word “Name“
- Type in “Reference Note“. Hit the “Enter” key to save your change.
Add Columns to Your Reference Note Table
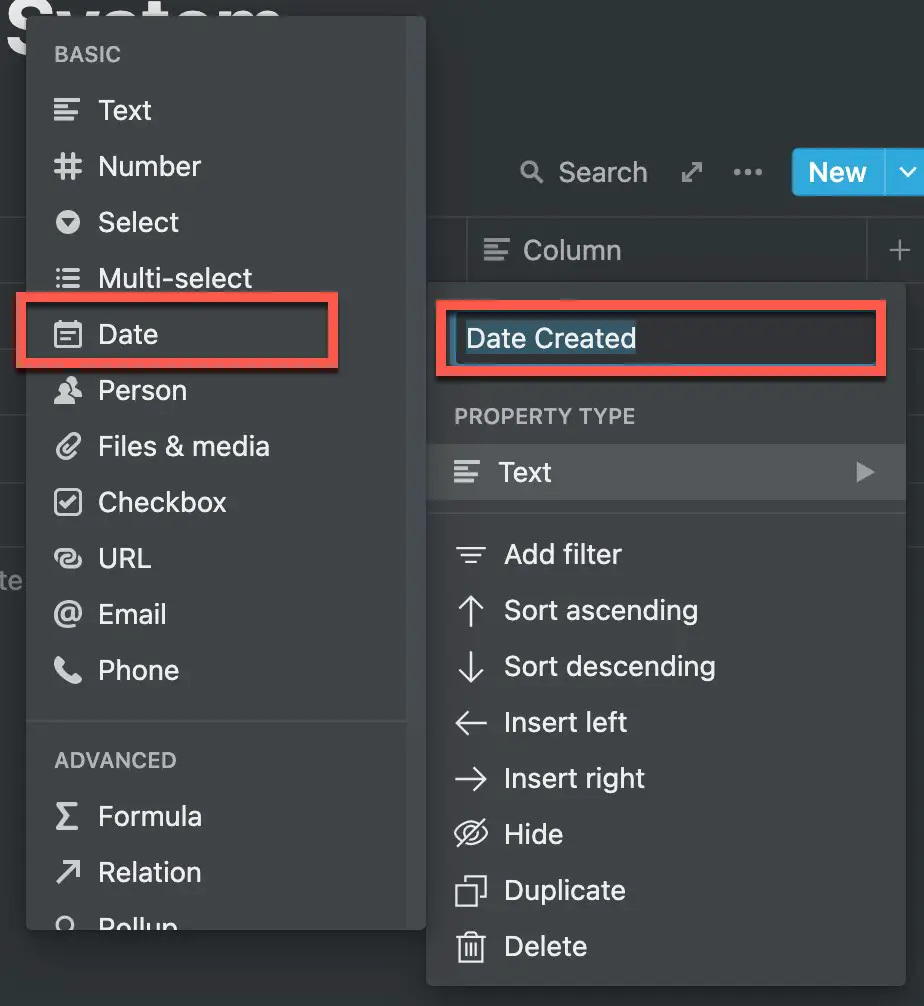
You can add more columns to your Reference Notes table. I like to have a “Date Created” column so I can know how old the note is. To create a date column in Notion:
- Click on the column you want to be a date column
- Click inside the text field and type in your column title as shown in the screenshot above
- Click the “Text” under “Property Type” and select “Date” from the options presented
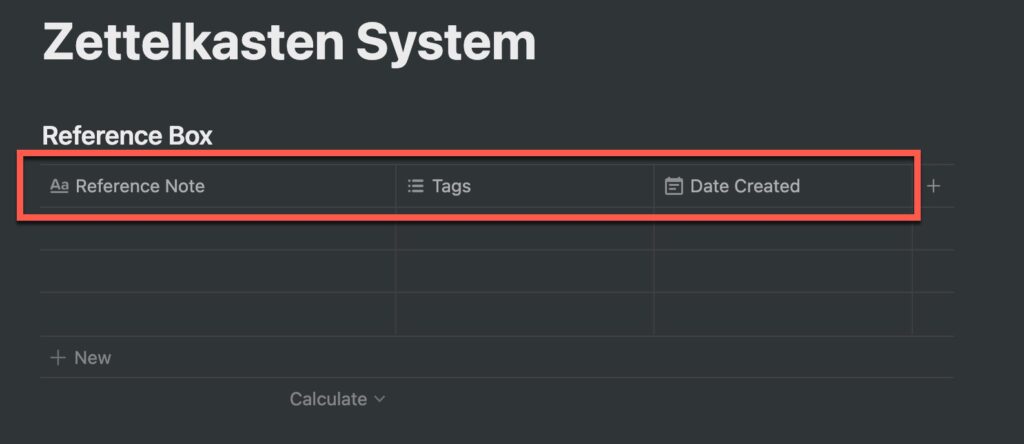
You should now see a “Date Created” column in your table.
Click underneath Reference Box Table to Create Main Box (aka Slip box) Table
Now that we have our reference box created, let’s create our main (aka slip) box. The slip box holds our detailed, permanent notes.
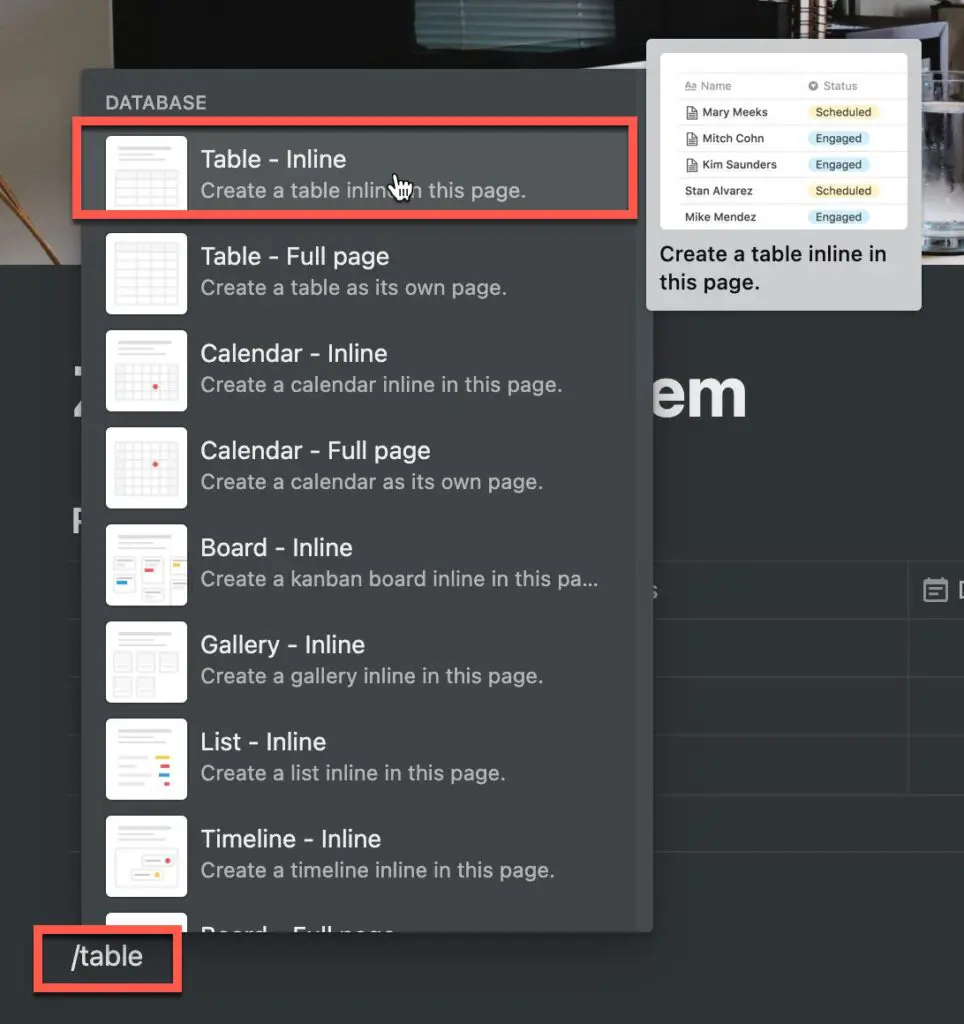
To create the slip box in Notion, do the following:
- Click underneath the table you previously created
- Type “/table” without the quotation marks to bring up the block menu
- Select “Table – Inline” as shown in the screenshot above
Give Your Slip Box Table a Title
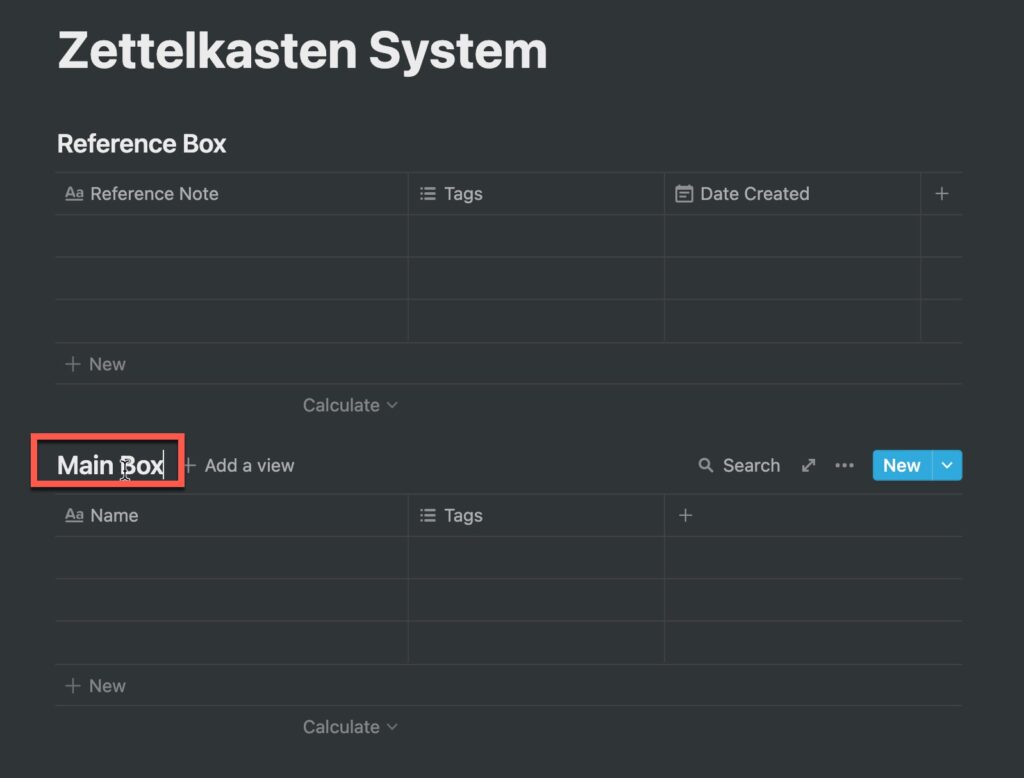
As we did with the reference notes table, let’s give our main table a title. We will use the same exact steps we took when we gave our reference notes table a title:
- Double-click on the “untitled” text
- Type in your title
- Hit the “Enter” key
Add a Date Created Column to Your Slip Table
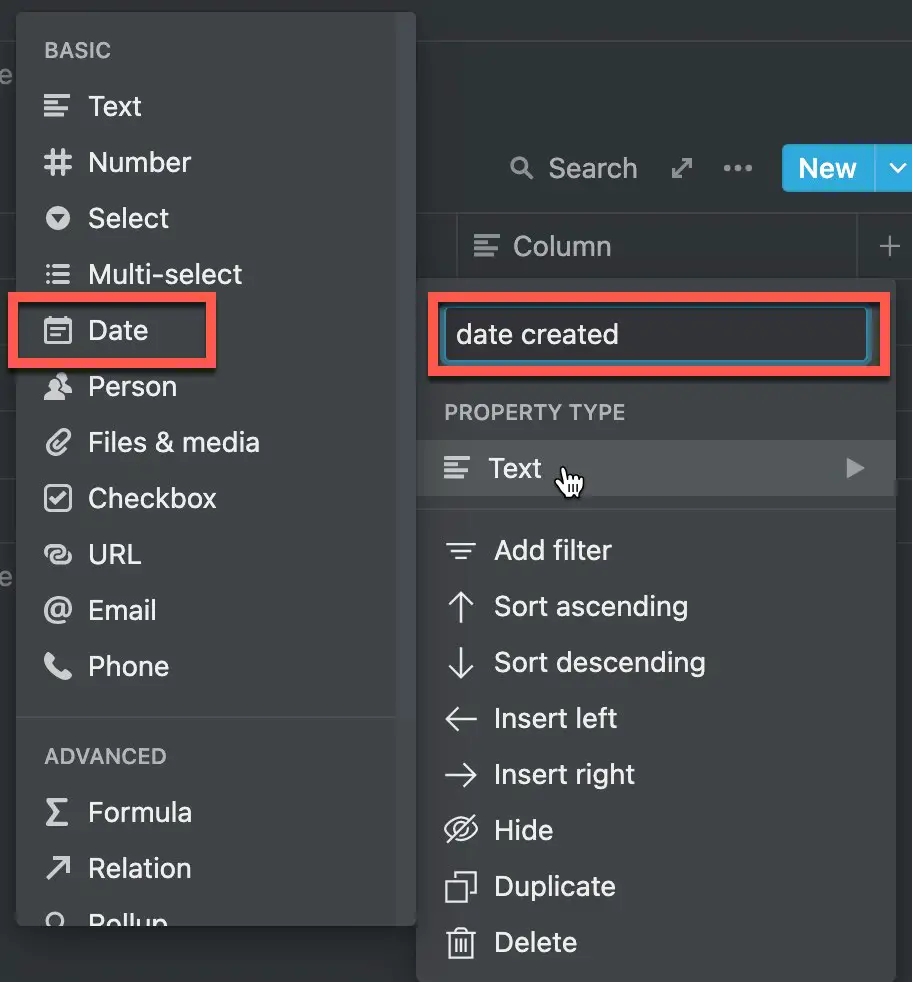
Let’s add a date column to our main or slip box table.
- Click on the column header you want to hold our date created
- Click on the text box and type in the title of your column (date created)
- Click on the “Text” option under “Property Type“
- Select “Date” from the available options as shown above
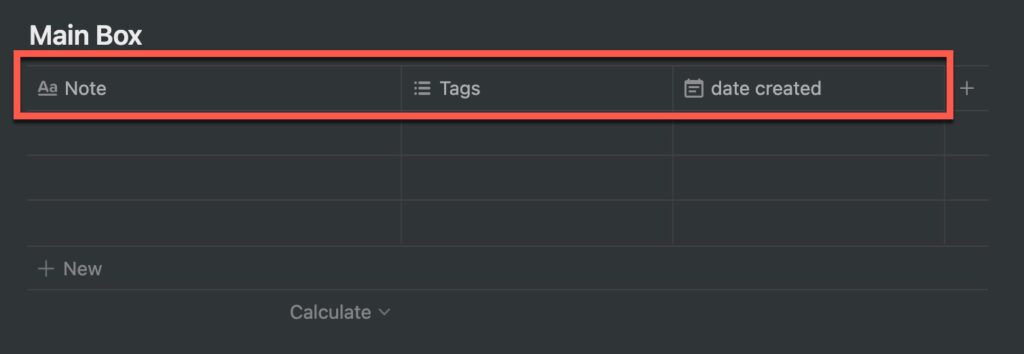
You should now have a Date Created column in your Notion table. Feel free to add more columns to fit your needs.
Create a Relation Column
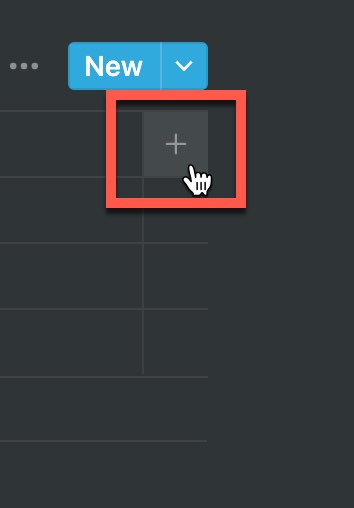
Click the + button at the top right of your slip table to add another column. We will use this column to create a relationship between our main notes table and the reference notes table using relations.
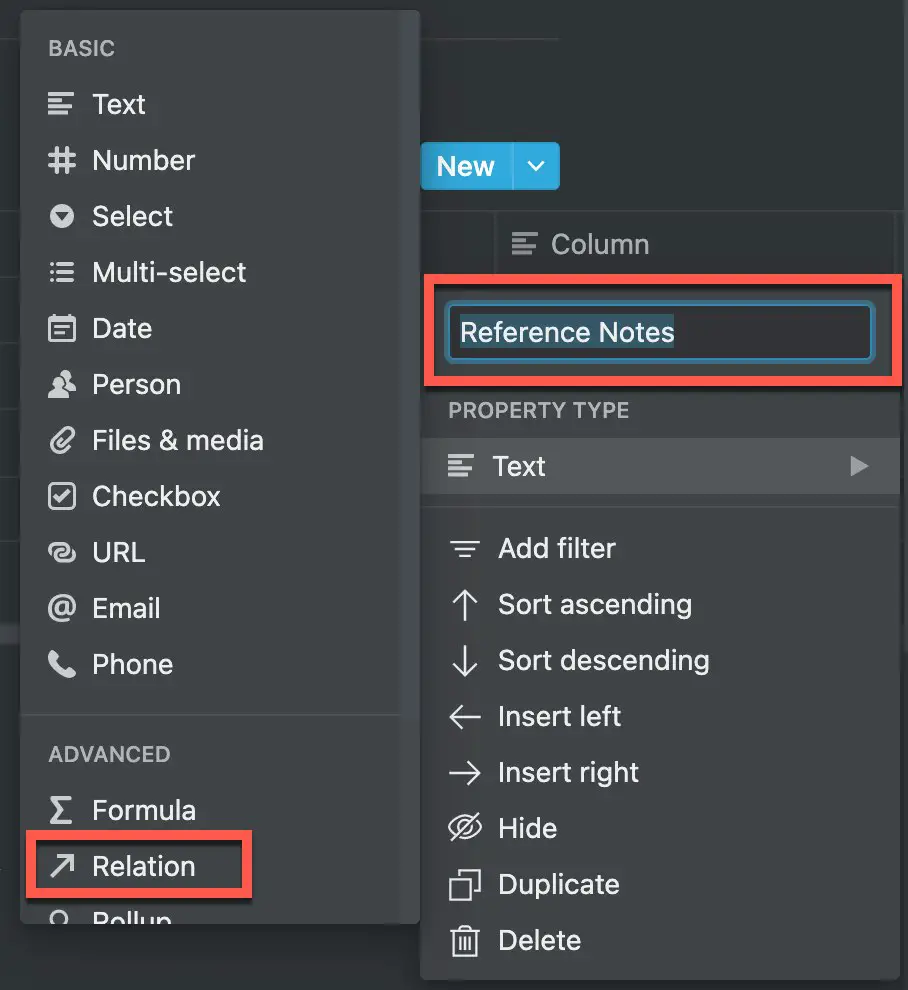
Give your column as name as shown above. Then select “Text” under “Property Type” and select “Relation” from the available options.
Click on “Select a Database”
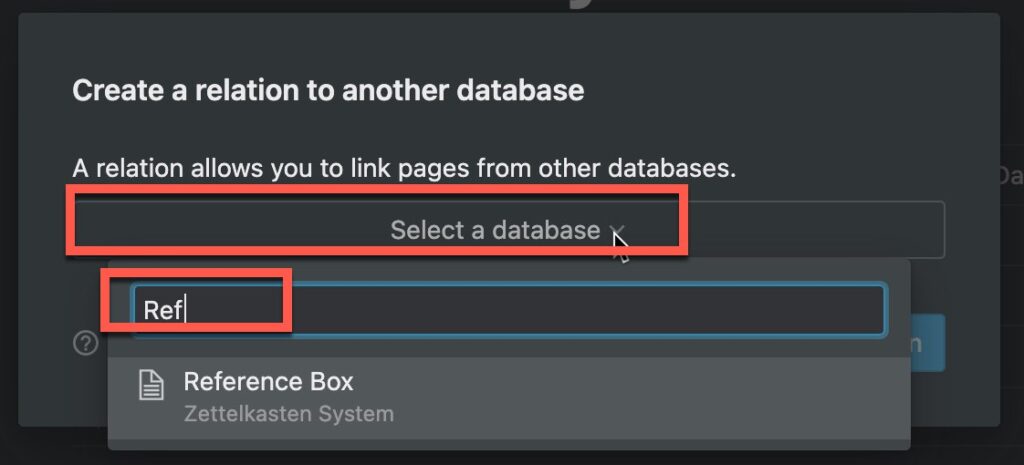
You should now see the “Create a relation to another database” pop-up dialog box. Click on “Select a database” and start typing in the name of your reference note table as shown above.
Click on the “Reference Database” and click the “Create relation” button
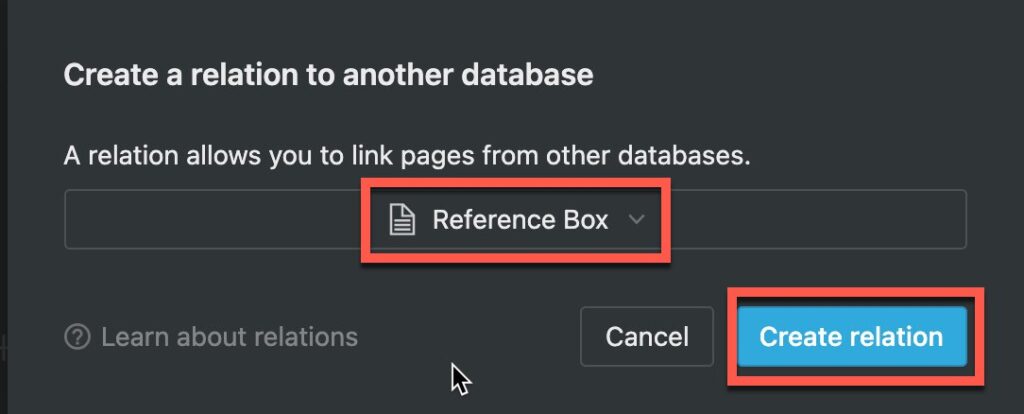
After you start typing in the name of your reference database, you should see it appear as an option. Click on it and you should see as screen like the one above. Click on the “Create relation” button to create your relation.

You should now have a relation column (reference notes in the screenshot above) to creates a relationship between your main box database and your reference box database.
Populate Your Reference and Main Databases with Notes
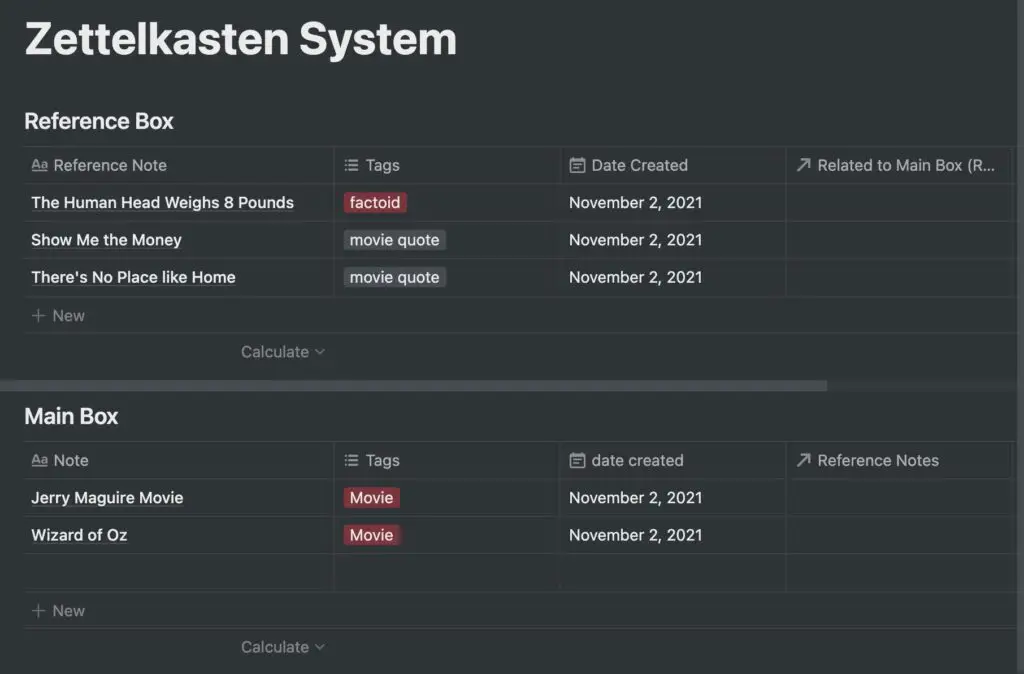
Now that both of our tables are ready, populate them with information. Remember to use the Reference box to hold reference material and quick notes and to fill your Main box with more detailed notes. For the purposes of this tutorial, I filled my databases with movies in my main box and movie quotes in the reference box.
Click on the Cell of the Main Note You Want to Add a Reference Note to

Now comes the fun part! Let’s create some relationships between our main notes and our reference notes. To do this, click on the cell in the Relation column for the main note you want to add a reference note reference to.
Start Typing in Name of the Reference Note You Want to Relate to Your Main Note

You will see a search dialog box appear like the one in the screenshot above. Start typing in the name of the reference note you want to relate to your main note. Once it appears as an option, click on it to select it.

Once you have selected the note, click away from the dialog box to close the dialog box.

A link to the reference note will appear in the relation cell (Reference Notes cell in our example) of your main note as shown in the screenshot above.
Repeat the Step Above to Add More Relationships Between Your Main and Reference Notes

Now that you know how to relate your main notes to reference notes, repeat the prior step until you have created all the relationships you want between your reference notes and your main notes as shown above. You can have multiple reference notes linked to a main note.
If you are looking to learn on the go, Audible is for you. Audible has a huge library of audiobooks on a variety of topics and listening to audiobooks is a great way to learn on the go. Audible includes podcasts and Audible Originals as well. For more information on Audible, click the link below to get your first 30 days on Audible for free:
Audible – Your First Audiobook is On Us
The Main Challenge of Using Notion for Zettelkasten
While Notion supports the ability to implement a Zettelkasten system, it is missing one major feature that would make it an amazing app for using Zettelkasten:
A Knowledge Graph
Apps like Obsidian, RemNote, and Roam Research all support the ability to visualize the inter-linking of your notes in a knowledge graph. While this may seem on the surface to be a superficial feature, it is actually an extremely valuable one.
Having the ability to see in one graph view all of the inter-relationships of your data and ideas helps to uncover new insights you probably wouldn’t have found otherwise. I really hope Notion implements a knowledge graph in the future.

