How to Change Margins in Google Docs: Adjust Margins Tutorial
Mastering the layout of your documents is essential for creating polished and professional-looking content. An integral aspect of that mastery is the ability to adjust margins to meet varying formatting needs. This tutorial will guide you through customizing the margins in Google Docs, Google’s versatile online word processor. Whether you need to adhere to academic formatting standards or want to optimize the use of space for readability, our straightforward instructions will ensure you can modify your document’s margins with ease and precision.
How to Change Margins in Google Docs Using the Ruler Tool
When working in Google Docs, you might find the need to tailor your document’s aesthetics by learning how to change margins. The ruler tool, a versatile Docs feature, enables you to adjust margins precisely. To initiate the process, do the following:
How to Change Margins in Google Docs using the Ruler Tool
Enable “Show Ruler”
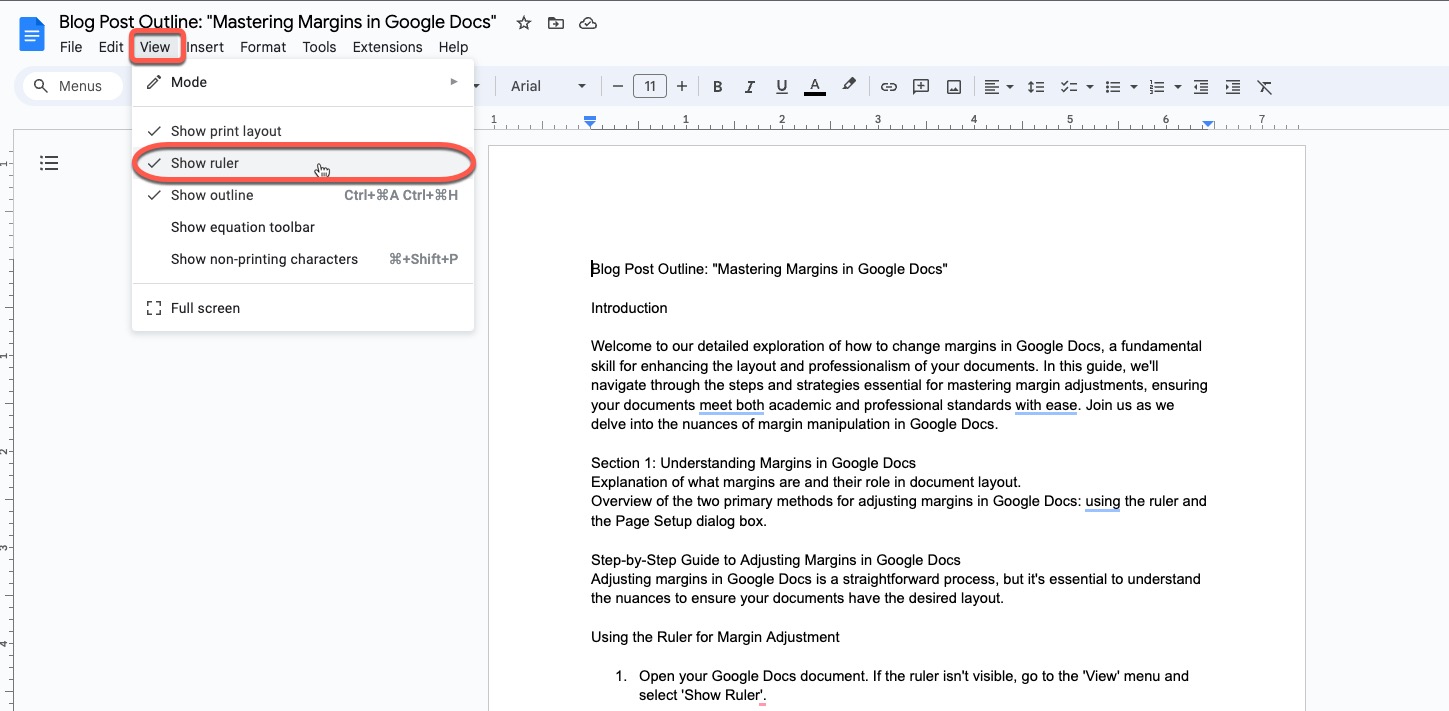
Open your Google Docs document. If the ruler isn’t visible, go to the ‘View’ menu and select ‘Show Ruler.’
Drag to adjust margin(s)
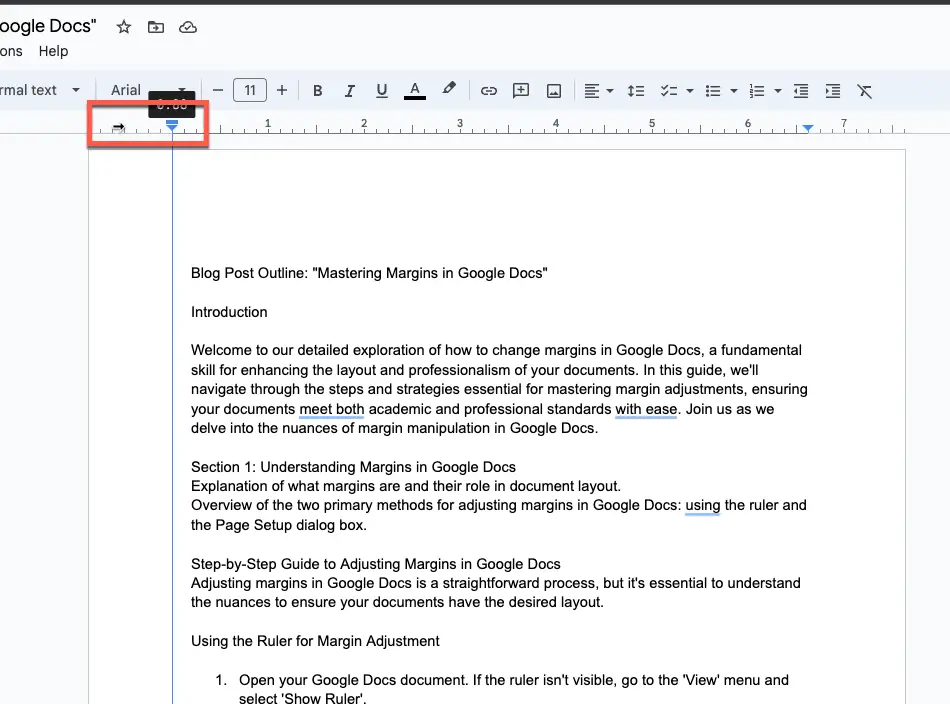
Click on the ruler to the left on the blue marker and drag left or right to adjust the margin.
Adjust top and/or bottom margins.
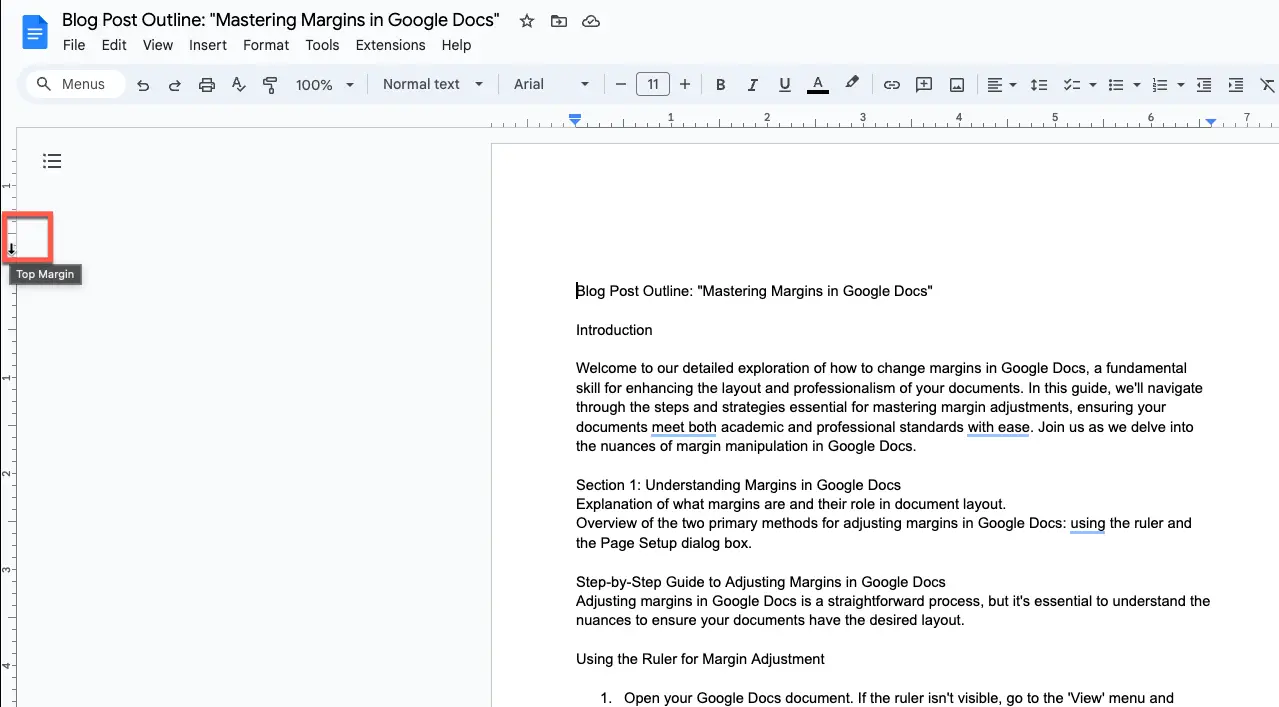
Use the vertical ruler on the left side of the document. Click and drag the grey area at the top or bottom to adjust these margins.
With the ruler tool, customizing margins in your Google Docs is an intuitive task, contributing to a seamless document creation experience.
Indent Adjustments: Be aware of the blue triangle on the ruler, which adjusts the first-line indent. This is separate from margin adjustments.
Tips for Changing Top and Bottom Margins in Google Docs
Adjusting the top and bottom margins in Google Docs is essential for ensuring your documents have a professional layout. Whether you want to enhance readability or meet specific formatting requirements, managing margins can make a significant difference.
To modify the top margins, go to the Page Setup under the File menu or use the ruler tool for on-the-fly changes. It’s worth noting that the top margin sets the tone for the entire page; hence, maintaining consistency is critical.
Conversely, the bottom margin often carries less weight in terms of visual impact, but it’s still crucial for comprehensive document structuring. In Google Docs, the top and bottom margins can be adjusted with precision, ensuring that your content is perfectly aligned within the confines of the page.
When modifying margins, it’s advisable to preview your changes to anticipate how they will appear in the printed document. Furthermore, adjusting the bottom margins can help prevent text from spilling over onto additional pages.
Overall, carefully setting both top and bottom margins in Google Docs not only aids in creating visually appealing documents but also conveys professionalism, which is often required in formal writing.
Using Page Setup to Change Margins in Google Docs
Understanding how to change margins in Google Docs is essential for perfecting your document’s layout, and utilizing the page setup feature is a straightforward method to adjust them.
To change the margins in Google Docs using the Page Setup method, do the following:
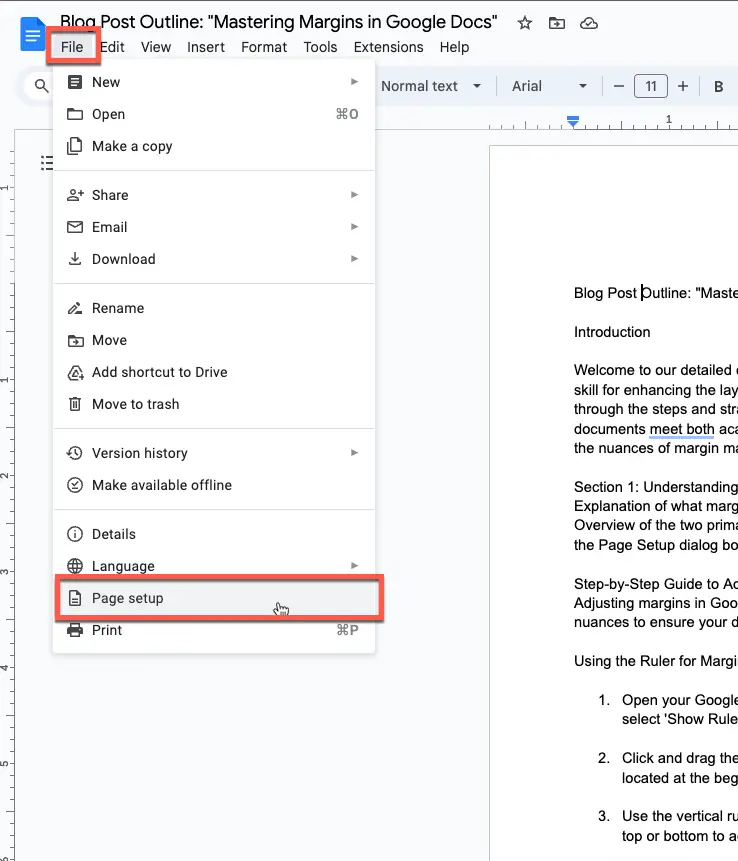
- Click on ‘File‘ and then select ‘Page Setup‘ at the bottom of the menu.
- In the Page Setup dialog box, you can enter specific measurements for top, bottom, left, and right margins. This method allows for precise margin settings.
- If you want these margin settings to apply to future documents, click ‘Set as Default‘ before closing the Page Setup dialog box.
Click on ‘File‘ and then select ‘Page Setup‘ at the bottom of the menu.
To change the margins of your Google Doc, go to File -> Page Setup to open the page setup options.
In the Page Setup dialog box, enter specific measurements for top, bottom, left, and right margins.
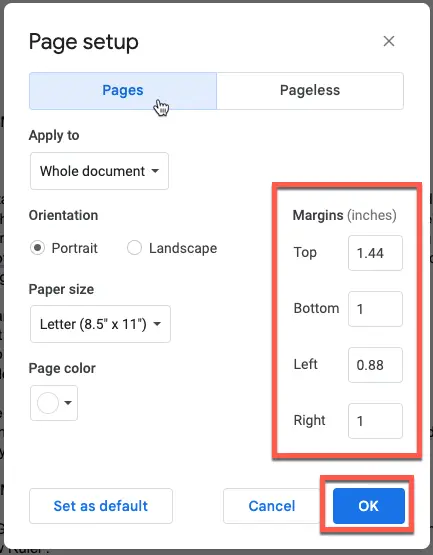
In the Page Setup dialog box, you can enter specific measurements for top, bottom, left, and right margins. This method allows for precise margin settings.
If you want these margin settings to apply to future documents, click ‘Set as Default‘ before closing the Page Setup dialog box.
Adjusting Margins on Mobile Devices
iPhone and iPad
- Open the document
- Tap the three-dot menu in the upper right corner
- Select ‘Page Setup’, then ‘Margins’.
- Choose from default, wide, narrow, or custom margin options.
Android Limitations
Android users currently cannot adjust margins directly in Google Docs. However, formatting changes like page size and orientation can be modified to influence the document’s appearance.
Practical Applications and Tips for Margin Adjustments in Google Docs
This section will explore practical applications and tips for changing margins in Google Docs, drawing insights from the provided URLs. Understanding how to use margins effectively can significantly enhance the presentation and readability of your documents.
Why Adjust Margins?
- Compliance with Requirements: Adjusting margins is often necessary to meet specific formatting requirements, such as those set by academic institutions or employers for papers, projects, and resumes.
- Professional Appearance: Proper margin settings can make a document look more professional and are crucial for adhering to industry standards.
Changing Margins Using ‘Page Setup’
- Accessing Page Setup: Click on ‘File’ and then ‘Page Setup’ to open the margin settings.
- Setting Custom Margins: Enter the desired measurements for top, bottom, left, and right margins. This method allows for precise control over the document’s layout.
- Applying to Future Documents: Select ‘Set as Default’ in the Page Setup dialog box to make these settings the default for new documents.
Using the Ruler for Margin Adjustments
- Locating the Ruler: If the ruler isn’t visible, enable it from the ‘View’ menu.
- Adjusting Margins with the Ruler: Drag the grey areas on the horizontal and vertical rulers to change the margins. This method offers a quick and visual way to adjust margins.
Margin Adjustments on Mobile Devices
- iPhone and iPad: Change margins by selecting ‘Page Setup’ and ‘Margins’ from the Menu. Choose from default, wide, narrow, or custom options.
- Android Limitations: Android users cannot adjust margins directly in Google Docs. Other formatting changes can be made to influence the document’s appearance.
Additional Tips for Margin Adjustments
- Fixing Paper Size: Ensure the paper size is correctly set (e.g., ‘Letter’ vs. ‘A4’) to avoid margin discrepancies.
- Printing as PDF: To maintain margin integrity, consider converting the document to a PDF before printing.
- Sharing Documents: If sharing a document without allowing edits, create and share a copy to preserve the original margin settings.
What is the default margin size in Google Docs?
The default margin size in Google Docs is set to one inch on all sides (top, bottom, left, and right).
How can I change the margins in Google Docs using the ruler?
To change margins using the ruler, first ensure the ruler is visible by selecting ‘Show Ruler’ under the ‘View’ menu. Then, click and drag the grey areas at the ends of the horizontal ruler to adjust the left and right margins, and use the vertical ruler for the top and bottom margins.
Is there a way to set exact margin measurements in Google Docs?
Yes, for precise margin measurements, use the ‘Page Setup’ option. Go to ‘File’, select ‘Page Setup’, and enter the desired measurements for each margin in the dialog box.
Can I change the margins in Google Docs on a mobile device?
Margin adjustments in Google Docs can be made on iPhone and iPad by selecting ‘Page Setup’ and then ‘Margins’ from the Menu. However, Android users currently cannot adjust margins directly in the Google Docs app.
How do I make my custom margins the default for new Google Docs?
After setting your desired margins in the ‘Page Setup’ dialog box, click ‘Set as Default’ before closing the window. This will apply your custom margins to all new documents you create.
Can I adjust margins for a specific section or paragraph in Google Docs?
Margin adjustments in Google Docs apply to the entire document. To adjust the layout of specific sections or paragraphs, use indents or spacing options instead.
Will changing the margins affect how my document prints?
Changing the margins can affect the printed layout of your document. It’s recommended to preview your document using the ‘Print’ option before finalizing to ensure it meets your layout expectations.
Are there any limitations to margin adjustments in Google Docs?
The main limitation is on Android devices, where direct margin adjustments are not currently possible. Additionally, margin changes apply to the entire document; you cannot set different margins for individual pages within the same document.
Summary
Mastering margin adjustment in Google Docs is essential for maintaining the professional appearance of your documents. Whether you seek uniform text alignment, accommodate specific formatting requirements, or merely wish to enhance visual appeal, the ability to tweak margins is an invaluable skill. Remember that precise adjustments can dramatically improve readability and overall layout quality. Embrace these tips to refine your documents and ensure your content is presented with the clarity and precision it deserves.
Sources
- GCFGlobal.org: Adjusting Margins in Google Docs
- SelectHub: How to Change Margins in Google Docs: Ultimate Guide
- Indeed Career Guide: How To Change Margins in Google Docs (3 Easy Methods)
- Google Support Forum: How to Change Margins In Google Docs?