How To Undo Always Correct to In Google Docs – The Ultimate Guide
Google Documents have a range of features that make them ideal text editors. One of the most popular is the AutoCorrect function. This will allow you to fix your most commonly misspelled words instantly. But how can you undo the Always Correct function within Google Docs?
To undo an automatic correction, users first need to select the word, then select the “Undo” button. Another option is to select Tools, then Preferences. This will allow users to edit the Always Correct settings or turn the function off.
You can customize AutoCorrect to ensure that it compliments your writing style. This should make creating documents easier. Keep reading to learn more about how to adjust the settings.
How To Change Always Correct to Within Google Docs?
The Always Correct to function is very simple. When you type in a word that Google perceives as being misspelled, it will automatically change it to the right version for you. For example, if you type in “cst”, it might automatically adjust it to “cat”.
However, there are some times when this can cause issues. For example, you might be deliberately misspelling the word. In this case, you will need to undo the change. Here are the steps to follow to reverse a word that has been automatically corrected:
- Select the word. To do this, you will need to hover your mouse cursor above the word you want.
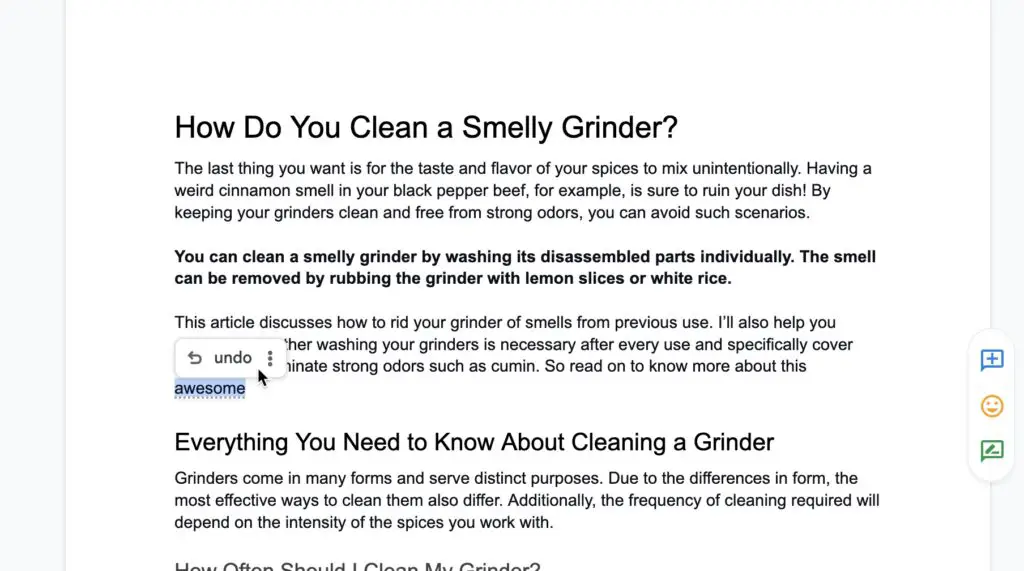
- Undo the correction. When you do this, you should see a dropdown menu. This will allow you to hit the Undo button. This will reverse the automatic correction, returning the word to the original spelling.
Adding A Spelling To Always Correct
Sometimes, you might want to add to the Always Correct function. This can come in useful for words that you frequently misspell. At other times, you might have a specific type of spelling you want to use within the document.
Here are the steps to add something to your Always Correct list within Google Docs:
- Select the word. To do this, you will need to right-click on the misspelled word.
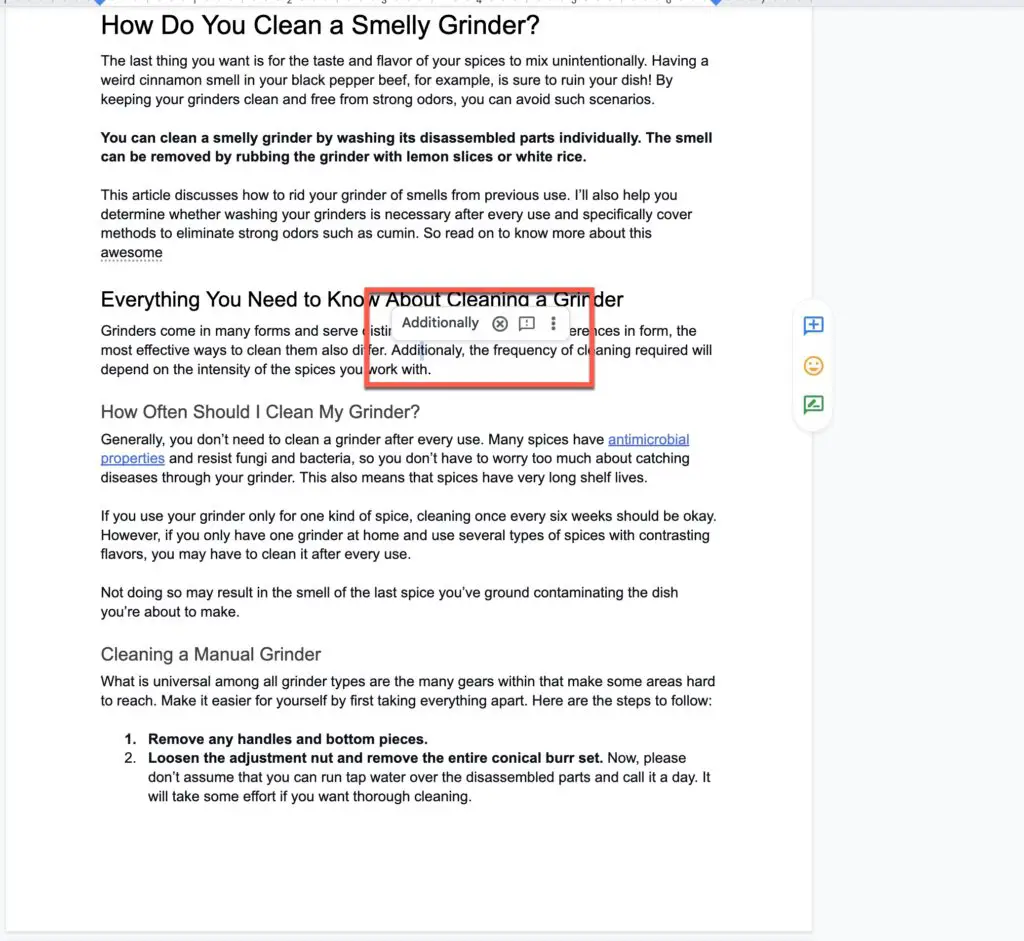
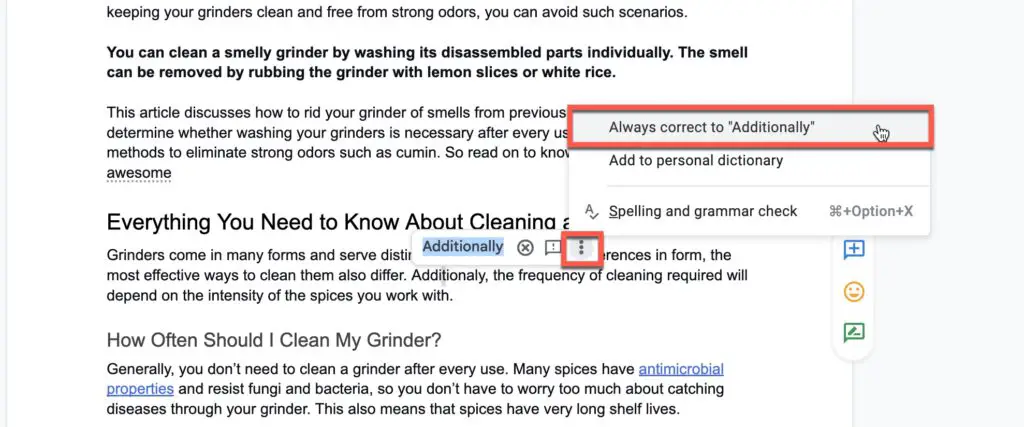
- Use Google to generate suggestions. When you click on the misspelled word, Google will generate a range of words you could attempt to spell. You can then click the ellipsis and use the Always Correct To function.
From now on, Google Docs will automatically autocorrect that misspelling to the proper spelling.
Sometimes, you might not see the correct word within the suggested list. Or you might want to make a more specific substitution. In this case, you will need to add the word to the autocorrect list manually. Here are the steps to follow when doing this:
- Select Tools, then Preferences. At the top of the screen, you will see a Tools option. Clicking on this will open a drop-down menu, where you should select the Preferences option.
- Use the Replace/With function. First, you will need to type in the word that you want to replace and what you want it to automatically correct to.
Editing The Preferences Within Always Correct
You can also change which type of corrections are made. Here is how you can do this:
- Select Tools
- Select Preferences
- Make the adjustments. There will be a series of checkmarks next to each option. This is how you activate or deactivate each one.
Turning Off Always Correct
Sometimes, you might want to turn off this function entirely. The good news is that there is an easy way to do this. Here are the steps to follow:
- Select Preferences. This is accessed from the drop-down menu at the top of the screen. You will need to select the Tools tab. The Preferences will be towards the bottom of the list.
- Uncheck the Automatic Substitution function. When you click the Preferences section, you will be given a list of available functions. One of them will be labeled “Automatic Substitution”. Turning this off will stop Always Correct.
It should be noted that even when you turn off this function, you will still see red lines under the misspelled words. This will allow you to comb through the document and manually correct any spelling mistakes.
When Should You Use Always Correct?
The Always Correct can be a great function to make using Google Docs easier. Here are some ideas on how you can use it:
- Fixing personal spelling mistakes. The most common option is to use this function to fix some words that you have trouble spelling.
- Using shorthand. Sometimes, you can save yourself a lot of time by setting up a shorthand system within AutoCorrect. This will allow you to type three or four letters instead of a whole word. Some people even have a shorthand command for a whole phrase or paragraph. If you are planning this type of thing, you might want to use an unusual phrase or start with a symbol like “:”. This ensures that you don’t accidentally trigger the Always Correct function.
- Adding markup or other special features. If you want to take the document online, you might want to include some markup language.
Because of this, the Always Correct function can save you a lot of time. Of course, you can constantly adjust your preferences if you dislike how it is performing.
How To Turn Off Spelling Suggestions
Sometimes, you might want to turn off the spelling suggestions entirely. Here are the steps to follow to do this:
- Select Tools
- Select Spelling
- Turn off Underline Errors. You must hit OK to confirm these changes and close the dialogue box.
It should be noted that you might have third-party spelling apps, like Grammarly. These will still highlight spelling mistakes. You will use the Extensions button to prevent them from accessing the website.
Final Thoughts
The Always Correct function can make drafting documents easier and help you overcome common spelling mistakes. But to do this, you might have to be prepared to change the settings a little, customizing the set-up to suit your needs better.
Sources
https://support.google.com/docs/answer/12022089?hl=en&co=GENIE.Platform%3DDesktop
https://zapier.com/blog/google-docs-autocorrect/