How to Set Up Repeating Tasks in Todoist – Step-by-Step Guide
Todoist is one of the best task management services in the market today. It is extremely simple to use yet powerful with rich third-party integrations and flexibility. One of the prime examples of this flexibility is the ability to easily create recurring tasks. Creating a recurring task in Todoist is very straight-forward and this step-by-step tutorial will teach you everything you need to know to get started with creating recurring tasks.
So how do you create a recurring task in Todoist? Enclosed below are the steps required to create and manage a recurring (repeating) task in Todoist:
- Open Todoist and click “Add a Task”
- Fill in name of task
- Click the “Today” button
- Click where it says “Type a due date”
- Type in the recurring schedule for your task (e.g. every tuesday at 2pm)
- Click the box containing your recurring schedule to save it
Before we get started with the tutorial, if you are looking to learn more about apps like Notion, Todoist, Evernote, Google Docs, or just how to be more productive (like Keep Productive’s awesome Notion course), you should really check out SkillShare. Skillshare is an online learning platform with courses on pretty much anything you want to learn. To learn more about Skillshare and its vast library of courses and get 30% off, click the link below:
SkillShare – Online Learning Platform
If you are looking for Todoist tips and tricks, check out my top Todoist tips and tricks at the link below:
Ten Great Tips for Using Todoist
Do you use the same password for multiple sites? Do you have trouble remembering all your passwords? You should try 1Password! 1Password is secure and allows you to log in to sites and fill forms securely with a single click. I use 1Password for all my passwords and it really makes managing all my passwords simple.
For more information on 1Password and to get a 30-day free trial, go to 1Password at the link below:
1Password – The world’s most-loved password manager
Now let’s get started with the tutorial!
Open up Todoist
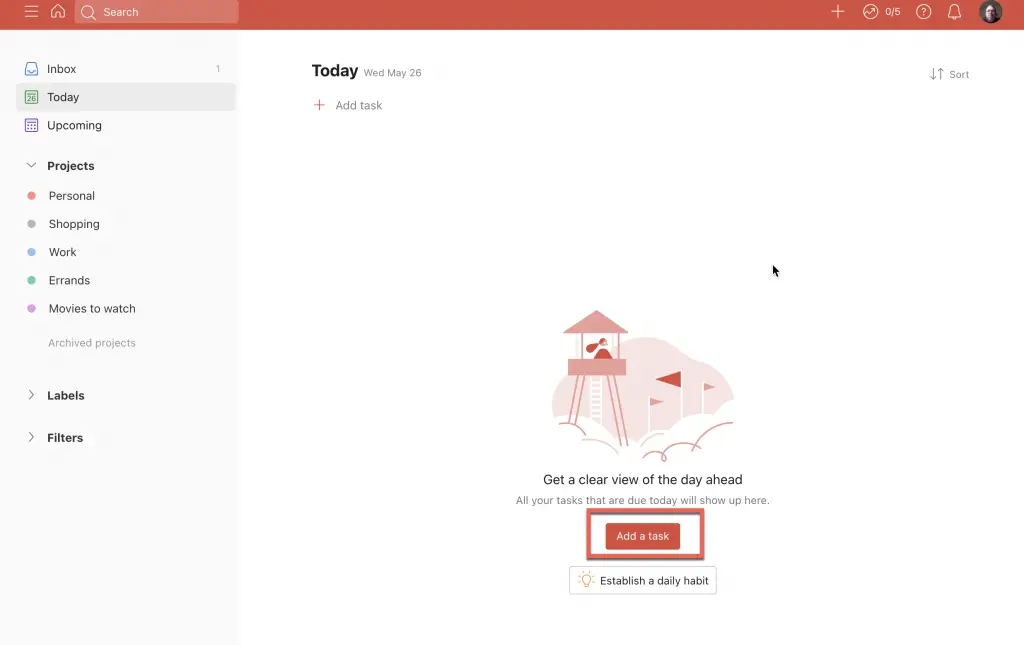
Open up Todoist. Your main window should look like the screenshot above. You can setup a new task from any of the existing views like Inbox or Today. For this tutorial, we will setup our new task from the Today view. Next, click on the “Add a task” button or click the + sign in the top bar to create a new task.
Type in your Task in Todoist

The next step is to give your task a name by simply clicking in the top of the new task to set your cursor and start typing in your task.
Click the “Today” button to bring up the task scheduling options for your Task
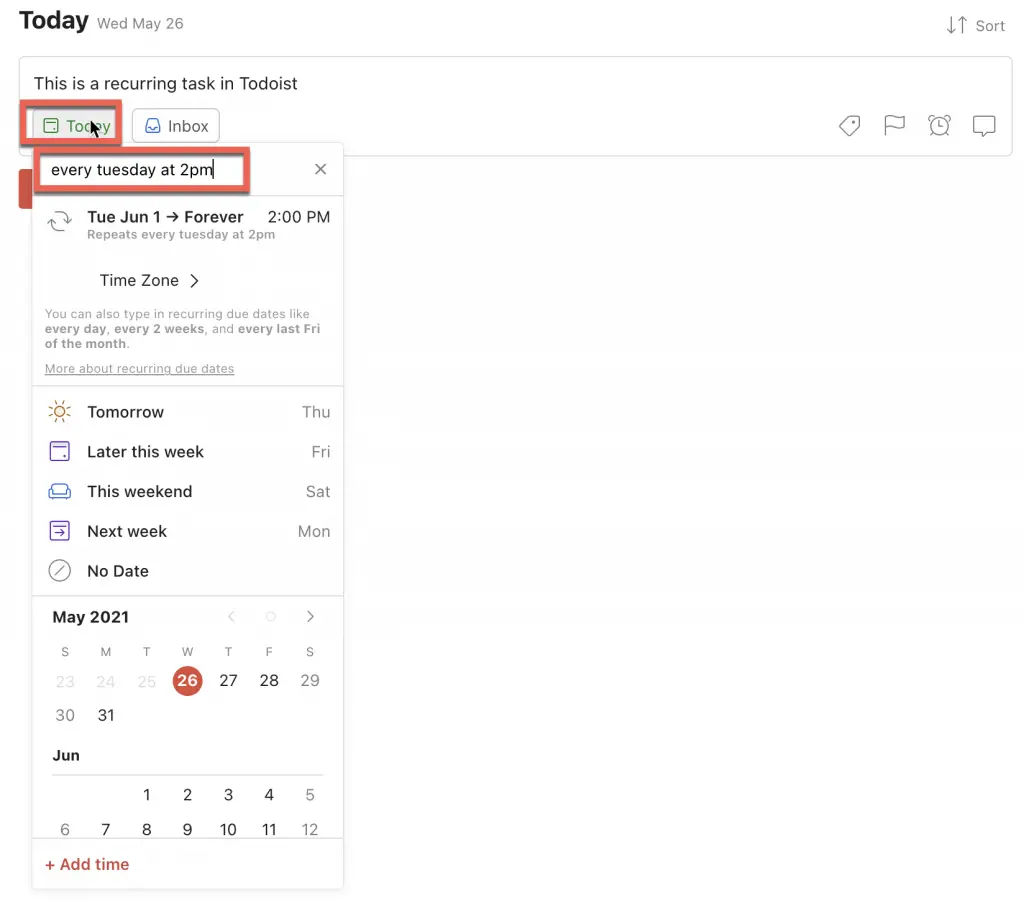
Underneath where you just typed in the name of the task, you should see a button called either “Schedule” or, if you are in the Today view, “Today“. Click that button to bring up the task scheduling menu for your new task in Todoist.
Next, type in the recurring schedule you want. Some examples might include:
| Recurring Schedule | Todoist Natural Language |
|---|---|
| task recurs every monday | every monday |
| task recurs every saturday at 2:30pm | every saturday at 2:30 |
| task recurs every monday, wednesday and friday at 6pm | every monday, wednesday and friday at 6pm |
| task recurs every other tuesday at 2pm | every other tuesday at 2pm |
| task recurs every saturday and sunday at 3pm | every saturday and sunday at 3pm |
| task recurs every third monday | every 3rd monday |
| task recurs yearly on April 1st | every april 1st |
| task recurs every 3 weeks starting july 1st | every 3 weeks starting on July 1st |
| task recurs every thursday staring on august 1st and ending october 31st | every thursday starting on august 1st ending october 31st |
As you can see from the table above, Todoist uses and understands natural language to figure out the recurring schedule that you want to set. The ability to process natural language (i.e. the verbiage that you would use in an actual conversation) greatly reduces the complexity of setting up your recurring tasks. This is especially evident in some of the more involved schedules you might want to set up.
Click on the box containing your recurring schedule
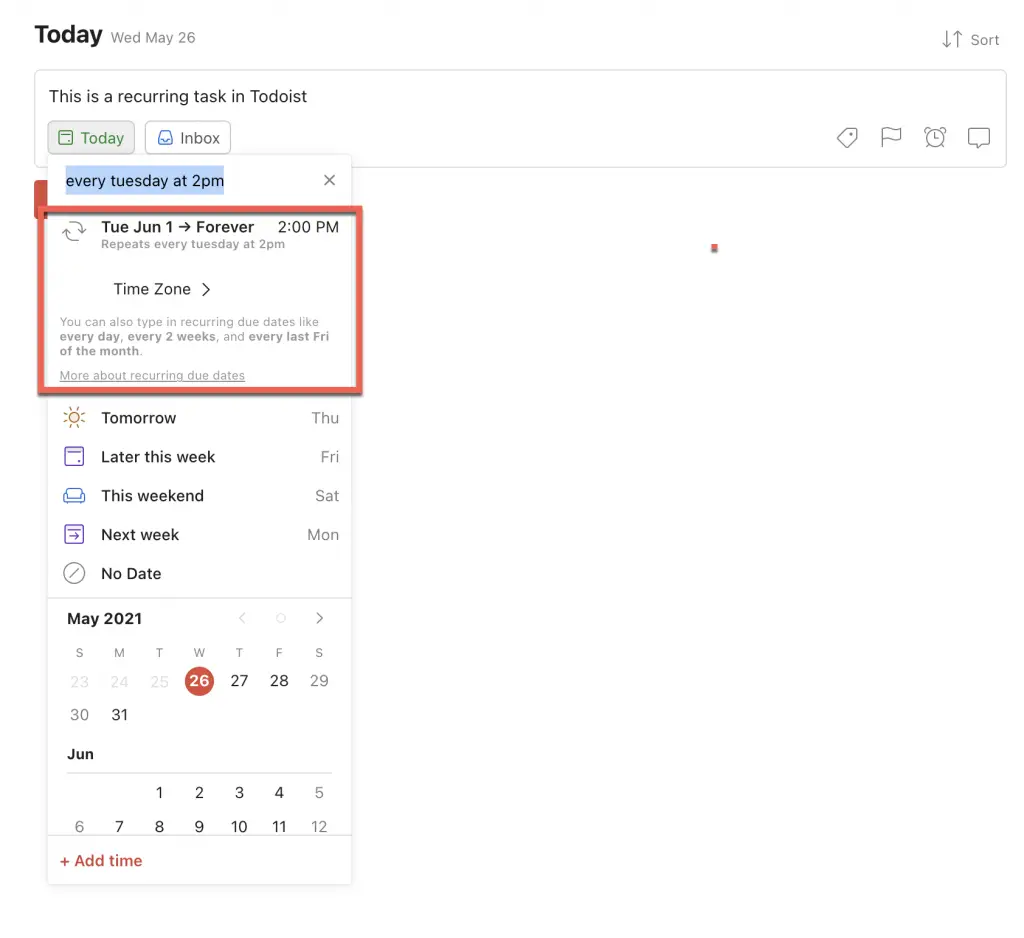
Once you have typed in the recurring schedule you want, if Todoist understands what you want, you should see a box similar to the screenshot above that outlines the interval you want your new task to use. Confirm that the proposed interval by Todoist is correct and click on the box to set the recurring dates/times for your new task in Todoist.

You should now see your new task configured with a recurring due date. To quickly verify that your new task is a recurring task, you should see two arrows in a circle to the right of the next due date as shown in the screenshot above.
Click “Add Task” to save your new task in Todoist

Once you have verified that you task is setup a recurring, click the “Add task” button to save your task with its new recurring schedule to Todoist.

Your new task is now configured as a recurring task in Todoist.
I hope this tutorial was helpful to you. Good luck!
Want More Tips and Tricks? Subscribe to our Newsletter!
If you haven’t already subscribed, please subscribe to The Productive Engineer newsletter. It is filled with tips and tricks on how to get the most out of the productivity apps you use every day. We hate spam as much as you do and promise only to send you stuff we think will help you get things done.
Check Out Our YouTube Channel!
We have a YouTube channel now and we are working hard to fill it with tips, tricks, how-tos, and tutorials. Click the link below to check it out!
Check out our Resources Page
Check out our resources page for the products and services we use every day to get things done or make our lives a little easier at the link below:
Looking to Get Started Blogging or on YouTube?
Getting started can seem daunting and scary (I know it was for me) but it doesn’t have to be. I was very lucky to find a program that that has helped me grow my blog to over 35,000 page views and a YouTube channel that is growing month-over-month.
Project 24 by Income School is the program that I have used. I have been a member for over a year now and just renewed my membership. I cannot recommend Project 24 enough! For more information on Income School, click the link below:
Project 24 byIncome School – Teaching You How to Create Passive Income from Blogs and YouTube

