How To Right Align In Google Docs – The Complete Guide
Using a tool like Google Docs, there are many ways to make text look attractive. You can change the format, the font, the size, and more. But one common question is, how can you use the tools in Google Docs to right-align your text?
You can use multiple methods to get your text aligned to the right on Google Docs. This includes using the alignment tool in the toolbar, using the appropriate keyboard shortcut, or using tabs to create alignment styles. The last option is used mainly when creating tables and such elements.
Aligning your text to the right (or in any of the alignment styles available) is generally an easy process and one that anyone can learn with a little bit of practice. So, if you want to change how your text looks in a Google Doc quickly, read this article to understand the proper alignment!
What Do The Different Alignment Styles Mean?

In Google Docs, there are several different alignment styles that you can use to arrange your text. These include left, right, centered, justified, and others.
Each of these alignment styles will change the way that your text looks on the page. For example, if you have a large block of text and decide to use the full justification style, your text will be spaced out so that each line is flush with the edge of the page. This can help create a more uniform appearance for longer passages of text.
On the other hand, if you want to align your text to the right or left side of the page, this can be accomplished using the alignment tool in the toolbar. This tool will allow you to choose between aligned left, centered, and right text styles, making it easy to change the appearance of your document quickly.
How To Change The Alignment On Google Docs
It is straightforward to change how your text is aligned using the built-in alignment tool on Google Docs. You can complete this process in just a few seconds with a couple of clicks. Here is the method that you need to be able to follow:
- Open up the google docs page on your web browser by going to the link: docs.google.com
- Next, select the file you want to edit when the Google Docs home page opens up.
- Once the file is open, in the text area, select the paragraph you want to align.
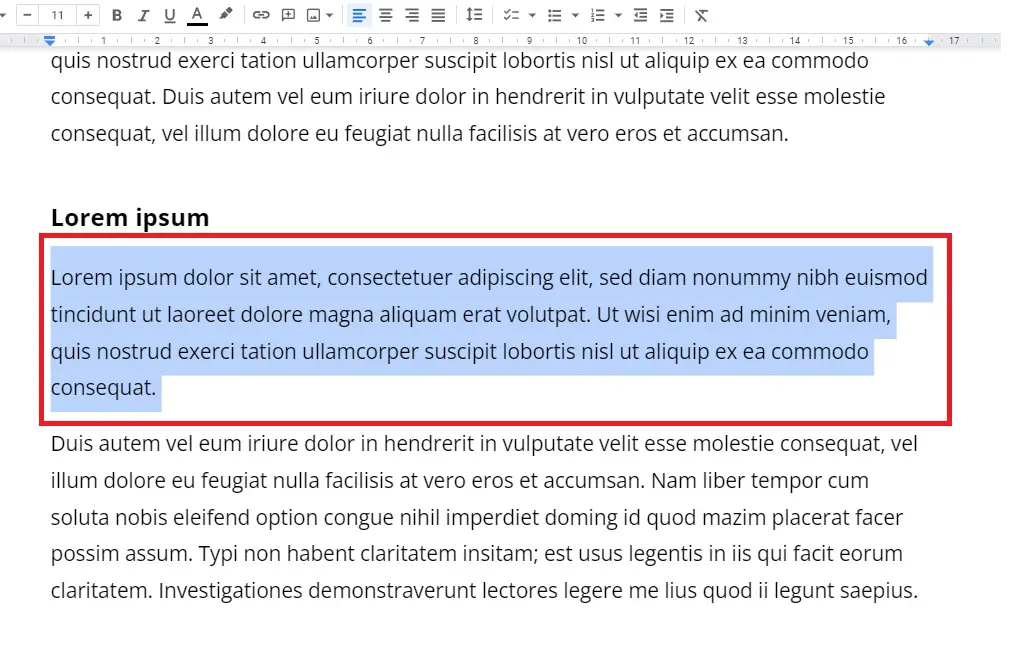
4. Now that the paragraph is selected, look for the alignment tool in the toolbar.
5. You can choose between four options, Right aligned, Left aligned, Center aligned, or Justified.
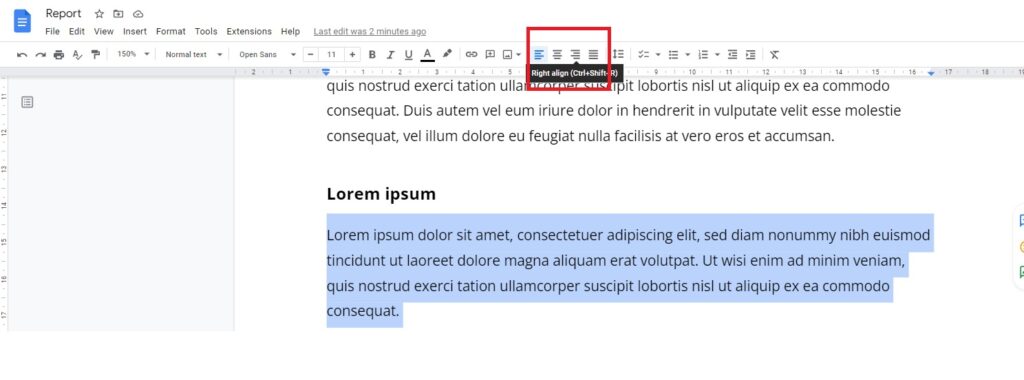
6. Choose your preferred alignment.
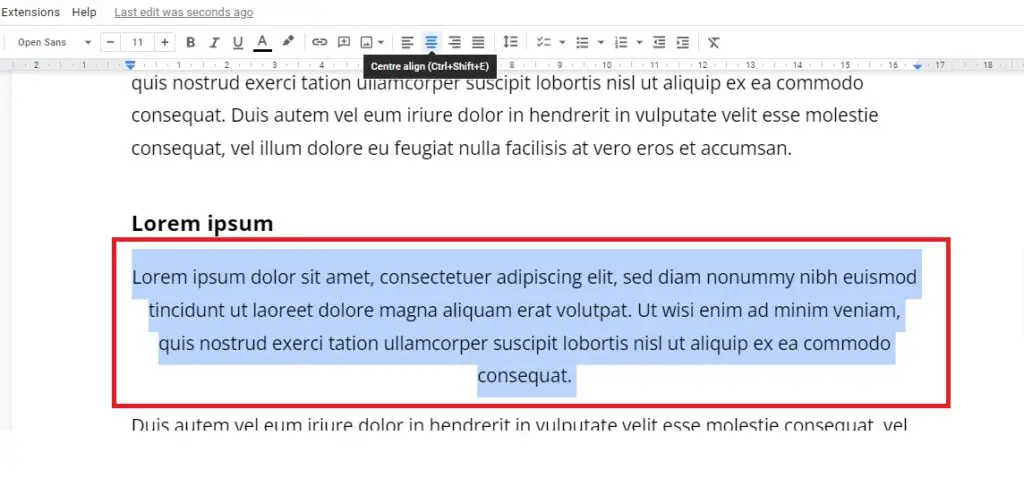
7. The text will move to accommodate the new alignment style you chose.
Here is a video that shows what you should read in the form of a tutorial:
How to right align text in Google Docs (G Suite) | Jan 2020
There are also keyboard shortcuts that you can use to achieve this effect in an even faster method. Here are the keyboard shortcuts in the form of a table:
| Alignment Styles | Windows Shortcut | macOS Shortcut |
| Left align | Control + Shift + L | Command + Shift + L |
| Right align | Control + Shift + R | Command + Shift + R |
| Center align | Control + Shift + E | Command + Shift + E |
| Justify | Control + Shift + J | Command + Shift + J |
How To Change Alignment Using Tabs On Google Docs
Alignment styles are not the only way to change the position of text in a Google Doc. Instead, you can use the tab tool to create space and gaps and move words to the other side of the screen. The tab tool helps to create distance and will, by default, move the cursor by a half-inch across the Google Doc.
Using the tab tool can be a huge benefit when you want the text to be aligned to a specific position towards the right of the Google Doc, using a tab stop. Here’s how this works:
- Start by opening the Google Doc of your choice in your web browser, using the same steps as mentioned before.
- Now, click on View in the menu, and then choose ‘Show Ruler’ in the dropdown menu.
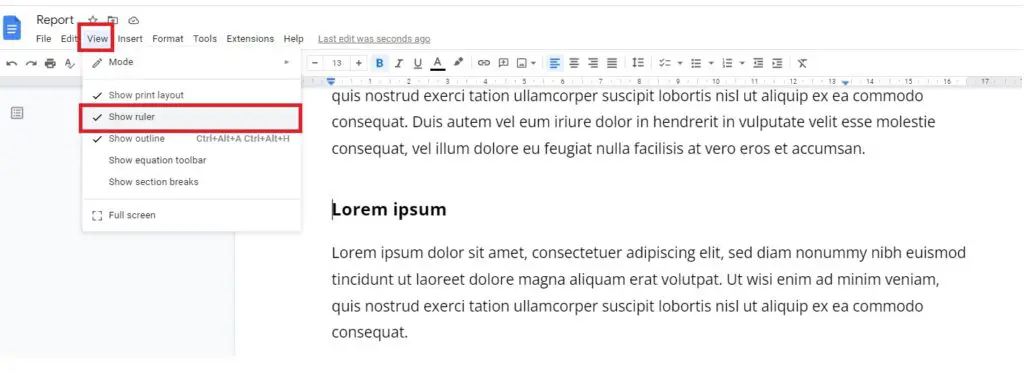
3. This will activate the ruler display on your Google Doc on the left and top of the document.
4. Select the text you want to edit. The tab stop will only apply to the area that you edit.
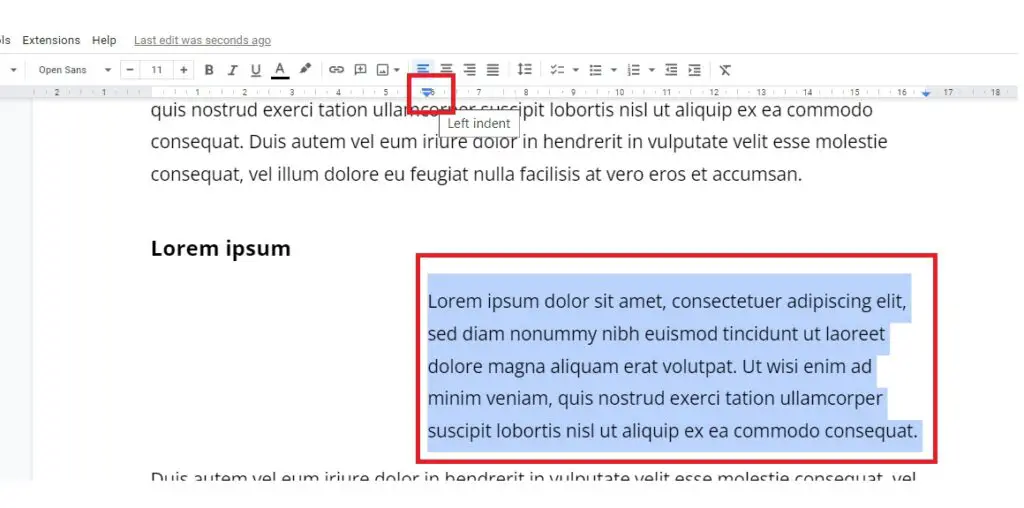
5. You can also select all text using the Control + A (on Windows) or Command + A (on macOS) shortcut if you want to apply your changes to the entire document.
6. Choose an area of the ruler above your text to add the tab stop, and click to place it there.
Once you do this, you can choose to add one of the following
- Left Tab Stop
- Center Tab Stop
- Right Tab Stop
7. Choose the option that best fits your needs.
8. When you press Tab, the cursor will automatically move to where the tab stop is placed.
9. Create as many tab stops as you want to create the alignment style you want.
While this method may seem a little more complicated, it allows you to create nuanced and complex alignment styles customized to the exact position you are looking for. With just a few simple steps, finding the right style of alignment is easy.
Whether you want to use the built-in alignment tool or work with tabs and spaces in your document, there are many different techniques that you can try. Which one is best for you will depend on various factors, including the specific needs of your text and how quickly and easily you want to make changes.
Final Thoughts
It doesn’t matter whether you are looking for a quick and easy way to align your text or more complex methods to edit the position of your words and paragraphs; there are many different ways to change the alignment on a Google Doc.
Ultimately, it is up to you to choose the right tools and techniques to get the most out of your Google Docs documents today!


