Keeping It Neat: How to Align Citations in Google Docs for a Polished Look
Working on a journal article or an educational document needs adherence to certain writing standards like APA, MLA, Harvard, and Chicago. If you’re using Google Docs, you may wonder if the application can support the needs of the standards. The question narrows down to the alignment of citations in Google Docs. It’s perhaps easy and instant.
- Open the document on Google Docs.
- Select the text/citation that needs to be aligned.
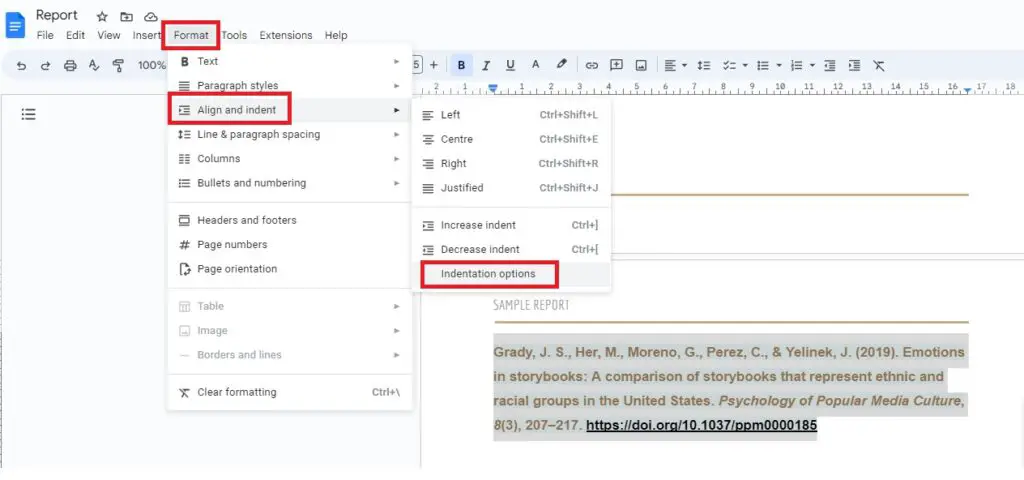
- Click Format -> Align and indent -> Indentation options.
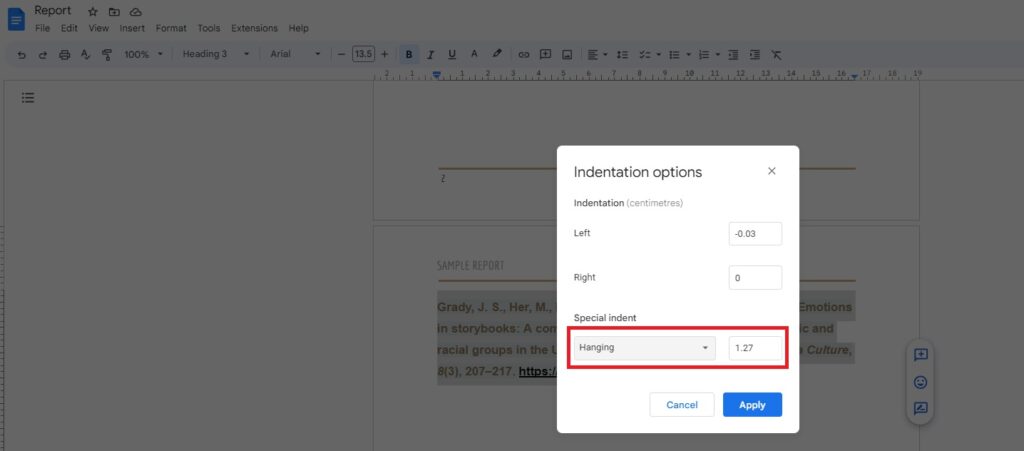
- Select Hanging from the Special Indent section in the new dialog box that opens.
- Click Apply.
Hanging indent isn’t rocket science; that’s assumed to take a lot of time. In a few clicks, you can get this done. If you’re new to it, this article handholds you about the purpose of a hanging indent and a step-by-step guide to aligning citations in Google Docs.
Hanging Indent: Purpose
A hanging indent is a type of paragraph formatting style where the first line remains in the regular format, but all subsequent lines have a sizeable indentation from the left margin. This style is commonly used for entries in a bibliography or reference list, as well as numbered and bulleted lists.
Its purpose is to make the document more organized and easier to read by providing visual cues between different parts of the text. No doubt, using a hanging indent can build the professionalism associated with a document and makes it standardized.
How To Align Citations In Google Docs
As soon as you’ve listed various references associated with the text in the document, it’s time to align them to meet the standard.
Unlike a regular indentation, where the first word of a paragraph is moved to the left/right by a measure, a hanging indentation also shifts lines (except the first line) to the right by a measure.
Here’s the exact procedure to align citations in Google Docs.
- Open the document on Google Docs.
- Select the text/citation that needs to be aligned.

3. Click Format -> Align and indent -> Indentation options.

4. In the new dialog box, select Hanging from the Special Indent section.

5. Click Apply.

That’s it. You can apply this to any volume of text in Google Docs. Alternatively, you can apply to a small portion to check and then extend it further.
Final Thoughts
There’s a huge difference between a regular indent and a hanging indent. Perhaps, a hanging indent is an integral part of the APA standard of writing. With a couple of clicks, you can indent citations and upgrade the document’s overall readability.
If you’re an academic expert, it’s time to get this right on Google Docs.


